Monthly Archives: June 2010

GE Profile and Arctica Refrigerators: Upgraded Thermistors

The newer GE and Hotpoint refrigerators– the ones with the muthaboard on the back– use thermistors to sense temperature in the freezer, beer compartment, and evaporator. The motherboard on the back of the refrigerator sends an electrical pulse to the sensor to measure its change in resistance and thus sense the change in temperature of the refrigerated space. The older thermistors had a defective seal which allowed water to seep in. This messes with the resistance and sends weird signals to the muthaboard resulting in erratic temperature control. The picture below shows the difference between the new and old-style thermistors (click for larger view):

GE Refrigerator Thermistor Replacement Guide
(click to enlarge)

If you’re having temperature control problems in your GE fridge, check to see if you have the old-style thermistors. If you do, you should replace all of them. Most models have four: two in the beer compartment, one in the freezer, and one mounted directly on the evaporator, shown in the diagrams below (click ’em for a larger view).

GE Profile and Arctica Refrigerator Thermistor Locations - Beer Compartment

GE Profile and Arctica Refrigerator Thermistor Locations - Freezer Compartment

Here’s the new-style thermistor you need:

GE refrigerator new-style thermistor-- click it to git it, Hoss.

To learn more about your refrigerator, or to order parts, click here.

Replacing the Blower Wheel in a Whirlpool-built Dryer with the Lint Filter in the Door

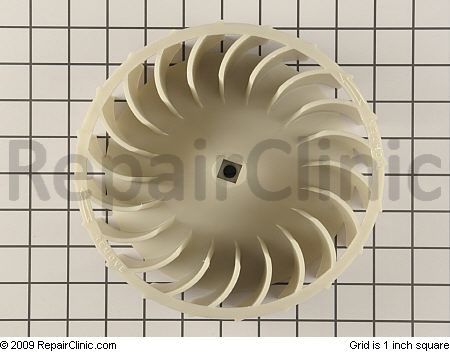
You’ll also find this dryer sold under the Sears Kenmore, Maytag, and Amana brands. These dryers have the lint filter in the door (as opposed to the top panel, like this one). This video shows you everything you need to know to replace the blower wheel. Tools you’ll need: hex socket, flat head screwdriver, Phillips head screwdriver, wrench, square 1/2″ drive socket wrench. And you can conveniently buy the blower wheel ratcheer. 🙂

blower wheel for a whirlpool-built dryer with the lint filter in the door-- click it ot hit, Hoss

To learn more about your dryer, or to order parts, click here.

Troubleshooting Icemakers with the Fancy Optical Controls

Most icemakers are controlled by a simple wire feeler arm that hangs off the side of the icemaker. As the ice bucket fills up, it raises the feeler arm and eventually stops it from making any more ice so it doesn’t overfill the bucket.

But the engineers at Whirlpool were told that they needed to increase the usable space inside the freezer compartment without increasing the size of the compartment itself. To do this, they figgered they needed to re-design the icemaker, ice container system and freezer shelving. This needed what we professional appliantologists call Divine Intervention®.

pot-bellied, bald-headed buddhaSo the engineers burned some funny incense and chanted “OM” to the pot-bellied, bald-headed, golden Buddha. And, yea verily, the pot-bellied, bald-headed, golden Buddha did grin down upon them and granted them a miraculous vision of the electronified optical control icemaker system!

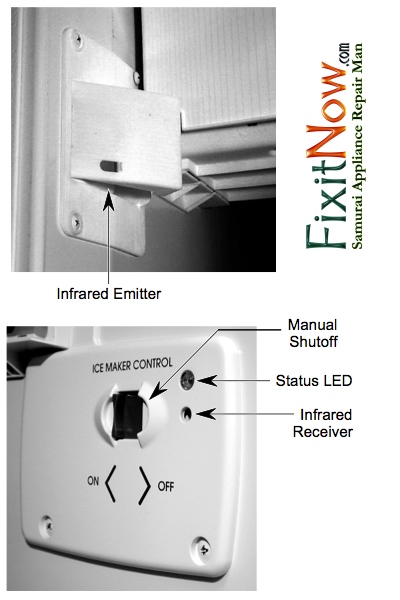
In this divinely-revealed icemaker control system, the mechanical feeler arm is replaced with the new optical controls, located on either side of the freezer liner, as shown below.

Whirlpool Optical Icemaker Controls.jpg

The optics use infrared light to sense the ice level in the ice bucket. The other change they made was to move the ice bucket from inside the freezer space to the freezer door. These changes increased the available usable space inside the freezer by over 50,000%! And the pot-bellied, bald-headed, golden Buddha did grin and the engineers did feast on fruit bats and breakfast cereals.

The main thing to keep in mind about this optical control system is that the only thing it really does is to shut off the icemaker. Other than that, it doesn’t affect the operation of the icemaker. There’s nothing new or special about the icemaker itself– it works the same way as the good ol’ Whirlpool-built modular icemaker that we’ve all come to know and love. So, for example, you can still manually start the harvest cycle the same way you would for any other Whirlpool-built modular icemaker with the feeler arm.

So that just leaves the optical control itself as something you may need to troubleshoot if you’re having problems with the icemaker not making ice… and that’s ezzacly what this spiffy troubleshooting flow chart will hepya do.

http://fixitnow.com/wp-content/uploads/2012/06/TroubleshootingOpticalIcemakerSystem.pdf

Word: This optical control system has been pretty reliable and I’ve not seen many of them fail. Most of the time, when I’m working on a no-ice complaint on one of these guys, I find either a bad icemaker or water inlet valve. But don’t be a parts changing monkey and just throw parts at it hoping to get lucky– do your troubleshooting so that, “…ye shall know the truth, and the Truth shall make you free.”

Can I hear an “Amen?”

To learn more about your ice maker, or to order parts, click here.

To learn more about your refrigerator, or to order parts, click here.

Adapting to Adaptive Defrost

Ahh, the good ol’ days when refrigerator defrost cycles were controlled by simple mechanical defrost timers. Yeah, used to be a man could go out on a refrigerator service call and make an easy $150 replacing a silly little $25 timer. The old mechanical timers would simply click the fridge into defrost mode every six or eight hours and fire up the evaporator defrost heaters for 21 minutes or so whether it needed it or not. But life never stays simple, does it? Alas, those days are rapidly disappearing.

Instead, the manufacturers have all taken to using the fancy-schmancy electronic timer boards so they could add an "adaptive defrost" feature. Supposedly, adaptive defrost makes the fridge more energy efficient by making the defrost cycle contingent on the number of door openings and other factors. I think it’s just an excuse to sell more expensive electronic parts that don’t really perform as advertised. It’s probably driven by some gubmint bureaucratic program–you know, the same geniuses who gave us the load of crap about how we can’t use R-12 anymore because it hurts the ozone layer.

Well, no use whining about it ’cause adaptive defrost is the wave of the future, for better or worse. And if you have a newer, high-end fridge, chances are that it has adaptive defrost. And one day, at the worst possible time, it will break.

The adaptive defrost board on Maytag fridges looks like this. To put this board into defrost, short "L1" and "Test" with a small screwdriver and wait three seconds. You should hear a clicking noise from the relay and the fridge will shut off and go through a defrost cycle.

The adaptive defrost on Amana fridges is a little different. A test procedure for this board is shown here. To initiate the defrost cycle, press the refrigerator light switch five times in six seconds. If you press it five more times within six seconds, this will cancel defrost and take the fridge straight into run mode. The operation is similar on both the bottom mount and side-by-side fridges. After the defrost terminator/thermostat opens, there will be a six minute delay before the compressor and condenser fan motor start running again, and a 10 minutes delay before the evaporator fan motor starts running. This is important to know because you can really start chasing your tail when things don’t start running when you think they should.

Whirlpool also has some adaptive defrost boards out there. I don’t need to post the diagnostic info on them here because it’s all in the mini-manual that comes with your fridge, usually folded up into a little itty-bitty square and tucked into a slot on the backside of the condenser grill, in front of the fridge.

For the nitty-gritty on the multitudinous varieties of adaptive defrost control systems used in all Whirlpool-brand refrigerators (includes Maytag, Amana, Kitchenaid, and Jenn-air) download this service manual (12.88mb).

Ok, so let’s say you’ve determined that your adaptive defrost board is fried. Well, you’ll need to replace that bad boy. Come git you one:


Maytag Adaptive Defrost Control Board
Amana Adaptive Control Board for Side-by-Side Models
Amana Adaptive Control Board for Bottom Freezer Models
Whirlpool Defrost Control Board
Whirlpool Defrost Timer Control Board
Whirlpool Defrost Control
To learn more about your refrigerator, or to order parts, click here.

Refrigerator Tuneup Tips for Summer

Ahh, sweet summertime– it’s what we professional appliantologists call “refrigerator season” because we get loaded up with calls for refrigerator problems. “Why is that, Captain Ron?” No one knows. Well, that ain’t ezzacly true. With the warmer temperatures and higher humidity, the refrigerator is having to work harder to keep your beer cold and get rid of all the extra moisture that accumulates inside. Here are some tips and tools that’ll hepya keep your beer tooth-crackin’ cold.

The single most important thing about your refrigerator for cold beer is temperature. This sounds obvious but did you know that most people have no idea what the temperature is inside their refrigerator? They ass-u-me that the setting on their refrigerator controls somehow correlates to a temperature inside the box year ’round, regardless of things like ambient temperature and humidity, amount of time the door is open, amount of pet hair on the condenser, etc. Read this quick explanation of how refrigerator controls work.

Pop Quiz: How can you tell what the temperature is inside the refrigerator?

Answer: By using a thermometer!

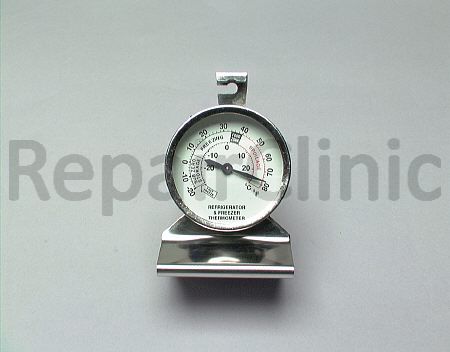
Every refrigerator should have a thermometer inside of it. Not having a thermometer inside your refrigerator is like driving a car without a speedometer. Here’s the thermometer you need:

refrigerator thermometer

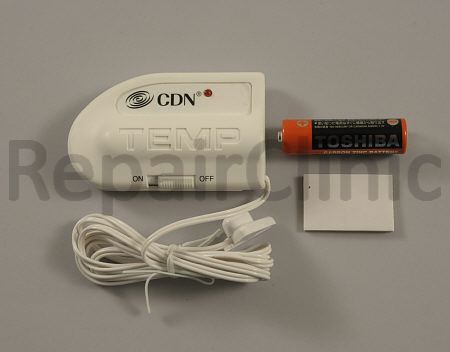
In addition to a thermometer inside the beer compartment, you should have a temperature alarm inside the freezer to give you an early heads-up incase it starts warming up. This can save big $$ by preventing spoiled food.

freezer alarm

Summer can bring out lots of smells inside the refrigerator that were masked by the colder temperatures of winter. These smells can impart off-tastes to the ice cubes, too. This nifty carbon deodorizer sucks up that nasty stink to keep your fridge smelling sweet, baby, sweet.

Refrigerator deoderizer

Dirty condensers are one of the biggest causes for warm refrigerators in summer. During winter, your refrigerator might have been able to keep things cold inside despite the condenser being matted with cat or dog hair. But now with the warmer ambient temperatures of summer, it can’t quite make it anymore. What’s a brutha to do? Clean the condenser with your vacuum and a condenser brush!

refrigerator condenser brush

And when was the last time you replaced the water filter in your refrigerator? The Samurai has a complete selection of water filters for any make or model of refrigerator. Come git you some!

Finally, ever wonder how much energy your refrigerator (or any other plug-in appliance) is using? Well, wonder no more with the Kill-a-Watt meter!

To learn more about your refrigerator, or to order parts, click here.

Replacing the U-Joint in a Whirlpool-Kenmore Calypso Washer

This washing machine is one o’ them designs that the engineers shoulda let die on the drawing board. Its one saving grace is that they’re pretty easy to work on, which is a good thing because you’ll be working on it a lot.

Replacing the U-joint in this beast is a pretty simple job, about three mugs on the world-famous SUDS-o-meter. Frequently, you gotta also replace the wash plate at the same time ‘cuz it gets warped from being banged around by the bad U-joint.

BTW, if this post or others ones here at Fixitnow.com are helpful to you, buy your tools and parts through the links on this site to help support us. Domo!

Awwite, let’s light this candle.

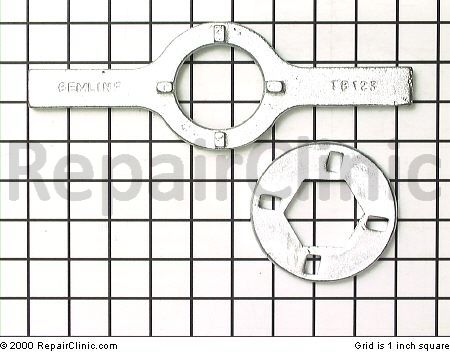
You’ll need a special tool, called a spanner wrench, to remove the lock nut in the tub. Come git you one:

spanner wrench for removing the lock nut in a Calypso washer

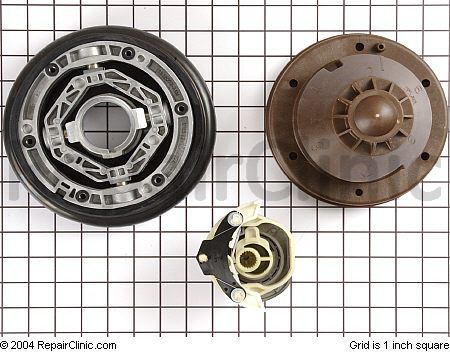
Next, you’ll need to the U-joint kit:

U-joint kit for the Calypso washer

The kit comes with instructions but in case you want a sneak preview or you just enjoy reading technical instructions recreationally, you can download ‘em ratcheer==> Calypso U-joint Installation Instructions.

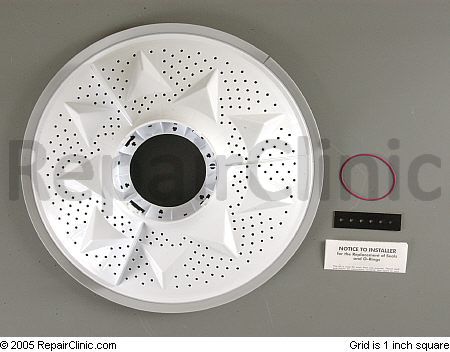
If the wash plate is warped or boogered up, now would be a good time to replace it, too:

wash plate for a Calypso washer

As I mentioned, this really is a pretty simple job and the destructions that come with the kit are detailed and illustrated. If you’d like more info on this machine because you’re a noob and aren’t comfortable taking things apart, download the service manual for the Calypso washer.

Awwite, go make me proud!

To learn more about your washing machine, or to order parts, click here.

Dryer Won’t Heat, Found Burnt Wire on Thermostat. Could This Burn My House Down?

Short answer: No.

This happens frequently. Over time, the cheap, stamped-metal terminals loosen just enough to make heat, sometimes enough to char the terminal and wire. Once it’s charred the wire enough to stop heating, it’s also stopped the current flow through the thermostat and hence any danger of burning your house down. Just fix it and chill. You’ll need to replace the thermostat, too. You can buy a replacement thermostat ratcheer.

Burnt Wire and Terminal on a Dryer Thermostat

To learn more about your dryer, or to order parts, click here.

Checking and Adjusting the Brake in a Maytag MAV or PAV Top-Loading Washer

One of the indications that the brake may need adjustment is if the brake squeals during last few seconds of spin just before the tub stops. The Brake is adjustable by using the thick or thin shim washer found in the thrust bearing kit.

Before we get into checking and adjusting the Brake, it would enhance your troubleshooting arsenal to know some basic katas of how this contraption works…

Transmission Operation

When the Drive Pulley rotates CLOCKWISE, the upper and lower cams are designed to nest together which allows the Drive Pulley to remain in position on the Drive Shaft. The Brake remains engaged and the Drive Pulley will turn the lower cam and drive the shaft to cause the Transmission to agitate.

When the Drive Pulley rotates COUNTERCLOCKWISE, the upper cam and pulley ride up the lower cam approximately 3/16 of an inch before the driving shoulders on the Pulley hub engage the “dogs” on the lower cam.

This causes the top of the Pulley hub to push against the spacer which compresses the Brake Spring and lifts the Brake Rotor and lining assembly off the Brake Stator. The Brake is disengaged and the Pulley will turn the lower cam and drive shaft to cause the Transmission to spin.

Determine Brake Rotor Condition

Watch the Spacer on the encapsulated Thrust Bearing. If the Spacer rotates with the Pulley, the Brake is functioning properly. If the Spacer stays stationary while rotating the Pulley to release the Brake, the Brake Rotor must be replaced.

To Check Brake Disengagement:

1. Manually rotate the Drive Pulley in a slow COUNTERCLOCKWISE direction until the Brake starts to release and the Transmission begins to turn.

2. Attempt to position the “Reference Cam Arrow” midway between the “Min Pulley Hub Reference” and the “Max Pulley Hub Reference” markers located on the Pulley.

If you can’t get the “Reference Cam Arrow” between the markers on the Pulley Hub, then you gotta adjust the Brake.

Checking Brake Disengagement on a Maytag MAV or PAV Top Loading Washer

To Adjust Brake Disengagement:

1. If the position of the Cam Reference Arrow is less than the Min Pulley Hub reference mark, remove the standard (.062 thickness) Thrust Washer and replace it with a thinner (.032 thickness) Thrust Washer. Recheck disengagement 3 times to verify proper adjustment.

2. If the position of the Cam Reference Arrow is more than the Max Pulley Hub reference mark, add a (.032 thickness) Thrust Washer to the standard Thrust Washer. Recheck disengagement 3 times to verify proper adjustment.

Adjusting Brake Disengagement on Maytag MAV and PAV Top Loading Washers

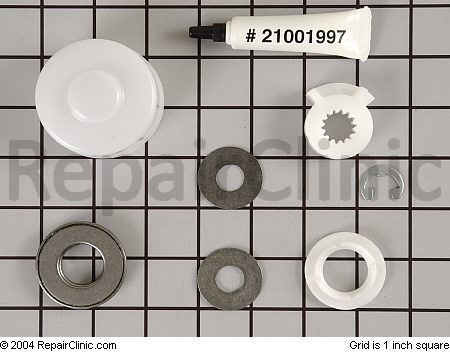
If you need to add a thrust washer to make the brake adjust properly, it’s usually a good idea to replace the thrust bearing kit at the same time. It includes all the washers you need.

Thrust bearing kit for Maytag MAV and PAV top-loading washers

And here’s a step-by-step guide for replacing the thrust bearing, custom-made by a Samurai Chief Apprentice Appliantologist:

Maytag Atlantic Washer Thrust Bearing Replacement, An Illustrated Guide!

To learn more about your washing machine, or to order parts, click here.

Converting the New Style Gas Valves in Whirlpool-built Gas Dryers

All gas dryers come from the factory set up to run on natural gas. Some places, such as up here in extreme northern Yankeeland, use propane instead of natural gas. If that’s the case where you live, you’ll need to pervert the dryer to burn propane instead of natural gas. If you have an older dryer, see this page for perversion destructions.

If you have a newer Whirlpool-built gas dryer (built since 2009, includes Maytag and some Kenmore models) that you need to convert to run on propane, you’ll see that the gas valve on your dryer is a different animal from what’s shown in the aforementioned post. Whirlpool has modified the gas valve to make it even easier to do the conversion. This post will ‘splain it all to you.

These new gas valves have what looks like a cap where the blocking pin screw used to be on the older valves:

New Gas Valve on Whirlpool-built Gas Dryers

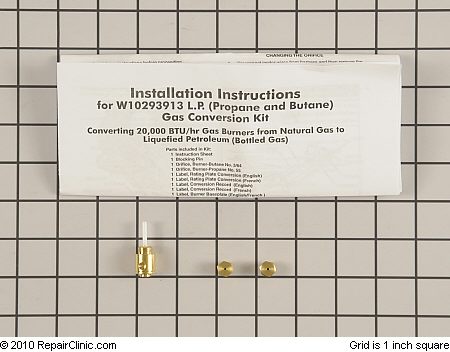
To convert the gas dryer, you’ll need the Gen-u-wine gas dryer perversion kit, which you can buy ratcheer. Here’s a purdy pitcher:

Whirlpool gas dryer conversion kit-- click it to git it, Hoss

Now, for those of you who don’t like reading a lot of detailed instructions, here’s the Cliff Notes® version:

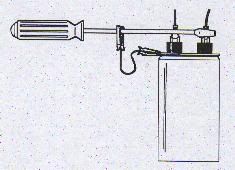
New Gas Valves On Whirlpool and Maytag Gas Dryers

You can download the Official perversion destructions from the Downloads section at Appliantology.org: http://appliantology.org/files/file/809-whirlpool-gas-dryer-installation-instructions-for-w10293913-lp-propane-and-butane-gas-conversion-kit/

You’ll need to be an Apprentice or an Appliantologist to Download files there but this is painless and can cost as little as nothing. Details here: http://apprentice.appliantology.org/

Remember to leak check your work when you’re done so your house won’t go BOOM and your pants go brown! Come git you a bottle of gas leak bubble solution.


So mote it be!

To learn more about your dryer, or to order parts, click here.

How to Test the Major Components in a Microwave Oven

Faced with their first microwave oven repair, the bowels of many Grasshoppers begin to quake uncontrollably with trepidation. Well, you just relax, Grasshopper, and clean out those skivvies ‘cuz once you know a few tricks, you’ll see that microwave ovens are no more complicated than any other appliance. The Samurai shall reveal all these truths unto thee and the Truth shall set thee free. Please open your Appliantology hymnal and sing along with me now.

Almost all microwave ovens have a control compartment that you access in various ways. We won’t get into that here but if you need help with your specfic model, just start a new topic in the Kitchen appliance forum at the Samurai School of Appliantology and we’ll hepya there. In this post, I’ll just go over some of the basics to de-mystify microwave ovens for you.

The basic parts of a microwave oven are:

– a high voltage power source, commonly a simple transformer or an electronic power converter, which passes energy to the magnetron
– a cavity magnetron which converts high-voltage electric energy to microwave radiation
– a magnetron control circuit (usually with a microcontroller, an electronic control board or PCB, which stands for “printed circuit board”)
– a waveguide (to control the direction of the microwaves)
– a cooking chamber

Now, don’t the let the word “radiation” make you all a-sceered and quivery. Gird up your loins like a man! Did you know that light is also a form of radiation? So whaddya gonna do, go live in a dark cave the rest of your life or get a little edumucation from the Samurai?

Still there? That’s the warrior spirit!

The radiation in microwave ovens is what we professionals call “non-ionizing” radiation. That means, like light and radio waves, it doesn’t kick out radioactive particles. So it’s a complete misnomer to refer to microwaving food as “nuking” because it has nothing in common with nuclear radiation.

Feeling better already? Good, let’s continue with our hymnal.

When you’re ready to disassemble the microwave oven and do some troubleshooting, you’ll begin the same way you would for any other appliance: UNPLUG IT!

PhotobucketAfter you get the control panel open, there’s just one other safety thing to do before you start sticking your paws all in there: discharge the high voltage capacitor. The HV capacitor can hold up to 2,000 volts which can really curl your hair. Don’t start freaking out on me, all’s you gotta do is short the terminals together like ahso. It the capacitor is holding charge, it can snap like a fire cracker and make a cool-looking flash-bang so… heads up!

Awwite, with that bit of funness outta the way, we can proceed to the meatus of this troubleshooting membrane.

Here’s a generic troubleshooting table that applies to almost all microwave ovens in current use:

Microwave Oven Troubleshooting Table

One of the most common things to test (‘cuz they go bad a lot) are the door interlock switches. You know those plastic hooks on the open end of the door? Well, they go into slots on the cabinet and jiggle some little switches called interlock switches. Here’s a typical configuration of these switches:

Microwave Oven Door Interlock Switches
(click for larger view)

And here’s a table of the other major components inside that can go bad and how to check ’em:

Testing Components in a Microwave Oven
(click for larger view)

Just one enhancement to the parts-checking table above. Most of the time, your typical multi-meter isn’t strong enough to properly check the HV rectifier (or “rectumflyer” as we call it in the trade). So you have to do a little battery enhancement to be able to check it in reverse and forward bias. Behold:

Testing the HV Diode in a Microwave Oven

Awwite, there you be. If you need more hand-holding, come start a new topic in the Samurai Appliance Repair Forums.

To learn more about your microwave oven, or to order parts, click here.

Disassembling the GE “Glass” Door Dryer

This is GE’s fancy-looking dryer with the see-through door, model numbers DBVH512, DCVH515, DHDVH52. If you need to get to any of the guts such as the heating element (electric models), gas burner (gas models), motor, belt, etc., this’ll hepya.

You’ll need to remove the top panel, control panel, and front panel to replace the belt. To go further into the belly of the beast for things like the gas burner, heating element, drum bearing, idler pulley, you’ll also need to remove the drum. Let’s take it one section at a time.

Top Panel Removal

If you just need to get to the power board, you’ll only have to remove the top panel. For most other innards, this will just be your first step.

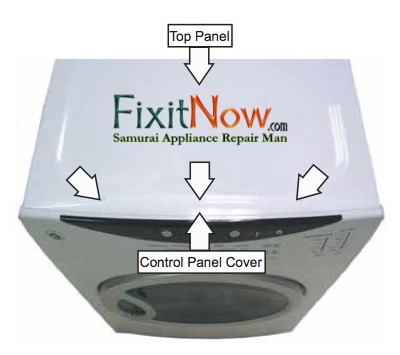
1. Remove the three Phillips-head screws that attach the control panel cover. Pull the cover toward the back of the dryer. If the panel seems stuck in place, you can use a putty knife along the top seam between the cover and the control panel to gently pry it back.

GE glass door dryer top panel removal 1 of 2.jpg

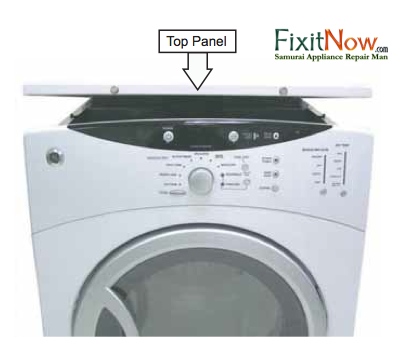
2. Remove the two Phillips-head screws that attach the top panel to the cabinet.

3. Raise the front of the top panel a few inches, then pull it forward to clear the rear tabs.

GE glass door dryer top panel removal 2 of 2.jpg

Control Panel Removal

After the top panel is removed, you’re ready to remove the control panel in just three easy steps:

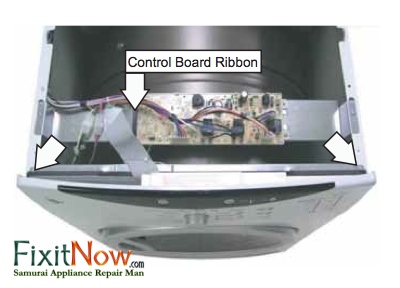
1. Disconnect the control board ribbon from the power board at connection CN110.

2. Remove the two Phillips-head screws that attach the top of the control panel to the cabinet.

GE glass door dryer control panel removal.jpg

3. Lift the control panel straight up and out.

Front Panel Removal

With the top panel and control panel removed, you’re ready to take off the front panel:

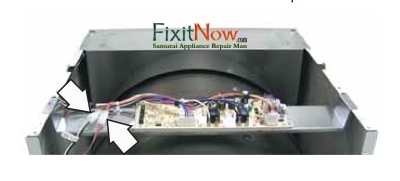
1. Disconnect the door switch wire harness and the sensor rod wire harness to the power board.

GE glass door dryer front panel removal 1 of 2.jpg

2. Remove the four Phillips-head screws that hold the front panel to the cabinet. You’ll probably need to raise up the front of the dryer and support it on a block of wood so you can get to the screws to remove ’em.

GE glass door dryer front panel removal 2 of 2.jpg

Drum Removal

Okay, so with the top panel, control panel, and front panel all out of the way, you’re now ready to remove the drum so you can get into the belly of the beast. Let’s do dis:

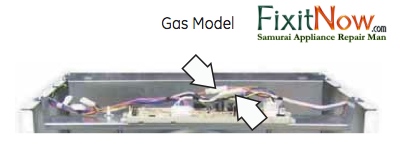
1. If you have an electric dryer, move on to Step 2. For gas models, disconnect the inlet control thermistor and the inlet safety thermostat wire harnesses.

GE glass front dryer drum removal 1 of 4.jpg

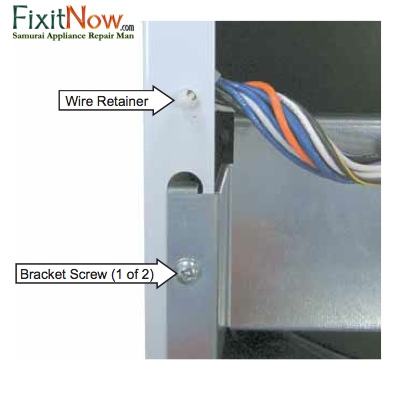
2. Detach the front plastic wire retainer from the cabinet by squeezing the little tabs.

3. Remove the two Phillips-head screws that attach the power board bracket to the cabinet. Carefully place the bracket on the rear plate.

GE glass front dryer drum removal 2 of 4.jpg

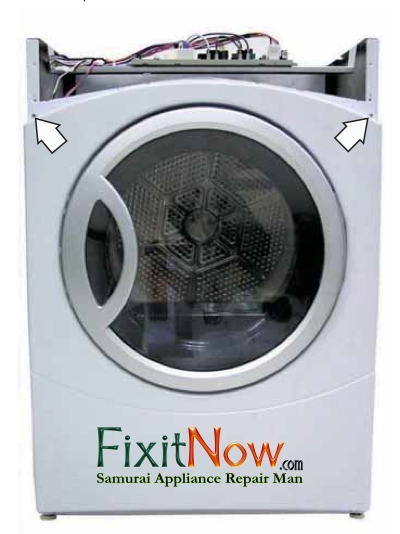
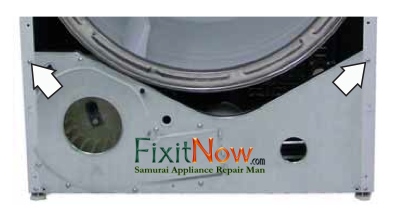
4. Remove one Phillips-head screw from each side of the cabinet, then gently spread the sides apart to provide clearance for the drum. Careful not to spread the sides too far or you’ll crease the sheet metal. Not a biggie, just a fine point of finesse for you aficionados out there.

GE glass front dryer drum removal 3 of 4.jpg

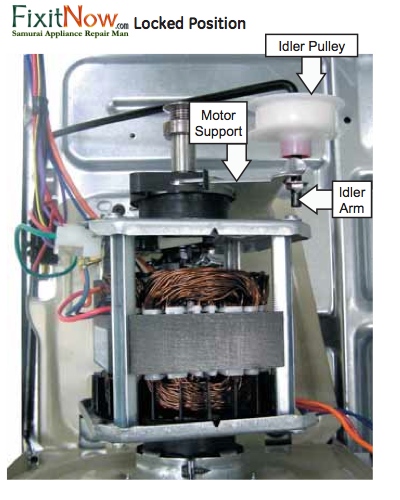
5. Remove the drive belt from the motor and idler pulley. Reach under the left side of the drum, push the idler pulley down and to the right, then lock the idler arm on the top corner of the motor support. Then remove the belt from the motor pulley and idler pulley. Guide the belt past the front of the cabinet base.

GE glass door dryer belt removal.jpg

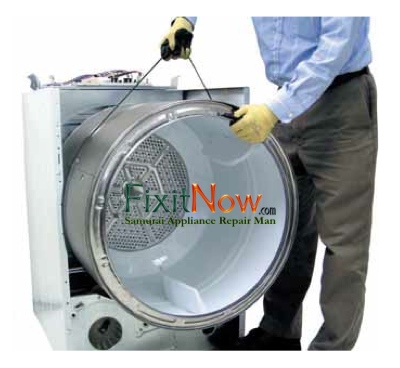
6. Using the belt as a handle, pull the drum forward and guide it out of the cabinet.

GE glass front dryer drum removal 4 of 4.jpg

And there ya be!

To learn more about your dryer, or to order parts, click here.

Finding the Tech Sheet / Wiring Diagram in a Kitchenaid or Whirlpool Side-by-Side Refrigerator

Tell you what, compadre, if you need to troubleshoot one of these modern electronified fridges and you don’t have the tech sheet, well, you’re up a creek without any beer. On Kitchenaid (and Whirlpool) SxS refrigerators, the tech sheet / wiring diagram is folded up into a leetle itty bitty wad and stuffed into a crevasse in the toe grill. Just open the doors, remove the toe grill, flip it over and there it be:

Tech Sheet Location in a Kitchenaid Side-by-Side Refrigerator

To learn more about your refrigerator, or to order parts, click here.

Maytag Neptune Washer Stops Mid-Cycle and/or Flashes a Code

So you stuff a load of stinky skivvies in your Maytag Neptune washer, get it going and head over to your computer so you can check out the latest cool videos on the Samurai’s YouTube channel. You watch the videos– you laugh, you cry, they become a part of you and they’ve given your life new purpose and meaning that you never even dreamed was possible. Your newfound special purpose informs you to go check on the skivvies in the washer.

You find the washer full of water, stopped in mid-cycle and flashing some kind of weird code, like French, or something. Suddenly, you become aware of another pair of skivvies that needs to go in the washer.

First thing to do is stop and congratulate yourself for coming to the right website. Next, unclench them glutes and swallow that bile burning the back of your throat’cuz ol’ Samurai’s gonna hepya whup up on that ornery washer. Here’s the scoop:

El Problemo:

Current models will stop and flash the error code, “LR” in the display. If you have a model with an LCD display, it’ll show the error message, “Locked Rotor.” Older models won’t show a code, they’ll just stop mid-cycle or won’t re-start.

Model Numbers Affected:

MAH14PDAAL, MAH14PDAAQ, MAH14PDAAW, MAH14PDABL, MAH14PDABW, MAH14PDAEW, MAH14PDAGW, MAH14PDBAW, MAH14PDBEW, MAH14PDBGW, MAH14PDCBQ, MAH14PDCBW, MAH14PDDWW, MAH14PDSAW, MAH14PNAEW, MAH14PNAGW, MAH14PNAWW, MAH14PNBAW, MAH14PNBEW, MAH14PNBGW, MAH14PNSAW, MAH14PRAWW, MAH14PSAAW, MAH14PSAGW, MAH20PDA3W, MAH20PDAWQ, MAH20PDAWW, MAH20PDCXQ, MAH20PDCXW, MAH20PNAWW, MAH20PRAWW, MAH20PRDWW, MAH20PSAWW, MAH21PDA3W, MAH21PDAGW, MAH21PDAWQ, MAH21PDAWW, MAH21PDCXQ, MAH21PDCXW, MAH21PDD3W, MAH21PDDGW, MAH21PDDWQ, MAH21PDDWW, MAH21PDDXW, MAH21PNAGW, MAH21PNAWW, MAH21PNDGW, MAH21PNDWW, MAH21PRAWQ, MAH21PRAWW, MAH21PSAWW, MAH3000AAW, MAH3000AEW, MAH3000AGW, MAH3000AKW, MAH3000AWA, MAH3000AWQ, MAH3000AWW, MAH3000BGW, MAH4000AWQ, MAH4000AWW, MAH4000BWQ, MAH4000BWW, MAH5500AWW, MAH5500BWQ, MAH5500BWW, MAH55FLBWQ, MAH55FLBWW, MAH6500AWQ, MAH6500AWW, MAH7500AWQ, MAH7500AWW, MAH7550AAW, MAH7550AGW, MLE19PDAGW, MLE19PDAYW, MLE19PDAZW, MLE19PDCZQ, MLE19PDCZW, MLE19PNAUW, MLE19PNAYW, MLE19PRAYW, MLE19PRAZW, MLE2000AYW, MLE2000AZW, MLG19PDAEW, MLG19PDAGW, MLG19PDAWW, MLG19PDAXW, MLG19PDBGW, MLG19PDCXQ, MLG19PDCXW, MLG19PDSAW, MLG19PNAWW, MLG19PRAWW, MLG19PRAXW, MLG2000AWW, MLG2000AXW, MLG23MNAWW

What’s Going On?

There’s a bad connection in the neutral wire (the white one) that runs from the power cord to the Motor Control Board. This neutral wire is routed across the water inlet solenoid valve via a terminal connection on its way to the Motor Control Board where it ends in another terminal connection. The problem is basically a crappy crimping job anywhere along this neutral wire’s path from the power cord, through the water inlet valves, and finally ending at the Motor Control Board.

Whaddya Gotta Do?

Start at the point where the power cord wire enters the washer and locate the neutral (white) wire. Follow it throughout the machine– this is the fine art of wire chasing. Tug on each terminal of the white wire wherever it’s connected at a terminal or wire harness, such as the water valve solenoid, and make sure that the wire is in there goodntight. If it comes out in your hand when you tug on it then– ding-ding-ding!– we have a winner. You’ll need to apply some wire-working skills and get that wire securely re-connected. That’s beyond the scope of this article but we can hepya with that in the Samurai Appliance Repair Forums.

Maytag has since changed this wire so that it by-passes the water solenoid valves and goes across the pump only, reducing the number of connections.

To learn more about your washing machine, or to order parts, click here.