This problem may be something as simple a broken door latch assembly. This topic in the washer repair forum will help you determine whether or not this is what’s going on with your Duet or Kenmmore HE3t/4t washing machine and describes a professional-style repair.
Monthly Archives: June 2006
The Disposable Chest Freezer Made by Haier and Sold by Sears as the “Kenmore Access Plus”
This is a $200 piece of garbage that no self-respecting appliance repair tech on the planet would even think about servicing. These dump-fillers are literally made to be disposable. Oh, but don’t take my word for it; read this topic in the kitchen appliance repair forum.
Maytag MAH5500 Won’t Spin – Locked Rotor Error; Washer Repair
This topic in the laundry repair forum is an excellent illustration of how to troubleshoot this particular washer problem along with general troubleshooting discipline and strategy.
Study this topic carefully and pay particular attention to the pearls of wisdom from Master Appliantologists Trying to Help and Stumpowitz. Note how they make skillful use of specific product technical knowledge, asking insightful questions, directing and interpreting basic electrical measurements using clear, logical thinking to draw valid conclusions for the root cause of the problem, ultimately resulting in a successful repair.
It’s a two-page topic, so don’t miss that second page!
Removing the Agitator in a GE Top-loading Washing Machine; Washer Repair
Read the heroic saga of one Grasshopper’s struggle and ultimate triumph over a stuck agitator in her GE washer.
LG Washer Shows LE Error Code on Display; Washer Repair
Some insight and cures for this problem and more in LG washers from some Master Appliantologists in this topic at the laundry repair forum.
Removing the Door Gasket on a Dacor Range
 Those braided door gaskets in Dacor oven doors are nice and fluffy and springy when they’re new. As you use the oven and spill grease on the door, the gasket will begin to compress allowing heat to escape. At some point, it will bother you enough that you’re gonna need to replace the gasket. This photo set shows some of the steps involved in removing the old gasket. Easy job, two mugs on the world-famous SUDS-o-meter.
You can buy your replacement gasket here.
Bosch Dishwasher Takes Forever to Complete a Cycle
I have actually been on a service call where the customer had hired another servicer to repair this problem. The other servicer, obviously merely a parts-changing monkey and not a real technician, simply slapped in a new heating element, didn’t bother to check his work, collected his money, and left. I asked the customer why she didn’t call him back to repair the problem for which she had hired him in the first place. She said he was too hard to reach, has left several messages with no return call, and she’s rightfully concluded that he is simply an incompetent cockroach and she wanted to try someone else.
Now, in the Bosch dishwasher, one indication that there’s a problem with the water heating circuit is if the dishwasher takes forever to complete a cycle. Note that “problem with the water heating circuit” does not equal “bad heating element.” While it’s true that the heating element is part of the water heating circuit, it is only one of several parts which can fail and kill power to the heating element. “How can we tell this?” you ask, incredulously. Well, Slick, a real technician uses a multimeter to make some simple electrical measurements so that he can determine, with absolute certainty, which part is bad. No guess work involved here. No replacing a part and hope you get lucky. Real technicians do something called “troubleshooting” in order to prove which part is defective.
So I pulled the wiring diagram for the dishwasher and measured the continuity of the heater and the heater’s thermal cutout fuse– both were good. Therefore, I knew that the problem had to be in the control board. So I opened the control panel, pulled the control board out and, walla!, found a burnt solder joint at the heater relay. How ’bout them apples?
So I got my solder gun from the van, soldered the connection, popped the board back in and ran the dishwasher. Within minutes, that heating element was drawing 11 amps, right on the design specification for that unit. Another successful Samurai repair.
If your control board is beyond repair or failed in another manner, you can buy a replacement control board here.
Maytag Dishwasher MDBH970 Fills But Doesn’t Clean the Dishwashes
You know the story: you load up your Maytag dishwasher, start the cycle and it fills ok, but it just doesn’t sound like it’s doing any serious dishwashing. In fact, when you open the door at the end of the cycle, all your dishes still have chunks of spam and bits of spinach stuck all over ’em.
So, being a DIY kinda grasshopper, you verify that the motor runs. Now what’s a grasshopper to do?
Look very closely at the wash motor shaft extension on your dishwasher. You’ll need to disassemble from the spray arm downward to get to it. Click the parts diagram shown here for a larger, annotated view of the guts. A plastic shaft extension was installed from the factory. If something too hard got caught in the cutter that mounts onto this extension, that plastic shaft extension strips out. When you remove the shaft extension from the motor shaft you will likely see stripped out threads from the extension left on the motor shaft. Replace the shaft extension, seal kit, and cutter with the new improved parts kit. Then you should hear that old familiar sound of your dishes being blasted clean.
To learn more about your dishwasher, or to order parts, click here.
Anatomy of a Whirlpool – Kitchenaid – Kenmore Dishwasher
If you’re preparing for a repair on this dishwasher or doing some troubleshooting on one, this illustrated, annotated photo of the underside will help get you familiar with the terrain.
Part link: New motor-pump assembly.
To learn more about your dishwasher, or to order parts, click here.
Maytag Neptune Spin Bearing Replacement; Washer Repair
Contemplating this repair? Big job, almost a complete teardown of the washer. This slideshow will give you a peek at what you’re in for.
Have fun, Homer! ![]()
To learn more about your washing machine, or to order parts, click here.
Samurai’s Appliance Repair Photo Galleries
After you’ve been kicking around the Web a while, you find that you’ve scattered your photo albums among several photo-sharing websites. As newer, slicker photo storing websites come available, you start using them; I never bother to transfer my photos from the older sites, waaay too tedious and, besides, I have important things to do, like picking tuna from between my teeth or scratching my bum then seeing how long I can resist sniffing my fingers.
Anyway, I’ve consolidated all my vast and awesome galleries of appliance repair photo albums into one convenient little page with its own little domain name: ScrotumScrubber.com. Be there now.
Washer Flood Prevention 101
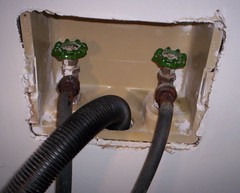
 Before the Great Washer Flood. Click for a larger view.
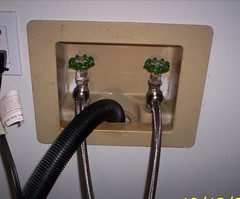
 Stainless steel hoses installed after the great washer flood that cost you over $20,000 in structural repairs to your house. Click for a larger view.
Buy your steel-braided fill hoses here.
Looking for Help on a Noisy Frigidaire Dryer
Diana opined:
I can’t find anything on a fridgidaire [sic] dryer. The drum thumps when it is running but heats up and drys [sic] clohes [sic].It is level and I’ve triied [sic] one piece at a time and still it thumps
_______________________________
Message sent from IP: 69.171.158.185
Well, for starters, you’re misspelling Frigidaire, among other words. Since I always speel everthing at this websight 100% cerrectly 100% of the thyme, the only article you’ll find in my site search using the key word fridgidaire will be this one. Spelled correctly, however, you’ll find a plethora of information on this very machine such as:
this page on the Frigidaire dryer front drum glides, or
or this page which has complete, illustrated disassembly instructions for every Ameedican dryer, including the Friggi-freakin-daire.
Jenn Air Electric Range Beeps Incessantly; No Fault Code
This is usually a bad touchpad. The way to tell for sure is to kill power to the unit, take the control panel down and unplug the ribbon connector that connects touchpanel to the clock. Put it back together and reapply power. The clock will just sit there blinking and, obviously, the buttons won’t work, either. Wait the length of time it takes to leisurely swill a decent beer, such as Tuckerman’s Pale Ale. If your beer drinking reverie is uninterrupted by beeping, then the touchpanel is bad; come git you one.
If it still beeps, then you have a bad clock.


