Monthly Archives: July 2011

How to test the Hall Sensor in an LG front-loading washer

A common symptom of a bad Hall Sensor in your LG washer is the LE error code (read more). A disconnected or damaged motor harness and even a bad main control board can cause the LE error, too, so you may want to check the Hall Sensor itself to see if it’s working. Here are two ways to test the Hall Sensor in an LG front-loading washer.

Ohm Testing the Hall Sensor

Start with an ohms test because it’s easy. But be aware that an ohms test is not conclusive– it’s merely preliminary. The Hall Sensor (and any other electrical component for that matter) can test good on ohms but still be bad because it can fail under load (when voltage is applied). That’s why ohms testing is just preliminary: if it fails the ohms test, it’s bad; replace the Hall Sensor (same for all LG models).

OTOH, if it passes the ohms test, this does not prove the Hall Sensor is good– you have to go on to the voltage test to prove that.

Wiring Harness And Resistance Checks On The Hall Sensor In An LG Washer

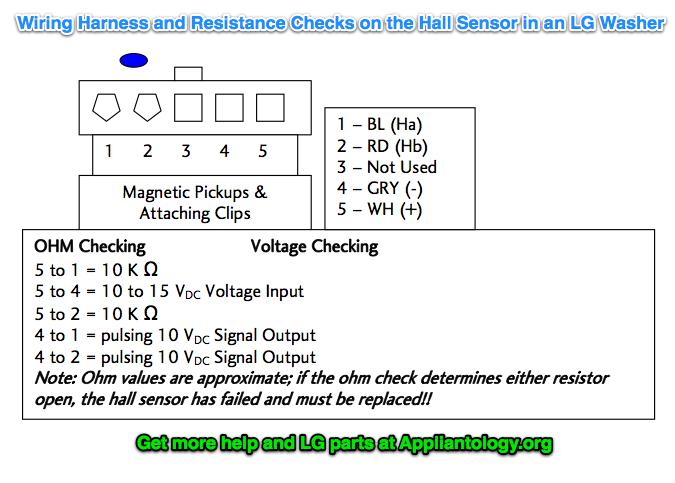
If tested off the stator using the diagram above, ohm check the resistors from pin 5 to pin 1 and pin 2. If the hall sensor is good, you should measure approximately 10 KΩ from pin 5 to pin 1 and 10 KΩ from pin 5 to pin 2. If either test shows an open (infinity) the Hall Sensor is defective and must be replaced.

Part link for the Hall Sensor (standardized for all LG models; includes a video showing how to replace it) ==> Hall Sensor

Voltage Testing Hall Sensor at Stator

Motor And Hall Sensor Wiring In An LG Washer

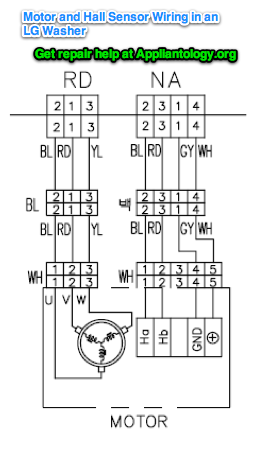
If measuring voltage from the control board to the Hall Sensor, follow the following steps:
1. Unplug the power cord.

2. Remove the rear washer panel.

3. Locate the Hall sensor connector on the stator behind the rotor.

4. Place the meter leads on terminals 5 to 4,white to gray.

5. Plug in the power cord,close the door,and press the power button. DO NOT PRESS START!

6. You should measure 10 to 15VDC. If 10 to 15VDC is present,the control board is OK! If not, replace the control board (look up the correct board using your model number).

7. To measure output signal voltage from the Hall Sensor, carefully move test leads to terminals 4 (gray) to 1 (blue). Slowly rotate the motor rotor by hand. You should read a pulsing 10 VDC. If 10VDC is measured from 4 to 1, move the lead on the blue wire to the red wire, terminal 2. Repeat rotating motor rotor by hand. You should read a pulsing 10 VDC.

8. If pulsing 10VDC is measured from pin 4 to pin 1 and pin 4 to pin 2, the hall sensor is OK! If either test netted only 9 to 10 VDC without changing (no pulsing) the hall sensor is likely defective; replace the Hall Sensor (same for all LG models).

To learn more about your washing machine, or to order parts, click here.

How to fix your gas oven that doesn’t get hot enough and save $800!

Amanda wrote:

Hello,
Just wanted to thank you for the great advice on forums. My 5 year old viking oven wouldn’t heat beyond 250. Per your advice, I replaced the ignitors (following your great video/picture demo). Viking service quoted me $900 to fix! I spent $112 on the ignitors and did it myself with your help. Working great now! Thank you thank you thank you!

That’s what Fixitnow.com is all about: Fix it yourself and save Big Bucks!

Here’s the page that Amanda used to help her replace the ignitor ==> http://fixitnow.com/wp/2008/08/06/how-to-replace-the-ignitor-in-a-gas-oven-a-pictorial-guide/

And here’s a tip for saving even more $$ in this repair. All oven ignitors are made of the same material: carborundum. The real variable is the length of the ceramic insulator and the type of wire connections. Here’s another fun fact to know and tell: Viking ignitors suck. They basically take the Maytag universal ignitor kit rejects, slap a Viking label on it and jack the price up almost three times. Next time, cut out the middle man (Viking) and get the Maytag universal ignitor kit:

Maytag universal ignitor kit

I have successfully used this ignitor on many other brands of ranges including Viking and Garland. This ignitor is less than half the price and lasts far longer.

To learn more about your range/stove/oven, or to order parts, click here.

How to locate the thermal fuse in a GE Profile “Hydrowave” washer

You know you have a blown thermal fuse in this washer when the control panel lights up but the motor doesn’t run; you check the status LED on the motor (see this post for more on that) and it’s dead, no lights, nuttin’. That’s a blown thermal fuse. Here’s where it lives:

GE Hydrowave Washer Thermal Fuse Location

Here’s what it looks like:

Thermal Fuse
(click image to purchase)

And you can buy the replacement right here ==> Thermal Fuse. The replacement kit comes with complete destructions.

To learn more about your washing machine, or to order parts, click here.

Why does a new-ish Bosch 500 WFMC front-load washer make a ratcheting sound during spin?

Listen to a few seconds of this video (don’t listen to the entire thing because it’ll eat your brain):

Sounds remarkably similar the sound that bad tub bearings will make. This particular washer is only three years old– very early for tub bearing failure.

The actual problem turned out to be something very simple: a loose concrete counterweight mounted to the front of the tub. A few minutes with a wrench and problem solved– no parts needed for this repair!

To prevent the problem from happening again, add Loctite to each of the counterweight mounting bolts.

To learn more about your washing machine, or to order parts, click here.

Tech sheet location and thermistor information for Samsung dryers

Sublime Master of Appliantology john63 at the Samurai School of Appliantology enlightens us on two key aspects of Samsung dryers: tech sheet location and thermistor operation.

On the rear/back of the dryer—there’s a TECH SHEET in a plastic pouch.

On the sheet—you’ll find the test values for various components.

THERMISTORS can fail and still not trigger an error display. Check the OHMS value (at room temperature) with a test meter.

Also, the thermistor is not in series with the heat element, the thermostat is.

The thermistor detects temp changes in the dryer by changes in resistance, which are interpreted by the control determining when to turn the heat on and off…

The THERMISTOR has a *coating* on it that becomes scratched/chipped over time by tiny particles in the blower housing. The salty air then corrodes the THERMISTOR (no heat at all).

Read more: Samsung DV337AEG Repair


(click image to purchase – 365-day return policy)

To learn more about your dryer, or to order parts, click here

Whirlpool Duet Sport Washer stops mid-cycle and display beeps and blinks, relay chatter on CCU

The surprisingly simple solution is revealed in this topic at the Samurai School of Appliantology – http://appliantology.org/topic/32407-whirlpool-duet-washer-wfw9150ww00-literally-on-the-blink/

To learn more about your washing machine, or to order parts, click here.

How to disassemble a Whirlpool Duet Sport dryer (also sold under the Kenmore label)

You may need to tear down this dryer for a variety of reasons: replace the belt, drum rollers, heating element, etc. This video shows you how to do it the right way:

Common replacement parts in the Whirlpool Duet Sport dryer (click to see photo and/or purchase):

Heating Element Assembly

Thermal Fuse

Door Latch

Thermistor

Idler Pulley

Lint Filter

Drive Belt

Thermal Fuse and High Limit Thermostat

Drum Roller

Drive Motor

Blower Wheel

To learn more about your dryer, or to order parts, click here.

Tips for adjusting the thrust bearing on a Maytag Atlantis or Performa washer

Grand Master appl.tech in the Samurai School of Appliantology shares with us some pearls of wisdom on the finer points of adjusting the thrust bearings in the Maytag Atlantis and Performa washers ==> http://appliantology.org/topic/32360-pav2300aww-not-spinning/

To learn more about your washing machine, or to order parts, click here.