Gas dryer won’t stay hot; fires up and then goes out. Wassup wif dat, yo? http://post.ly/uKbb
Gas dryer won’t stay hot; fire…
Leave a reply

Gas dryer won’t stay hot; fires up and then goes out. Wassup wif dat, yo? http://post.ly/uKbb
Maytag Performa dryer rattling and knocking like dead bones. Some weird voodoo goin’ down. | ApplianceGuru.com http://ow.ly/2wdEu
Frigidaire Dryer Front Drum Glide Replacement | Fixitnow.com Samurai Appliance Repair Man http://bit.ly/bePTAM
If you’re troubleshooting the burner assembly on a gas dryer, one of the basic things ya just gotta know is the main parts: what they are and where they’re located. This photo shows the main parts of a gas dryer, click it to see the annotations of the various parts:

(click to enlarge and see annotation numbers)
1. Radiant Sensor
2. Ignitor
3. Flame comes out here
4. Flame Tube
5. Valve Coils (2)
6. For propane fuel, this will be a blocking pin; for nat. gas, this will just be a cap.
7. Gas supply pipe
GE Electric Dryer Model DBXR453EVOWW Schematic Diagram and Troubleshooting Tech Sheet
DBXR, DBXR453, DBXR453V
Schematic Diagram:

(click to enlarge)
Troubleshooting and Tech Sheet

(click to enlarge)
If you’re installing a new setup for a gas dryer, here’s a handy reference of the basic requirements so that the dryer will work right and your house won’t go boom and your pants go brown.
• Use a new CSA International-approved gas supply line.
• Install a shut-off valve. Securely tighten all gas connections.
• If connected to LP, use a manometer to measure the gas pressure to make sure it does not exceed 13 ̋ (33 cm) water column.
All dryers come equipped to burn natural gas. But many places use LP instead. If this is the case for you, you’ll need to convert the dryer to burn LP. For older dryers, this page will show you how to do that:
http://fixitnow.com/wp/2009/03/13/converting-a-gas-dryer-from-natural-gas-to-propane/
For newer, Whirlpool-built dryers using the new-style gas valve, see this page:
http://fixitnow.com/wp/2010/06/24/converting-the-new-style-gas-valves-in-whirlpool-built-gas-dryers/
Gas Supply Piping
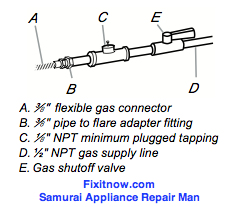 • 1/2 ̋ IPS pipe is recommended.
• 3/8 ̋ approved aluminum or copper tubing is acceptable for lengths under 20 ft (6.1 m) if local codes and gas supplier permit.
• Must include 1/8 ̋ NPT minimum plugged tapping accessible for test gauge connection, immediately upstream of the gas connection to the dryer (see illustration).
• If you are using Natural gas, do not use copper tubing.
• 3/8 ̋ flare x 3/8 ̋ NPT adapter fitting between dryer pipe and 3/8 ̋ approved tubing.
• Lengths over 20 ft (6.1 m) should use larger tubing and a different size adapter fitting.
• If your dryer has been converted to use LP gas, 3/8 ̋ LP compatible copper tubing can be used. If the total length of the supply line is more than 20 ft (6.1 m), use larger pipe.
NOTE: Pipe-joint compounds that resist the action of LP gas must be used. Do not use TEFLON tape.
• The gas supply pipe must include a shutoff valve:
In the U.S.A.:
An individual manual shutoff valve must be installed within six (6) feet (1.8 m) of the dryer in accordance with the National Fuel Gas Code, ANSI Z223.1.
In Canada:
An individual manual shutoff valve must be installed in accordance with the B149.1, Natural Gas and Propane Installation Code. It is recommended that an individual manual shutoff valve be installed within six (6) feet (1.8 m) of the dryer.
The location of the shut off valve should be easy to reach for opening and closing.
Gas Supply Connection Requirements
• Use an elbow and a 3/8 ̋ flare x 3/8 ̋ NPT adapter fitting between the flexible gas connector and the dryer gas pipe, as needed to avoid kinking.
• Use only pipe-joint compound. Do not use TEFLON tape because the white stuff that’s commonly available is too thin to make a good, reliable seal.
• The dryer must be connected to the gas supply line with a flexible gas connector that complies with the standard for connectors for gas appliances, ANSI Z21.24 or CSA 6.10 such as the one shown below:
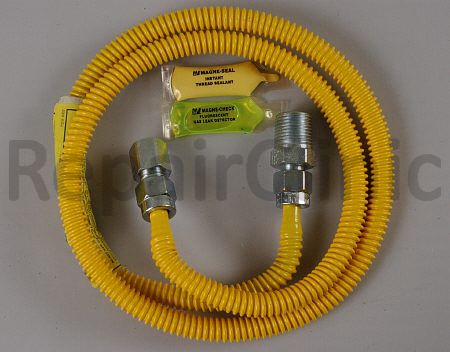
(click it to git it)
This flexible gas connector kit includes everything you need to connect your dryer to your gas shutoff valve, including 4 feet of 3/8-inch outside diameter coated stainless steel gas connector with two fittings, leak detector solution and pipe sealant compound. Procoat polymer coating resists corrosion caused by bleach, ammonia and acids found in many home care products.
This episode of Appliance War Stories™ is brought to us by the letters “L” and “G.” Sublime Master Appliantologist john63 from the Samurai Appliance Repair Forums shares with us an epic hand-to-machine war story with an LG dryer. Y’all go grab a brewski, get me one while you’re at it, and let’s gather ’round the campfire and listen in…
On a recent service call—I had an LG gas dryer with a *no heat* complaint—all components checked out fine.
As I was testing the NUMBER 2 gas valve coil for 90 volts from the MAIN BOARD (inserting the test meter leads into the gas valve coil plug) the gas burner began functioning.
The plug at the GAS VALVE COIL (there are two sets for coil no.1 and another for coil no.2) was not tight enough–in my case–the number 2 gas valve coil plug was too loose.
I removed both plugs from the gas coils and slightly bent the plug connectors on the gas valve coils. One slightly downward and the other slightly upward—reconnected the plugs–and the gas burner functioned perfectly.
This should be considered if the following test procedure does NOT identify a cause:
The correct sequence of operation for GAS HEAT operation is as follows:
1) FLAME SENSOR must be *closed* (closes at 320F/Opens at 370F)
2) COIL no. 01 is energized (90 VOLTS DC)
3) IGNITOR is energized & glows (120 volts)
4) FLAME SENSOR opens (370F) & IGNITOR begins to turn off
5) COIL no. 02 is energized (90 VOLTS )—Flame Ignites.
If no power is measured at the gas valve coils (90 volts)–replace the MAIN BOARD.
(click it to git it)
Kenmore Dryer Model Number 110.66662500 Schematic – Gas and Electric Models
110.66662, 110.666625

(click to enlarge)
What does “local” mean anymore in this age of the Internet? I mean, can you get any more local than right here on your computer screen? I know we look big time an’ all, but we’re a mom & pop (literally!) operation, too. Instead of a brick n’ mortar repair shop, we’re your online DIY appliance repair shop; we’re every bit (pardon the pun) as real and we’re as close as your compooter screen. How’s that for local?
Fun Fact to Know and Tell: The “local” appliance repair shop in your town or city cannot buy LG appliance parts directly from their parts dealer like they do for other appliance brands; they have to buy them directly from LG.
What does this mean for you? It means you’re gonna pay a higher price and wait longer to get LG parts if buy them from your “local” parts house.
 But the Samurai has the solution: buy your LG parts right here through Fixitnow.com– your local online appliance repair place– you’ll save mucho dinero and you’ll get your parts delivered lickety-split. Just use the handy links below:
– Dishwashers
– Dryers
– Ice Makers
– Refrigerators
– Microwave Ovens
– Ovens/Ranges/Stoves
– Refrigerators
– Washers
dmurry wrote:
I have the DPGT750EC1PL, 6 yrs old, and it stopped blowing (and therefore, drying). I ran the diags and it said low blower RPM and I poked around on the internet and figured I needed a blower motor. So I replaced that and it worked and we’ve run a few loads thru no problem. Then I get the call today from my wife…. not drying, not blowing. Bummer. Does that mean I need to replace the inverter board? I saw a post from a guy somewhere that replaced the board and still had a problem. How can I be sure what the problem is? Also, this seems to be a pretty common problem with these dryers, based on my casual glance across the internet. Do I have a clunker? I still consider 6 yrs old pretty “new”, or at least I didn’t plan on dryer replacement even being on the radar until the 10 year mark.
Not to make this too long, but we’ve had another problem for 1+ year. The drum sometimes doesn’t turn. We give it a spin by hand and close the door real quick and it works. In replacing the blower, I checked the belt and it seems perfectly fine so I don’t suspect a worn belt. I did clean out the cr*p around the dryer support wheels and I’m sure that helped but the problem still persists.
Your help GREATLY appreciated!!
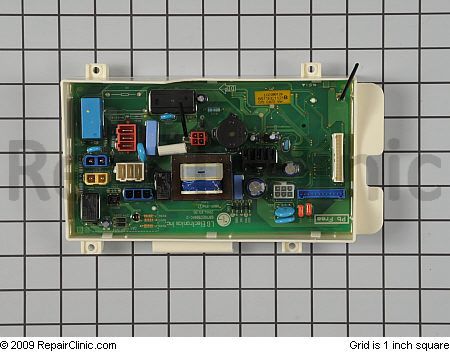
The antithetically-named GE Harmony dryer is a great disrupter of household harmony. They’re more convoluted than most dryers because they use fluky electronics for things like running the blower motor instead having the blower directly coupled to the drive motor. This is one those Frankenstein designs that the GE engineers should have let quietly die on the drawing board. But, to our horror, IT’S ALIVE!
Here’s an inside look at its Franken-guts:
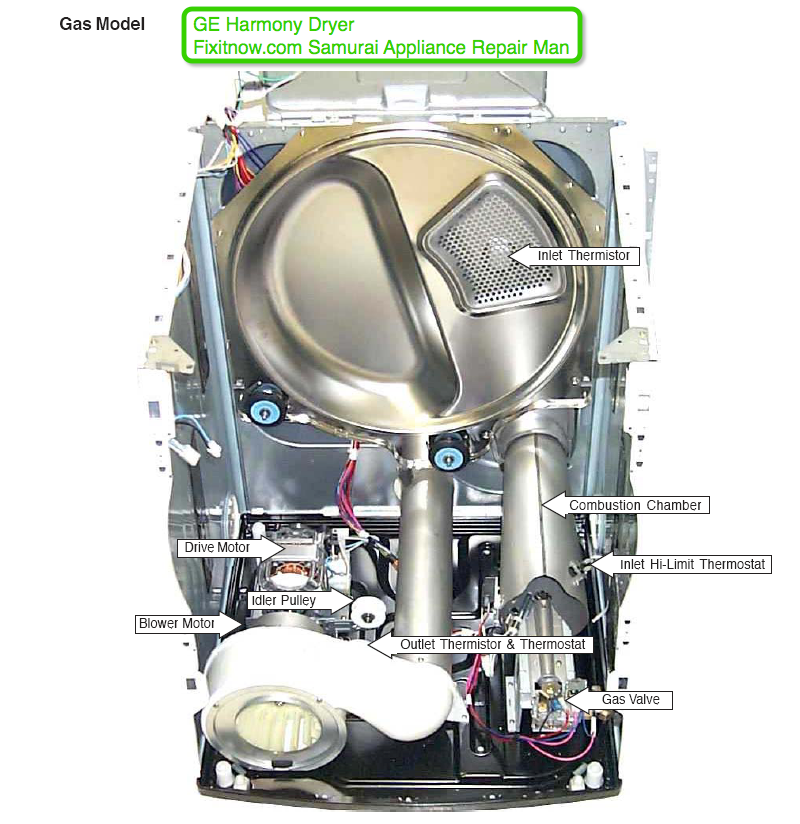
(click for larger view)
The blower motor is a DC, variable speed motor that operates at different speeds depending on air temperature and venting back pressure. If the blower is running below 1000 rpm, the dryer control turns the heater off.
Resistance of the motor windings can be measured at the 10-pin connector on the inverter board or at the motor; gory details and more fun facts to know and tell in the troubleshooting cheat sheet below:
For your convenience, the part link for the blower motor is included below, should your troubleshooting confirm that it’s bad:
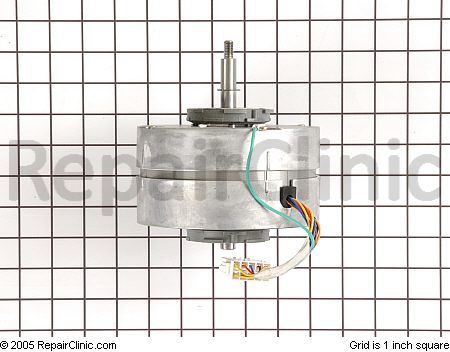
(click it to git it)
Phillips screwdriver and 5/16″ nut driver: $6
Time to remove all the panels from the front to gain full access to the inside of the dryer: 5 minutes
Cutting a huge hole in the back of your dryer to have even less visibility than you do from the REMOVABLE access panel right beside it… priceless!


(courtesy of Sublime Master appl.tech.29501)
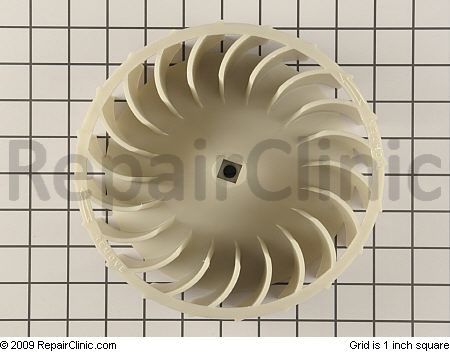
You’ll also find this dryer sold under the Sears Kenmore, Maytag, and Amana brands. These dryers have the lint filter in the door (as opposed to the top panel, like this one). This video shows you everything you need to know to replace the blower wheel. Tools you’ll need: hex socket, flat head screwdriver, Phillips head screwdriver, wrench, square 1/2″ drive socket wrench. And you can conveniently buy the blower wheel ratcheer. 🙂
Michael wrote:
O wise one, if I am forced to purchase a new gas dryer please tell me which brand you approve of.
Fondly drinking beer as well,
Mike
Get this one… if you can still find it:

Short answer: No.
This happens frequently. Over time, the cheap, stamped-metal terminals loosen just enough to make heat, sometimes enough to char the terminal and wire. Once it’s charred the wire enough to stop heating, it’s also stopped the current flow through the thermostat and hence any danger of burning your house down. Just fix it and chill. You’ll need to replace the thermostat, too. You can buy a replacement thermostat ratcheer.

All gas dryers come from the factory set up to run on natural gas. Some places, such as up here in extreme northern Yankeeland, use propane instead of natural gas. If that’s the case where you live, you’ll need to pervert the dryer to burn propane instead of natural gas. If you have an older dryer, see this page for perversion destructions.
If you have a newer Whirlpool-built gas dryer (built since 2009, includes Maytag and some Kenmore models) that you need to convert to run on propane, you’ll see that the gas valve on your dryer is a different animal from what’s shown in the aforementioned post. Whirlpool has modified the gas valve to make it even easier to do the conversion. This post will ‘splain it all to you.
These new gas valves have what looks like a cap where the blocking pin screw used to be on the older valves:

To convert the gas dryer, you’ll need the Gen-u-wine gas dryer perversion kit, which you can buy ratcheer. Here’s a purdy pitcher:
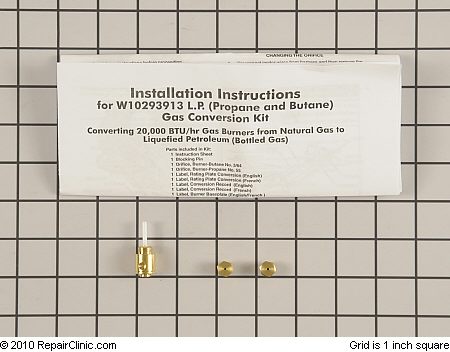
Now, for those of you who don’t like reading a lot of detailed instructions, here’s the Cliff Notes® version:

You can download the Official perversion destructions from the Downloads section at Appliantology.org: http://appliantology.org/files/file/809-whirlpool-gas-dryer-installation-instructions-for-w10293913-lp-propane-and-butane-gas-conversion-kit/
You’ll need to be an Apprentice or an Appliantologist to Download files there but this is painless and can cost as little as nothing. Details here: http://apprentice.appliantology.org/
Remember to leak check your work when you’re done so your house won’t go BOOM and your pants go brown! Come git you a bottle of gas leak bubble solution.
So mote it be!