
(click for larger view)
To learn more about your dryer, or to order parts, click here.

(click for larger view)
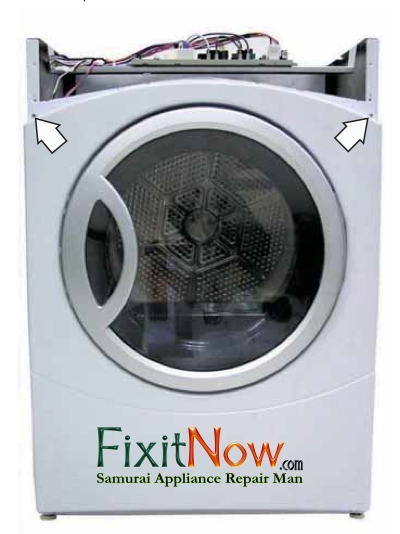
This is GE’s fancy-looking dryer with the see-through door, model numbers DBVH512, DCVH515, DHDVH52. If you need to get to any of the guts such as the heating element (electric models), gas burner (gas models), motor, belt, etc., this’ll hepya.
You’ll need to remove the top panel, control panel, and front panel to replace the belt. To go further into the belly of the beast for things like the gas burner, heating element, drum bearing, idler pulley, you’ll also need to remove the drum. Let’s take it one section at a time.
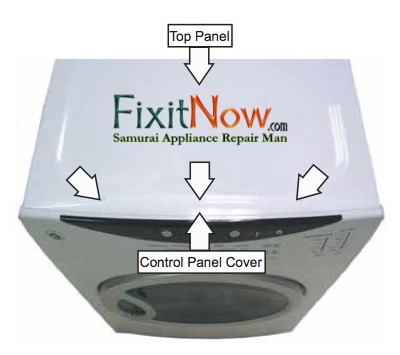
Top Panel Removal
If you just need to get to the power board, you’ll only have to remove the top panel. For most other innards, this will just be your first step.
1. Remove the three Phillips-head screws that attach the control panel cover. Pull the cover toward the back of the dryer. If the panel seems stuck in place, you can use a putty knife along the top seam between the cover and the control panel to gently pry it back.
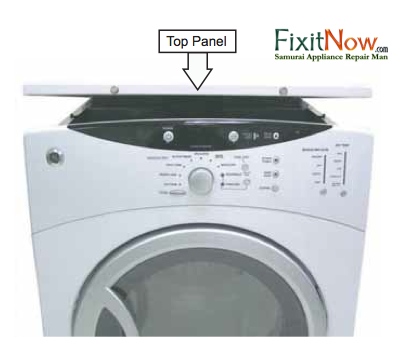
2. Remove the two Phillips-head screws that attach the top panel to the cabinet.
3. Raise the front of the top panel a few inches, then pull it forward to clear the rear tabs.
Control Panel Removal
After the top panel is removed, you’re ready to remove the control panel in just three easy steps:
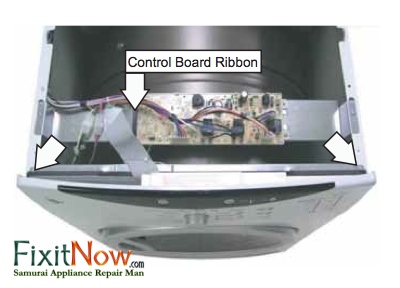
1. Disconnect the control board ribbon from the power board at connection CN110.
2. Remove the two Phillips-head screws that attach the top of the control panel to the cabinet.
3. Lift the control panel straight up and out.
Front Panel Removal
With the top panel and control panel removed, you’re ready to take off the front panel:
1. Disconnect the door switch wire harness and the sensor rod wire harness to the power board.
2. Remove the four Phillips-head screws that hold the front panel to the cabinet. You’ll probably need to raise up the front of the dryer and support it on a block of wood so you can get to the screws to remove ’em.
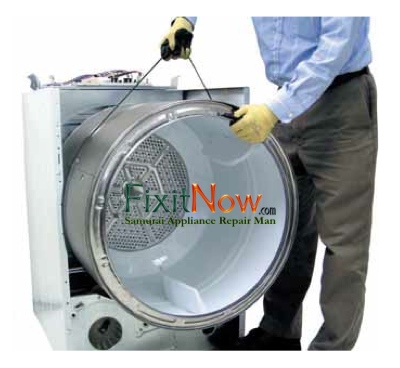
Drum Removal
Okay, so with the top panel, control panel, and front panel all out of the way, you’re now ready to remove the drum so you can get into the belly of the beast. Let’s do dis:
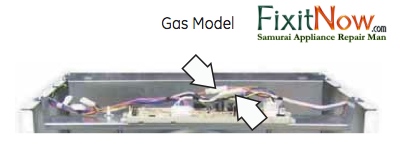
1. If you have an electric dryer, move on to Step 2. For gas models, disconnect the inlet control thermistor and the inlet safety thermostat wire harnesses.
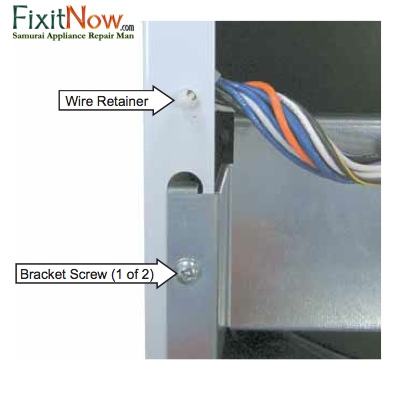
2. Detach the front plastic wire retainer from the cabinet by squeezing the little tabs.
3. Remove the two Phillips-head screws that attach the power board bracket to the cabinet. Carefully place the bracket on the rear plate.
4. Remove one Phillips-head screw from each side of the cabinet, then gently spread the sides apart to provide clearance for the drum. Careful not to spread the sides too far or you’ll crease the sheet metal. Not a biggie, just a fine point of finesse for you aficionados out there.

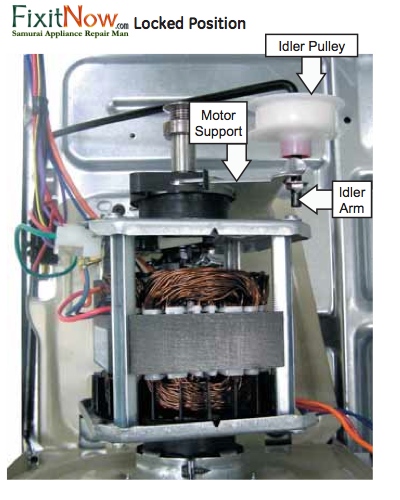
5. Remove the drive belt from the motor and idler pulley. Reach under the left side of the drum, push the idler pulley down and to the right, then lock the idler arm on the top corner of the motor support. Then remove the belt from the motor pulley and idler pulley. Guide the belt past the front of the cabinet base.
6. Using the belt as a handle, pull the drum forward and guide it out of the cabinet.
And there ya be!
Angi wrote:
Hi, Thanks for you timely response.
I you have a well vented crawl space under your house, why can’t you vent your dryer underneath your house.
Oh, but you can! If you don’t mind mold, mildew, rotted floor joists, caved in floors, and chronic illnesses from all the gookus in dryer exhaust. Also, the US EPA has identified the fragrances in fabric softeners as particularly potent source of allergens for many people.
I dunno, dryer manufacturers come up with these silly venting requirements because they have this crazy notion that most people don’t like this stuff. Go figure!


Emily wrote:
Hi
Have a kenmore dryer 110.85089400 that will run for a while then flash F11. Please enlighten me, O Samurai!


shodhan wrote:
I have Maytag Neptune MDG4000BWW gas dryer. I won’t heat up. I checked the vent is clean. Also I observed the igniter comes on initaly, burner stays on for minute or two. afte that it shuts off, but igniter continues to come on & ff. but burner willnot fire gas. Any suggestion or advise, How to trouble shoot & fix it.
Thanks in advance.
val lewis wrote:
I have an old Kenmore dryer model # 110-97573220. It hums when start button is engaged, but does nothing else. what could be the problen Sen- Se? Where can I find a diagram of said machine? Pleae respond. Domo Arrigato!
Press start, dryer hums.
Check belt, blower wheel, motor.
Take apart and see.
Kameron Lyne wrote:
your website is fabulous but I’m having trouble trying to find disassembly for my Maytag dryer model #SDE5401AYW. Ther does not seem to be any screws in the front. I tediously removed screws from back and around the bottom last night, but that didn’t get me to the drum. I think I need to replace my belt, but I can seem to access the drum easily. All the diagrams you have on your site don’t match my dryer. HELP! husband is at laundry mat drying clothes right now as I try to fix…doesn’t that seem backward? Thanks for any input I hope the picture helps.
Ahh, grasshoppah, this is indeed a sublime repair kata that the Samurai is pleased to impart to you. So let’s fire up a spliff, er, I mean, a stick of your favorite incense and contemplate the zen of dryer disassembly.
Before starting, make sure the dryer is unplugged. To remove the front panel, you first need to “pop the hood.” The top panel is attached to the front panel by C-clip springs, which you can see in this picture labelled Item 8. Use your short katana to press the C-clips in at the locations shown here. A stiff putty knife will also work but isn’t nearly as artistic.
Now you can prop up the top panel and remove the two screws– one on each side– holding the front panel to the side panels. Stick your head in and look at each side up top, you’ll see ’em.
Can you snatch this pebble from my hand, grasshoppah?
Related Post: Dryer Disassembly
To learn more about your dryer, or to order parts, click here.
Dryer no workee but you have no idea how to even begin fixing it? No worries, grasshoppah, the Samurai’s got just whachoo be needin’ with the Samurai Dryer Repair School. Learn how to repair your own dryer in the comfort of your own garage. But space is limited so enroll today!

(Live action shot from our webcam of a Samurai Dryer Repair class now in session. This could be you!)
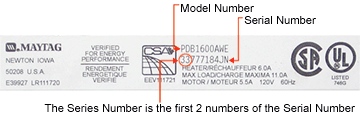
Lots of times, when you’re working on Maytag appliances, you need to know the series number to order the correct part. Not to be confoosed with the model number, the series number refers to different production series within the same model. In the world of manufacturing, it’s common to substitute originally-specified components with upgraded or re-designed ones based on failure reports from the field. Since these component changes may affect other components in the machine, which may have been modified, you need a way to keep track of what component goes with which production run. In the Maytag world, this is done via “series numbers.” Series numbers are simply the first two digits of the serial number, located on the model number tag, like ahso:
If you’re having trouble locating the model number tag on your appliance, come feast your bloodshot squinties on these diagrams.
Freaky appliance
flashing mysterious code.
Mystery revealed!
Problem: Dryer warm but clothes take too long to dry.
Solution: Dryer is dirty with lint inside, vent is excessively long, or filled with lint. FIRE HAZARD!
The house dryer vent line is notorious for being neglected and most people don’t even think about cleaning it out periodically. You’ll wanna clean that sucker out about every two to three years. There are services that specialize in dryer vent cleaning. Or come git you a vent cleaning brush on a 12 foot wire wound coil, and you can get ‘er done yourself.
Other things besides poor venting that can cause this problem: Intermittent burner coils, faulty thermostats, reduced airflow through machine (poor vent). If dryer is electric, make sure you’re getting 240vac at the wall outlet. Check both rails of the 240 VAC supply… may be getting only 120 VAC. I’m just sayin’.
Problem: Drum turns but no heat at all.
Solution:
Gas dryers— Maybe a burner component failed. Check coils, flame switch, igniter, motor centrifugal switch, thermal fuse, thermostat, hi-limit thermostat, belt switch.
Electric dryers— Centrifugal switch (built into the motor), heating element, thermal fuse, thermostat, hi-limit thermostat, broken belt switch. I have a special page just for you on things that can cause an electric dryer to not heat.
Problem: Drum wont turn.
Solution: Is the motor turning? “But, Samurai, I am but a Grasshoppah, how am I supposed to know these things?” Use your earballs, Slick; do you hear the freakin’ thing running? Could be a broken belt, seized belt idler wheel, foreign crapicus jammed in drum.
Problem: Dryer makes a scraping sound.
Solution: Worn rollers; worn drum glides or drum bearing (especially common on Frigidaire dryers); crapicus jammed in the drum; cheesey idler pulley.
Problem: Dryer getting too hot.
Solution: Stuck thermostat, airflow backing up from restricted vent. WARNING WILL ROBINSON: FIRE HAZARD! DANGER! DANGER!
Problem: Rumbling sound (particularly noticeable when the dryer starts).
Solution: Worn out blower wheel— especially common on Maytag models, also some Frigidaire. I’ve yet to see this problem on a Whirlpool model, though I suspect the models with the lint filter in front are susceptible to this.
Problem: Dryer runs normally then shuts down for about 10-15 minutes then starts back up again by itself.
Solution: Drum motor over-current or thermal relay is tripping. May be due to hot air being blown against the motor or just a motor that’s old and drawing too much current. Check vent connections, clean out dryer / house vent.
And many, many more more dryer problems and solutions await you in the Online Dryer Diagnostic Guide and the Complete Compendium of Dryer FAQs.
To learn more about your dryer, or to order parts, click here.
Appliance Breakdown Diagrams
Grok on these mind-expanding, interactive breakdown diagrams of various appliances so you can see how they’re put together. An indispensible troubleshooting and repair aid! Just click on the appliance you’re working on and run your mouse over the diagrams. It’ll popup pictures of the various key components inside as well as give you insight into how to disassemble. It’s the miracle of Flash!
If you need more detailed help, start a new topic in the Samurai Appliance Repair Forum and we can get you more info.
Dryers
Freezers
Ice Makers
Microwave Ovens
Ovens, Ranges, and Stoves
Refrigerators
Washing Machines
John wrote:
I need to buy all new kitchen and laundry appliances. Which brand would you stick with (Samsung, LG, Whirlpool, Maytag). I am looking for a frenchdoor and all appliances should match…Stainless too.
Thanks,
John
Let us open our Appliantology hymnals to the Second Law of the Prophecy wherein it is written, “All appliances break.” With this wisdom firmly implanted in that muck betwixt our ears, we begin to see your question from a new perspective.
Like so many propagandized Ameedicans victimized by the slick marketing campaigns assaulting us in the corporate media organs, we see that you have placed aesthetics ahead of practical considerations, such as repairability. In other words, you have placed more importance on form over function, exactly as you have been programmed to do as a good little consumer.
But fear not, my mushy-headed grasshopper, for the Samurai is here to break the spell that the marketing wizards have placed you under. Lo, with his mighty katana, he shall cut asunder the chains of your programming and free you from the trap of mindless consumerism! Let us begin by re-phrasing your question in the way the Samurai would ax it, “Knowing that all modern appliance brands and models are mediocre at best and that all fall short of the glory of the Samurai, which piece of junk am I going to have the easiest time fixing?”
Ahh, Grasshoppah, now you’re beginning to pierce the veil and to do what we professional appliantologists call, “critical thinking.” Using this new, enlightened paradigm, which emphasizes function over form and recognizes the Second Law of the Prophecy, the question further reduces to, “Which appliance manufacturers make their service manuals and technical bulletins freely and readily available to professional appliantologists as well as Joe Do-it-yourselfer?” Eggzellent question, my querying grasshoppah, domo fer axin’!
Currently, there are only three brands which make their service information freely available: Whirlpool (which includes Kitchenaid, Roper, and Maytag brands), Frigidaire (which includes Electrolux brands), and Dacor (which includes, well, just Dacor). Emphasis on the word, “currently” because Whirlpool is considering restricting access to their technical information to professional appliantologists only– you can thank the over-abundance of lawyers and the bidness-killing tort system in Ameedica for that.
At the other end of the information spectrum are companies that are very restrictive with their technical service information and, for that reason, I would never even consider buying their stuff. The worst offenders in the infowar are Viking and GE. In the case of Viking, they’re not only tight-fisted with their service manuals, but their ranges are the shoddiest on the market. And you get to pay a premium price tag just to have the “Viking” badge in your kitchen. Viking is the poster boy of what I mean by placing form over function.
Awwite, armed with this sacred wisdom and enlightened perspective, gird up thy loins and go git ’em!