Category Archives: Appliance Repair Posts

All appliance repair categories.

Amana Range Model ARR3601WW Schematic and Wiring Diagram

Amana Range Model ARR3601WW Schematic and Wiring Diagram

Model number variations: ARR3601

Amana Range Model ARR3601WW Schematic and Wiring Diagram
(click to enlarge)

Samurai Appliance Repair Man

Parts==> http://parts.fixitnow.com
Forums==> http://appliantology.org
Facebook==> http://facebook.fixitnow.com
Twitter==> http://twitter.fixitnow.com
Newsletter==> http://newsletter.fixitnow.com
SMS==> 603-505-8460

GE Range Model JBP21BC1CT Wiring Diagram

GE Range Model JBP21BC1CT Wiring Diagram

Model number variations: JBP21BC1, JBP21B

GE Range Model JBP21BC1CT Wiring Diagram
(click to enlarge)

Samurai Appliance Repair Man

The Samurai Family of Appliance Repair Websites

Parts==> http://parts.fixitnow.com
Forums==> http://applianceguru.com
Facebook==> http://facebook.fixitnow.com
Twitter==> http://twitter.fixitnow.com
Newsletter==> http://newsletter.fixitnow.com
SMS==> 603-505-8460

How to remove the bake element in a Kitchenaid KEMC308KSSO electric range

Download these parts list and breakdown diagrams then open your Appliantology hymnal and sing along:

TO REMOVE THE HIDDEN BAKE ELEMENT:

a) Remove the right side panel (see below for the procedure).
b) Spread the insulation away from the front of the hidden bake element.
c) Disconnect the two wire connectors from the hidden bake element terminals.
d) Remove the element shield screw from the right end of the shield.
e) Pull the hidden bake element and its shield to the right and unhook the left and right tabs.
f) Remove the hidden bake element from the unit, and place it on a work surface.
g) Remove the two bracket screws, and remove the shield from the element.

REMOVING A SIDE PANEL

1. Unplug range or disconnect power.
2. Pull the range away from the wall so that you can access the rear of the unit.
3. Remove the oven door and set it aside (see below for the procedure).
4. Pull the storage drawer out as far as it will go.
5. Remove the two rear screws from the side panel
6. From the rear of the unit, reach inside and remove the screw from the bottom of the side panel.
7. Slide the side panel forward and unhook the front edge, then tilt the top of the side panel out,
and lift the panel from the unit.

NOTE: When reinstalling the side panel, set the bottom edge on the rail,
hook the front edge at the top and bottom, and install the two rear screws;
then install the bottom screw from inside the rear of the unit.

REMOVING THE OVEN DOOR

1. To remove the oven door, open the door to its first stop.
2. Grasp the sides of the door, lift it slightly, and pull the door forward
until the hinge hangers are partially out of the slots in the chassis.
Do not completely remove the hinge hangers from the slots,
since there will be spring tension on them.

3. Reposition the angle of the door to its vertical position to remove the spring tension
on the hinge hangers, then pull the hangers the rest of the way out of the chassis slots.

To reinstall the oven door:

1. Grasp the sides of the door and insert the hinge hangers into the hinge slots.
Lift the door slightly and push in at the bottom until the hangers are fully installed in the unit.

NOTE: If the hinge hangers are not seated properly, the door will not close tightly and may be off-center.
To seat the hinge hangers, keep the door vertical, then lift it slightly, and push in on the bottom
until the hangers are fully seated.

2. Open and close the oven door to make sure that it operates and seals properly.

Samurai Appliance Repair Man

The Samurai Family of Appliance Repair Websites

Parts==> http://parts.fixitnow.com
Forums==> http://applianceguru.com
Facebook==> http://facebook.fixitnow.com
Twitter==> http://twitter.fixitnow.com
Newsletter==> http://newsletter.fixitnow.com

Bosch WFMC3200UC washer not draining completely and E04 error code

For any front loading washer with a draining problem, the first things to check for are a clogged pump or drain hose. But Bosch, always wanting to be different, adds another little Gotcha to their washers that’s not well-known but can also cause poor or no-draining problems. Sublime Master denrayr reveals this esoteric kata unique to Bosch washing machines:

There is a big ball in the hose that connects [the pump] to the tub. This ball is there to act as a one way valve to prevent dirty water from enterin the tub. Sometimes this ball will get stuck due to dirt or other contaminents. Remove the ball and clean it and the hose and reinstall.

Samurai Appliance Repair Man

The Samurai Family of Appliance Repair Websites

Parts==> http://parts.fixitnow.com
Forums==> http://Appliantology.org
Twitter==> http://twitter.com/fixitnowsamurai
Facebook==> http://facebook.com/fixitnowsamurai
Newsletter==> http://newsletter.fixitnow.com

– Posted using BlogPress from my iPad

Test points and schematic diagram for a Whirlpool-built modular ice maker

The little ice maker inside the freezer compartment of a refrigerator is called a modular ice maker. Most of these ice makers are built by Whirlpool regardless of the refrigerator brand. The exceptions are GE, LG, and Samsung.

Go ahead and download this handy troubleshooting sheet and share it with all your friends. Makes a great gift for Thanksgiving!

Samurai Appliance Repair Man

The Samurai Family of Appliance Repair Websites

Parts==> http://parts.fixitnow.com
Forum==> http://applianceguru.com
Facebook==> http://facebook.fixitnow.com
Twitter==> http://twitter.fixitnow.com

Sent from my iPod

Frigidaire Stack Washer-Dryer Model FEX831CS0 Schematic

Frigidaire Stack Washer-Dryer Model FEX831CS0 Schematic

Model number variations: FEX831CS, FEX831C

Frigidaire Stack Washer-Dryer Model FEX831CS0 Schematic
(click to enlarge)

Samurai Appliance Repair Man
fixitnow.com

Parts==> parts.fixitnow.com
Forums==> applianceguru.com
Facebook==> facebook.fixitnow.com
Twitter==> twitter.fixitnow.com
Newsletter==> newsletter.fixitnow.com

Usage tips for an LG combo all-in-one washer-dryer

You may have seen the LG combo washer dryers the last time you were looking at appliances. They’re all the rage among city dwellers where space in those tiny studio apartments is a rare and precious commodity because the washer and dryer are combined into one machine. While they do save on space, don’t expect it to act exactly like a stand-alone washer dryer set.

A Grasshopper in the Samurai Appliance Repair Forums recently scored a good deal on a used LG WM3431HW combo washer dryer and asked about some noticeable differences in how these machines run compared to stand-alone washers and dryers. Sublime Master john63 gives a good summary of the differences. Let’s listen in…

I was wondering if i have a problem cause the clothes are not coming out dry like a standard dryer does.

*******************************

This is a combo washer and dryer all-in-one.

The dryer is of the condensate-dry type (no external dryer exhaust vent system).

The dry cycle can take (depending on fabric type) 3 to 6 hours to dry laundry.

Open the door to the tub—you’ll notice a black slash mark near the opening which indicates 2/3rd full.

Dry laundry should not be loaded into the tub higher than this mark—or the wet laundry will take an abnormal amount of (for a condensate dryer) time to dry—or not dry completely.

If the unit is more than a year old—it may be necessary to clean out the condensate DUCT.

Remove the rear access panel. On the left side of the tub—remove the DUCT where it attaches to the bottom of the tub & remove any / all lint accumulation.

********************************

Also i was wondering if you should be hearing the water turning on and off in the dry cycle ?

********************************

Normal.
During the dry cycle—a special cold water misting valve sprays into the condensate DUCT. This converts steam from the wet laundry in the tub back to liquid—to be drained by the drain motor—which turns on & off intermittently.

*********************************

I was doing some reasearch on a “Cd” error. From what i have been reading it is a cool down process not an error am i correct ?

*********************************

Correct.

Need parts for your LG washer, dryer or combo unit? Get ’em here==> http://parts.fixitnow.com

Samurai Appliance Repair Man

The Samurai Family of Appliance Repair Websites

Parts==> http://parts.fixitnow.com
Forums==> http://applianceguru.com
Twitter==> http://twitter.com/fixitnowsamurai
Facebook==> http://facebook.com/fixitnowsamurai
Newsletter==> http://newsletter.fixitnow.com

– Posted using BlogPress from my iPad

Tips for installing the spring-loaded door gasket ring on a Bosch washing machine

Replacing the door boot in a Bosch washer is a pretty straight-forward job; this little cheat sheet shows the basic disassembly and gets you most of the way there==> http://db.tt/OFujKrn

The one little detail they gloss over is getting the spring-loaded door boot retaining ring back on. This seemingly innocuous and trivial procedure has been the source of much spleen-venting for both Grasshoppers and Master Appliantologists alike. Well, you just go grab you a cold brewski and a small screwdriver and sing along with Master Appliantologist Delawaredrew as he shares some tips for getting the retaining ring back on:

Place spring clamp around seal partway, making sure one end of the spring is behind lip, and nearly 1/2 of the left side of the clamp is in position. I usually locate spring at bottom so I can hold the spring behind the lip with my left hand and use my elbow to hold top side of clamp behind the lip. SO left hand down holding one end of spring, left elbow holding wire behind lip towards top and free right hand.

Insert the screwdriver into loop on clamp where spring attaches. Gripping the shaft of the driver near the tip to stop spring from sliding up it and allowing you to keep the spring from pulling away from washer, you can the stretch spring enough to allow rest of clamp to drop behind the lip. It’ll take some force to stretch it, and might take a few attempts to get the hang of it but it is easy once you get the trick down.
—->Point the screwdriver tip slightly in the direction you want to stretch the spring, do not lead with the handle end as it will likely pop out and you’ll gouge the front of your machine (ask me how I know this!) Make sure screw driver is large enough not to slide out of the loop sideways but not too large to slip though the hole in the loop.

If you need a new door boot for your Bosch washer, get it here (use your model number to select the correct one)==> http://www.repairclinic.com/Shop-For-Parts?searchText=Bosch%20washer%20door%20gasket&Search=Find%20Parts

Samurai Appliance Repair Man

The Samurai Family of Appliance Repair Websites

Parts==> http://parts.fixitnow.com
Forums==> http://applianceguru.com
Twitter==> http://twitter.com/fixitnowsamurai
Facebook==> http://facebook.com/fixitnowsamurai
Newsletter==> http://newsletter.fixitnow.com

– Posted using BlogPress from my iPad

GE Monogram built-in refrigerator ZISS480DRDSS condenser fan wiring

If you find yourself the victim of a botched condenser fan motor “repair” job, like this grasshopper was, you may need to know the wiring scheme for the fan motor. After the parts changing monkey finally gave up on brutalizing his refrigerator, here’s the conundrum our grasshopper was left with:

A local repair shop attempted to replace my condenser fan and in the process he removed the wires from the control board harness connector that mates with the fan harness connector. He couldn’t figure out how to put it back and eventually gave up. How hard can this be? I have the wiring diagram that was attached inside the refrigerator but it doesn’t show enough detail to re-install the connector.

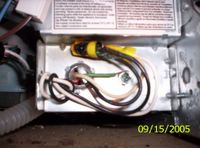
There are 4 wires on the fan: Red, White, Yellow, and Blue. There are only 3 wires in the harness that connects to the control board: Red, White, and Pink. Schematic says Red is 12VDC, White is Fan Common, and Pink is Condenser Fan. Schematic doesn’t show the 4 wires between the fan motor and its harness connector. Only shows the Red, White, and Pink wires between control board and fan. The big question is what color wire from the control board mates with what color from the fan motor.

And the answer is…

Red to Red
White to White
Pink to YELLOW

The blue wire is RPM feedback to the main control which is not used.

In case you’re interested, here’s how the whole sordid story of appliance butchery ended up:

Issue: My refrigerator was making a ticking noise that my wife could not tolerate. (She’s the sensitive type)

I called a local repair company and the diagnosis was the condenser fan motor. The motor was running but supposedly the shaft was making noise. The repair tech had a lot of trouble removing the fan motor due to limited access on top of the fridge. He was complaining the whole time. When he left the fan wasn’t running but he attributed it to the system needing to warm up. He even called another tech who confirmed it. So I let him leave. The fan never came on.

The guy came back twice when I wasn’t home and my wife has no idea what he was doing but he eventually gave up and said call GE or another repair company. Here’s what I found.

1. The fan motor harness connector must pass through a very small hole that you cannot see. Apparently he just ripped the fan connector through because the old fan motor just has bare wires.

2. The mating connector on the harness back to the control board was in a bag when I took over the problem. I don’t know why it was removed but maybe it had something to do with him ripping the fan motor out. This is why I was inquiring here what the wire colors were for.

3. I attempted to put the wires back in the harness connector when I noticed one pin was broken. I don’t know if this was the cause of the problem or whether it just happened when he was trying to get it to work.

4. I didn’t know where to get this type of pin so I just went to Radio Shack and bought a different 4 pin connector and changed out the motor and mating harness. The fan started running immediately. Should it ever fail again the new one won’t mate with the new connector but it’s easy enough to change it out. I used the same type of connector you’d find on a computer hard drive.

As is stated in an earlier post, the condenser motor wiring for a GE Monogram built-in refrigerator is:
RED to RED
WHITE to WHITE
PINK to YELLOW
BLUE is not used (it is used on the evaporator fan which has a very similar motor to the condenser fan)

Samurai Appliance Repair Man

The Samurai Family of Appliance Repair Websites

Parts==> http://parts.fixitnow.com
Forums==> http://applianceguru.com
Facebook==> http://facebook.fixitnow.com
Twitter==> http://twitter.fixitnow.com
Newsletter==> http://newsletter.fixitnow.com

Maytag dishwasher MDBH955AWB: He’s dead, Jim

Just like Dr. McCoy said, your Maytag dishwasher model MDBH-something is dead, no lights, no beeps, no nuttin’. Two ways to handle this’n, Hoss:

1. You could tear apart the dishwasher and slog through the incomplete information in the tech sheet and wiring diagram, making measurements and tests with your meter and maybe identify the problem or

2. Sit at the feet of the wise and battle-hardened Master and allow him to take your hand and lead you directly to the problem.

Your call.

If you chose option 1, you can stop reading now.

If you chose option 2, here are some pearls from Sublime Master Appliantologist Willie that will lead you to Appliance Nirvana™:

The most likely problem is the touchpad/console assembly hardly ever see the control board go bad on these models. I see an unreasonable number of touchpads going bad though.

Order the touchpad/console from RepairClinic and if it doesn’t fix your problem, (It will), then return the part, or order both the touchpad and controller and install only the touch pad and return the control board when you find out that you don’t need it.

Touchpad/console assembly:
http://www.repairclinic.com/PartDetail/Touchpad-and-Control-Panel/1469761

– Posted using BlogPress from my iPad

Frigidaire SxS refrigerator, installed new adaptive defrost control board and now won’t start

As if it’s not confusing enough just figuring out what’s wrong with an appliance in the first place, sometimes the manufacturers like to spice things up for us by playing musical parts.

In this case, Friggidaire (not a typo) uses two different but similar-looking ADC (adaptive defrost control) boards in their newer model SxS refrigerators. Both boards look the same, come in the same white case, and mount the same inside the refrigerator. It got so confoosing for even Master Appliantologists that Friggidaire put out a service flash on it. You can read it and more discussion on this ratcheer:

http://applianceguru.com/forum1/27553.html

Need parts for your refrigerator? Get ’em here==> http://parts.fixitnow.com

– Posted using BlogPress from my iPad

Jenn-Air W30400W wall oven with a F5 error code

According to the service manual for this wall oven, the F5 error code pops up when the power to the heating element relays (either the bake or broil element) is disabled while in cook mode. This can happen when one of two things are going on with the oven:

1) Intermittent sensor or wire harness connection.

2) Intermittent contact on power relay board (PRB).

Check the sensor wire harness, undo and reconnect. If the F5 code re-appears, replace the PRB, here’s the part link==> http://www.repairclinic.com/PartDetail/Relay-Board/905230?modelNumber=W30400W

Got a pictorial guide for this job ratcheer==> http://fixitnow.com/wp/2009/05/16/jenn-air-svd48600-range-power-relay-board-and-electrode-changeout-a-pictorial-odyssey/

Not sure that’s the problem? Don’t trust ol’ Samurai? Tell you what: you buy the part through that link and, if that doesn’t fix it, you can return it within 30 days for a full refund, less shipping, even after you already installed it. That’s about as close to risk-free as you’re gonna get!

Samurai Appliance Repair Man

The Samurai Family of Appliance Repair Websites

Parts==> http://parts.fixitnow.com
Forums==> http://applianceguru.com
Facebook==> http://facebook.fixitnow.com
Twitter==> http://twitter.fixitnow.com
Newsletter==> http://newsletter.fixitnow.com

KitchenAid Dishwasher KUDI24SE — No power

Sublime Master Reg succinctly points out the two most common causes for this problem:

Check your Nuts …

click on picture

There is also a small Thermal Fuse in the Console …

repair kit comes with extention wires (for thermal safety)

click on picture


Read more: http://applianceguru.com/forum1/28055.html#ixzz130xeSTur


Need parts for your dishwasher?  Get ’em here==> http://parts.fixitnow.com