Category Archives: Washer Repair

Appliance Repair Revelation: Wiping Out Washer Lint

appliance tip of the day archiveAhh, yes, the infamous ‘residue’ problem. Before you go gettin’ your panties in a wad, ready to sue the manufacturer of your washer, do these two tests to rule out mechanical problems:


  1. Slow Drain Test
    Fill washer to the maximum level then advance timer to spin. Time for 90 seconds. If all the water isn’t pumped out, then there’s a restriction in the drain system. If all the dirty water doesn’t drain outta da tub, that gookus will stay on your clothes, dontcha know?
  2. Water Pressure Test
    Make sure you’ve got a strong stream of water for both cold and hot. Especially cold because rinse is done with cold. No cold water == no rinse == gookus on clothes. If no cold water, the valve is probably plugged by gookus in the inlet screen. And, Hoss, don’t go doin’ the cute plumbers’s trick and remove the inlet screen–replace the valve!

Ok, so you did those tests and now your saying, "I’m still getting gookus on my clothes, Mr. Smarty-pants Samurai Guy. Now what?" Hey, you’re not happy with the free information you get from the Samurai? Ask for a refund. Ver goot, we shall proceed.

Other common usage things to check:

  1. Detergent formulation
    Make sure you’re using a high quality detergent that contains both sodium carbonate and aluminosilicates. They’ll be listed on the ingredient list.
  2. Amount of detergent
    The detergent amounts given on the usage label of the detergent box are for average water hardness (4-9 gpg). If your water is harder than average, or if your clothes are really dirty, you’ll need to use slightly more detergent than what’s recommended on the box. If you have really hard water, you may need to add a packaged water conditioner to each load, such as Calgon® or Spring Rain®.

    If your water is softer than normal, you’ll create too many suds, which will retain gookus. In this case, you’d use slightly less detergent than recommended on the box.

    Recommended Reading: The Hard Facts About Hard Water

  3. Cold water washing
    If you wash clothes in cold water only, the cold water should be in the range of 65-75F. If it’s too cold for your hands to comfortably be in the water, it’s too cold to activate the detergent.
  4. Overloading
    After the washer is loaded with clothes and then filled with water, there needs to be enough head room in the tub for the clothes to swish around in. A properly loaded washer has clothes loosely placed in the tub up to the top row of holes.
  5. Rinse-added fabric softener
    Some fabric softeners and detergents have a chemical reaction that can create white deposits (also called ‘gookus’) on the clothes. Try switching brands of fabric softeners or detergents or not using fabric softener at all for a couple of loads.

Well, there it is, more wisdom from On High.

To learn more about your washer or to order parts,
click here
.

grasshoppers sitting with the master, wearing freshly washed robes free of unsightly link.

Appliance Repair Revelation: Removing the Agitator from Your Washing Machine

appliance tip of the day archiveTrying to remove the agitator from your top-loading washing machine but feeling, instead, like you’re failing miserably at an I.Q. test for nitwits? Fear not, my mentally-challenged grasshopper, for the Samurai shall illumine your murky path.


GE Old Style Washer: Remove agitator cap by pulling it off and look for a bolt, remove the bolt and pull up hard on the agitator. Not all models of this style washer has a retaining bolt.

GE New Style Washer: Use a old dryer belt or rope to help remove the agitator. Hook the rope/belt under the lower agitator fins and make the loops to the top. Use a board to help “pop” up the agitator, lift up on the side of the board that is sticking out further.

Whirlpool and Kenmore Direct Drive Washers: Remove the agitator cap, some caps unscrew and some will just pull off. Look for a bolt and remove the bolt, lift up on the agitator.

Maytag Dependable Care Washer: Locate a 1/4 inch screw on the side of the agitator, ( about 3/4 of the way down) remove this screw and lift up on the agitator.

Maytag Atlantis and Performa: Remove the cap and softener dispenser by pulling it off and locate the agitator bolt. Remove bolt and lift up on the agitator.

Frigidaire Washer, Older Models: Older style, unscrew the agitator cap and bolt, lift up on the agitator.

Frigidaire Washer, Newer Styles: Remove center cap–this can be difficult to do–by lifting up really hard on the center tab. Locate bolt and remove it and lift up on the agitator.

Amana Washer: The older washers have a bolt under the cap that must be removed to remove the agitator, then grab hold of the agitator and lift up. The newer washer agitator just pulls out, remove cap, if no bolt, just grab hold and lift up hard.

To learn more about your washer or to order parts, click here.

grasshoppers learning the ancient and mystical art of washing machine agitator removal from the master

Appliance Repair Revelation: Water Flows into the Washer but the Tub Never Fills Up

appliance tip of the day archiveThis is a pretty common problem and the solution is blindingly simple. It’s caused by the drain hose siphoning water out of the washer tub. There are two common causes for siphoning and I’ll explain both of them below.


minimum washer drain height
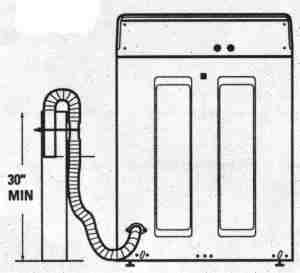
One cause for siphoning is simply that the drain hose discharge is below the fill level of the washer tub. This picture shows the minimum drain height needed to avoid siphoning.

Another common cause for siphoning is not having an air break between the drain hose and the drain stand pipe. Usually, this isn’t a problem since the drain hose diameter is usually much smaller than the diameter of the drain stand pipe. But sometimes folks will inadvertently remove the air break by duct taping the drain hose to the stand pipe. They might do this because the drain hose keeps popping out of the stand pipe when the washer pumps out the tub. Other times, the drain hose might fit into the stand pipe with a tight interference fit.

The other day, I talked to a guy on Skype who was having this problem with his washer. Since he didn’t know what caused it, he had taken is whole washer apart, thinking there was something wrong with the pump! I thought I could hear him kicking himself after I explained this siphoning business to him!

To learn more about your washer or to order parts,
click here
.

the master revealing the mysteries of hydrostatics and fluid dynamics to his grasshoppers

Mailbag: No-Spin and a Burnt R43 on a Maytag Neptune Washer

Jamie wrote:

I just wanted to let you know that your site is awesome. I
have a maytag neptune and your site pointed me in the right
direction to fixing the problem. I had the same no spin
problem. I also had a burnt out R43. I believe that the R43
gets burnt out if there’s another problem with the machine.
After finding this, I then checked the motor control board
and found that the fuse had completely melted. I tried
replacing the fuse but that didn’t work. Anyhow after
contacting repairclinic.com they told me to replace the
motor control board AND to get the motor replaced because a
new motor and a AC filter was needed to stop the problem
from happening again. Just thought you would like to know!
All the best. Jamie

_______________________________
The above message was sent when you were offline, via your LivePerson site.

Message sent from IP: 68.239.102.85

This is a great update to my War Story on this very problem. As chronicled there, I also saw a burnt R43 on the machine control board in a Maytag Neptune stack laundry unit with a no-spin complaint.

Maytag lists the common-fail resistors on the machine control board and their associated washer components in Technical Bulletin TDL-0052-B. R11 is associated with the door latch switch and is almost always found to be burnt when diagnosing the infamous and pervasive no-spin complaints on this washer that dares not speak its name; R43 is not even listed in the bulletin.

Apparently, this problem with the burnt R43 on the machine control board has eluded even those titans of engineering at Maytag–actually not too surprising considering that this machine is a monument to contemporary appliance engineering incompetence. So, this means we’re all on a journey of discovery together–thanks for adding your glimmer of light to the dim flicker of understanding that we all have about this machine. Hey, maybe if some Maytag engineers read this they’ll explain the burnt R43 problem in a future service bulletin…if they figure it out.

Mailbag: Washer Keeps Filling Even When Unplugged

Ron wrote:

1997 GE washer keeps filling with cold water, even with
machine unpluged. Recently cleaned plugged inlet screens.
Why?????

_______________________________
The above message was sent when you were offline, via your LivePerson site.

Message sent from IP: 64.12.116.81


the bamboo reveals all

Washer keeps filling.

Unplugged–still trickle, trickle.

Replace inlet valve.

Appliance Repair Revelation: Fixing Washer Water Flow Control Problems

appliance tip of the day archiveWasher water control problems just gotsta be in the top five most frequent appliance complaints I get. The complaint is either:

  • very slow water flow into the washer (usually on the cold water only), or
  • water keeps trickling in even with the washer unplugged.

Thang about it is that the solution is just so gawd-awful simple to fix that I’m reluctant to give away the secret to this great cash cow. Yeah, I know, I shouldn’t reveal this treasured trade secret that all appliance repair techs swear an oath to defend. What? You say you want me to tell you anydamnway? Well…ok then.

Most of the time, your water flow complaints will be about either the cold or the hot water being restricted to near nothing. Sometimes, both the hot and cold water flow are restricted and the water just trickles in no matter where you got the temp control set at. Either way, 90% of the time, the problem is because of sediment built up on the inlet screen of the washer inlet valve. Almost always, the cold water flow is most affected by sediment because your water heater acts as a settling basin and removes most of the sediment. (This also means that sediment is accumulating inside your water heater and its tank is rotting out even as you read this.)

Typical Washer Fill ValveHere’s a typical two-solenoid inlet valve. This is the most common, although some Whirlpools use a three solenoid arrangement and front loaders get even more funky, but the diagnosis and correction are the same. Most of the time, what happens is that sediment builds up on the inlet screen of the solenoid valve and restricts the water flow into the valve.

Now, here’s where you can benefit from my lifetime experience as a certifiable appliance guru. There’s something I call the stupid plumber’s trick where the unsuspecting appliance owner calls in one o’ them real hairy, stinky plumbers to fix their washer. Well, Buttcrack Bubba correctly takes a look at the inlet valve and figgers he’s being reeeel clever by just removing the inlet screen altogether. Most of the time, Buttcrack Bubba does this ’cause he ain’t even got a washer valve on his truck so it’s the difference between making something off the job ’cause he "fixed" it, or making next to nothing ’cause he didn’t have the part and he’d have to come back to do the repair. Buttcrack Bubba’s in, what we in the trade call, "the horns of an enema." Yessir, so he goes ahead and removes that screen. The customer don’t know any better; heck, all he knows is that water’s flowing to his washer again. It’s a freakin’ miracle!

exploded diagram of a washer water inlet valve gutsWhat happens next, though, is a sad tale to tell. Y’see, after a while, the innards of the valve get so gunked up with sediment that the valve can no longer stop the flow of water when it’s supposed to (like, when the washer is unplugged). You can see here that they’s a whole buncha delicate leetle bitty parts in there, da, comrade? Little, itty-bitty pieces of dirt and pipe scale can stick that plunger guide wide-ace open. So, water just keeps on flowing into the washer. Meanwhile, you’re outside playing frisbee with the dog, knockin’ back a fohty of Old Milwaukee and the gottdayam washer overfills making one helluva mess in your house. All cause o’ that stupid plumber’s trick. Now, how smart was that to call in a plumber to do an appliance tech’s job?

Other times, problems with no water can be the pressure switch or a burned-out solenoid in the water valve. If there ain’t much sediment on the inlet screen of the water valve, you gotsta measure the continuity of the solenoid coil at the terminals. If your meter says there’s no ohms in the solenoid coil, that sucker is slap-open and it’s gotta be replaced. That’s the name o’ that tune, Hoss.

If solenoid continuity is OK, then you may need to measure the voltage at the solenoid coil. This is a live test, meaning the circuit will have 120v on it, so you can get your big ol’ gluteus flabbeous shocked off if’n you ain’t careful, Slick. If you ain’t getting 120v to the valve during the fill portion of the cycle, then you need to check the pressure switch, or fill switch. This diagram shows how the pressure switch (fill switch) talks to the water inlet valve.

Well alright then. That’s about all the rocket science involved with this little gig. All that’s left for you to do is order a new water fill valve. While you’re at it, how ’bout upgrading those cheesy black rubber fill hoses to burst-proof stainless steel-braided fill hoses. Hey, Slick, it’s the cheapest flood insurance you’ll ever buy. Since we’re talkin’ about washer floods, come read more about how to prevent ’em ratcheer.

And, of course, your loving donations to the United Samurai Beer Fund would be received most joyously.

To learn more about your washer or to order parts,
click here
.

a couple of grasshoppers resting with the master after mopping up a washer flood

Mailbag: Maytag Neptune Machine Control Board R11 Burned Out…Again

David Schmidt wrote:

After 3 years of dependable service my machine decided not to spin. Thanks to the internet I thought I tracked the problem to the Wax Motor causing the R11 to burn out. Well, I replaced both the R11 and the Wax Motor and the resistor blew again. Can you tell me what I might have missed? Could something else have caused the R11 to blow? I don�t want to spend $181 on a control board to have it blow again. You can email me at *****@*******.***

Thanks

_______________________________
The above message was sent when you were offline, via your LivePerson site.

Message sent from IP: 64.3.35.242

Looks like Ol’ Lonely is at it again. According to Maytag’s Technical Bulletin TDL-0052-B, replacing the wax motor along with the machine control board is the prescribed corrective action for a burned out R11. This machine is such an electronic abortion that even Maytag’s engineers haven’t fathomed all of its myriad failure modes.

First, I’d go back to Maytag and tell them they should send you a replacement machine control board because you just replaced it along with the wax motor per their technical bulletin and the board blew again. I think an argument can be made that the board was defective and they should send you a new one under warranty. Most parts have a 90-day to a year warranty, anyway.

Anticipating that you’ll not have much satisfaction dealing with the Customer Disservice Reps at Maytag, you could try repairing your existing board instead of spending almost $200 on a replacement.

Lock n’ load!

Mailbag: Amana Washer Leaks

Scott wrote:

I currently own an Amana washer, model no. LWA10AW. A few months ago it started leaking about 2-3 cups of water. It has started to shake while it is in the spen cycle and continuley gotten worse. I figure it could be a pump or hose for the leak. Was curious if it might be the balance or belt causing the shake. It sounds like there are about 4 pairs of shoes in it.

Thank You for your time,
Scott

P.s. It would be great if you could get back to me tonight before 12est, If not thank you again

or call me between 9-11am tomm at 765-832-XXXX

_______________________________
The above message was sent when you were offline, via your LivePerson site.

Message sent from IP: 208.28.202.146

Start by removing the front panel to see where the leak is coming from. Then, pray to Allah, who is compassionate and merciful, that it’s just a leaking hose because if’n it ain’t, start practicing yoga so you can kiss your sweet derriere goodbye.

If the tub seal is leaking, you’ll need to replace the hub and seal kit on this puppy. I hope you enjoy spending hours on end in a dark, damp basement, breaking apart old parts fused together by years of corrosion while another glorious summer day gallops by outside, leaving you more pallid and one day closer to the bed pan. Time and pain–that’s what awaits you in this repair journey to Hell, Budrow. And there’s a fair chance that this will be a one-way trip, too, since your hours of weeping and gnashing of teeth may not result in a successful repair. How much time and pain? Let’s just say that it’s off the scale on the SUDS-o-meter. This is one of those jobs that makes even crusty old appliance warriors wet themselves and pretend they have a bad phone connection when they get a call for one of these jobs.

Ahh, Grasshopper, let this be your wakeup call. But if, after reading my wise admonitions, you think you have the cohonas for this job, then here are a couple resources that’ll hepya:

Do you hear your phone ringing yet?

Appliance Tip of the Day: Replacing the Drive Coupler on a Whirlpool (or Kenmore) Direct Drive Washer

appliance tip of the day archiveOne sure sign that the drive coupler is bad is if the washer will fill with water and pump out ok, but it just won’t agitate or spin. Replacing the motor coupler is the most common repair task on this washer and is a pretty easy job, even for appliance repair virgins. How easy? About two mugs on the SUDS-0-meter. How can you tell if your washer is the direct-drive or belt-drive model? Like this.

We begin this repair odyssey by removing the washer’s cabinet. The secret to removing the cabinet is revealed in this post. Read it now, go ahead, I’ll wait…

Finished already? See, you’re a whiz at this!

motor coupler for a whirlpool or kenmore direct drive washer--click for larger viewOk, so with the machine stripped naked like a fatted calf in a butcher shop, we focus our keen Vulcan squinties on the pump, down in front, and remove the two clips holding it on to the motor. Then pull off the pump, unclip the wiring harness from the motor and the two wires from the capacitor (if present). Then remove the two motor clips (top and bottom) to remove the motor. Wallah! The motor, by the way, is double-shafted (for those of you in Palm Beach, “double-shafted” means it has two shafts). The coupler is the three-part piece you see between the motor and the transmission (the other side of the motor). Your old coupler probably looks something like this, or even worse. Here’s what a new coupler looks like.

Incidentally, for an excellent and detailed interactive diagram of the guts of this washer, see this page. You’ll be glad you did.

When you’re all done and you have the guts all tucked back in place, replacing the cabinet is just as easy…if you know the trick. And remember to reconnect the lid switch harness or you’ll be scratching your head wondering why the washer won’t spin.

Ok, that’s about all the rocket science involved with this little gig. All that’s left for you to do is order the coupler, maybe even a genuine repair manual for more adventurous repairs in the future. And, of course, your love offerings to the United Samurai Beer Fund would be received most joyously.

To learn more about your washer or to order parts,
click here
.

a couple of grasshoppers driving the master to the laundromat

Mailbag: Replacing the Belt on a Whirlpool (or Kenmore) Belt-Drive Washer

Jeannie Avery wrote:

Hello,
My belt just broke on my Whirlpool, belt driven washer. I bought the belt for it today, glanced at the instuctions on it, but my daughter ripped the package open(so all the instuctions got stretched and distorted) when I wasnt looking so now though I have tried and tried I cant get the belt on. I wanted to know if you would know how to replace the belt on this washing maching. It is a whirlpool, top loading washer. The model number is IHA7680N1, and the Belt # is 95405
Thank you for any help.
Jeannie

_______________________________
The above message was sent when you were offline, via your LivePerson site.

Message sent from IP: 67.113.52.89

This is one of those repairs with a steep learning curve. Referring to the SUDS-o-meter scale of appliance repair difficulty, this repair rates five mugs of beer for tender, nubile repair virgins like yourself, but only a single mug for crusty, old appliance repair prostitutes like myself. I recommend you have a six-pack of Old Milwaukee on hand. Your bold determination to tackle this repair is exactly what made this country great and you are an inspiration to appliance repair grasshoppers all over the world! In the electrifying words of AC/DC, “For those about to rock, we salute you!”

If you’ve never replaced the belt on a Whirlpool belt-drive washer, you’re in for a banquet of appliance repair merriment. During this repair celebration, you’re going to gain valuable expertise in busting loose rusted nuts and bolts. These new skills will serve you well in many other areas of your life like, uhh, busting loose rusted nuts and bolts on other old, broken stuff. You’ll also learn how to hang on to greasy wrenches with tired, bleeding hands–another valuable life skill that actually has some application to auto repair.

Now that I mention it, this repair kinda reminds me of working on an old ’73 Ford Maverick I used to have. Seems like anything I did on that car involved lots of rust, grease, and blood. And that was just the interior.

Ok, ok, your washer. Oron Schmidt has done a good job of putting together illustrated, step-by-step instructions for tackling this repair. While you have the belt off, turn the pump pulley by hand. Sometimes, the pump seizes and burns the belt. If you can’t turn the pump pulley easily by hand, replace the pump, too.

To help encourage you onward in this repair, I leave you with the battle cry we used to scream when I was in the Kamikaze squad, “I’m gonna kill the bastard who talked me into this!”

Appliance Tip of the Day: Whirlpool / Kenmore Calypso Washer Repair Manual

appliance tip of the day archiveCalypso washer repair manual--come git you one!Got a Whirlpool or Kenmore Calypso washer that’s giving you an FL or CE or some other error code? Find out what that pesky code means and how to whomp-up on that bad boy in this genuine Whirlpool repair manual for the Calypso washer. This is the real deal written by the manufacturer of this washer, not some third-party. With over 60 pages of detailed technical information, photographs, diagrams, and illustrations, you’ll be able to easily do any repair on your Calypso washer using this manual. It’s written in a clear, easy-to-understand style so that even if you’re a technical neophyte, you can easily handle even the most complex repairs on this washer. All this for less than 20 bucks! Come git you one!

While you’re at it, come get manuals for all your other appliances, too.

Mailbag: Maytag Neptune Washer Won’t Spin

Mark wrote:

I have a Maytag Neptune MLE2000AYW stack W/D. It runs fine until the spin cycle then justs agitates in both directions it never goes into spin. Any suggestions? All door switches have good continuity.

_______________________________
The above message was sent when you were offline, via your LivePerson site.

Message sent from IP: 67.250.216.152

I battled one of these beasts not long ago. Exact same problem. Read all about it in this war story.

Mailbag: Slow Water Flow into a Washer, Part II

Diane wrote:

Elder Samurai,
I came upon this site and was delited to see how informative it is. I have a problem with slow (hot) water flow into my cloths washer. I took the hot water hose off to look at the filter screen in the inlet valve as you suggested and it looked ok???? Do I have to remove the inlet valve gadget from the washer to check a different part of it? I’m still searching your site to see if I find more but I keep getting side tracked reading other stuff and have not found anything. Thank you, Grasshopper Diane

_______________________________
The above message was sent when you were offline, via your LivePerson site.

Message sent from IP: 65.142.149.35

Konichiwa, grasshopper. While pondering your dilemma, I peered deeply into my steaming cup of green tea and perceived the solution to your problem. Now, snatch the pebbles from my hand and restore harmony to your washer.

War Story: Maytag Neptune Stack Laundry MLE2000AYW, Washer No Spin

Awwite, all you grasshoppers, go git you a brewski and gather ’round. It’s time for another one of weird ol’ Uncle Samurai’s war stories.

A while back, one stormy, wintry day, I got a call on a Maytag Neptune stack laundry, complaint was that the washer wouldn’t spin. So, I saddled up my not-so-trusty Ford service van and rode on out into the frozen tundra to fix it.

When I got there, I verified the complaint–sho nuff, no spin. So I go through all the basic checks that you do on these machines for these types of complaints: make sure the washer’s pumping out (if it ain’t, it’ll never spin), check the door switches and the balance sensing circuit. All checked out ok.

Now, as an astute practitioner of the repairing arts and being in the know about these things, I turned my keen, laser-like attention on the machine control board. I pulled that sucker out which, in the stack Neptune, is located upstairs in the dryer compartment, and feasted my Vulcan squinties upon it. My trained and bifocaled eyeballs were looking for any signs of the infamous burnt R11, a problem more common with these Neptunes than ticks on a hound dog. Not seeing anything unusual with R11, I was getting ready to tuck the machine control board back in when my calibrated eyeballs noticed something off-color about R43. I took a closer look and, sho nuff, it was as toasted as the Samurai on a Saturday night.

Now this was a head scratcher. See, R11 is in the spin cycle circuit and that’s why it tends to burn up when there’s a spin problem. But R43 is in the end-of-cycle signal circuit–ain’t got nothin’ to do with spin. I was confronted with what we professional appliantologists call a “connundrum.” That’s one o’ them fancy words you learn after you been in the trade a while. Oh, they’s a whole bunch of other words like that, but I can’t remember ’em right now on account o’ I’m too busy writing this sto-ree. Speaking of which…

Well, this was one o’ them problems where I had to use what they call on CSI “dee-ductive reasoning.” Oh yeah, the Samurai is fully qualified to perform all types of reasoning. For ezzample, I’m real good at coming up with reasons why Mrs. Samurai awwta go into town to git me some more beer. Anyway, what it boiled down to was that if everything else checks out ok and you see a problem on a particular component, like the machine control board, then you can dee-duce that the machine control board is bad. And so I done dee-duced it.

Now, one other thang to keep in mind. They’s been so many problems with the door latch mechanism causing the machine control board to fail that it’s just SOP for me that whenever I replace a Neptune machine control board, I always replace the door latch assembly at the same time–whether it needs it or not. If you don’t, you stand a real good chance of burning up a brand new, mondo-expensive machine control board in short order.

Everyone loves a story with a happy ending, and this story has one, too: replacing the machine control board and the door latch assembly fixed the washer and the customer was happy…with me. They’re very perturbed with Maytag, however, and will be joining that class action lawsuit.

These days, seems everyone wants a moral to the story. Well, I don’t wanna dissapert y’all so this story has one, too. When working on these Neptunes, understand that the engineers were smokin’ crack when they designed the electronics on this thing. Anything that goes wrong on the Neptune, from a door switch to a water valve, fries the machine control board, sometimes in peculiar and unexpected ways. Watch for it.

Awwite, story time’s over. Now come git you some parts and go fix that washer.

The Maytag Neptune Washer: A Class Act

I subscribe to Maytag’s technical bulletin service that gives monthly tech updates on all Maytag appliances. Many times, the bulletin package is almost entirely devoted to bandaiding the Maytag Neptune’s myriad design blunders. Judging from that, and the Neptune service calls I’ve done, I always figured that the Neptune’s engineering team musta been smokin’ crack when they hit the drawing board. Lots of pissed-off Neptune owners out there, Maytag’s Priority One warranty service notwithstanding. The sell-job to buy a Maytag is that you won’t need warranty service because they’re so reliable. Not this bad boy. Well, this class action lawsuit awwta be a wakeup call for Ol’ Lonely.