Author Archives: Samurai Appliance Repair Man

Replacing the Thermostat in a Gas Range with Standing Pilot Ignition

Gas ranges use one of two types of ignition systems for the oven: pilot flame ignition or hot surface. You can read about each kind and how they work in this scroll from the Appliantology scriptures. Here’s an excerpt:

Within the the world of pilot ignition ovens, two types of pilot flame systems are used:

1. the pilot flame is either always on (called a “standing pilot”) or

2. a spark lights up the pilot flame when you turn on the oven (called a “spark-assisted pilot”).

Today, I’m gonna ‘splain how to replace the thermostat in the first type of pilot ignition oven listed above, the standing pilot ignition.

Lots of these old gas ranges are still out there in use today. I actually prefer these ranges to the newfangled electronified junk they’re making these days. The other distinguishing characteristic of this type of range is that it requires zero electricity to operate. No electrical outlet is required because there’s nothing electric on this range. That makes this type of range a popular choice for homes (and camps) which aren’t connected to the power grid. In fact, the pictures in this article were taken during a repair I did for some friends of ours in Vermont who live off-grid.

This article deals with replacing the thermostat in a standing pilot range. One of the symptoms that the thermostat is bad is that the oven won’t fire up but the stove burners still work. So, does this mean that the thermostat is the only thing that can cause the oven to quit firing up? Nyet, tovarish. You may have a bad gas valve or a fouled pilot assembly. So, how do you verify that the thermostat is the problem? I refer you, once again, to my timeless tome on this topic. Here’s another excerpt from that seminal work:

But when you turn on the oven or the thermostat calls for heat, the pilot flame gets bigger and jumps down so it can heat up the thermocouple bulb. This extra gas to increase the pilot flame size comes from the thermostat. This is important to know because it leads to a couple of fine diagnostic points:

  • If the pilot flame jumps upwards or just gets bigger, but doesn’t shoot down, then you need to replace the pilot assembly.
  • If the pilot flame size does not increase or jump down when turning on the oven thermostat, then the problem is the thermostat not sending enough gas to the pilot assembly. It’s also possible that the pilot gas supply tube has a hole in it somewhere.

Now, slowly re-read the pearls above several dozen times and savor them like fine saké. It helps to also burn incense and chant “Fixitnow.com Samurai Appliance Repair Man” at least 100 times while meditating on this arcane wisdom.

Once you’re posilootely, absotively certain that the thermostat is the bad actor here, then you may proceed with the pictorial guide that tip-toes you ever-so-gently through the tulips of this repair. And you remember the deal with thumbnail pics, da? That’s right, grasshoppah: you gotta click ’em to see the larger picture with the enlightening annotations.

And if you need to buy a new thermostat for your range, type your model number into the parts search box below and you you can buy it right there. It may give you a warm, fuzzy feeling in your navel to know that when you purchase parts through the links at my website and repair forum, it lets me write how-to articles like this one and save you wads of cash on service calls. Domo!

Find Parts Fast!
Search by part number or model number for best results.
If you don’t know your model number – try searching by appliance type, brand or part type.


OK, when you’re ready, grab ‘hold of those two large lumps at the base of your spine and let’s romp…

Replacing the Thermostat in a Gas Range with Standing Pilot Ignition
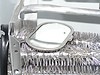
On this range, the thermostat is located in the middle of the control panel. You can access it by removing the grills and lifting the hood, as shown here.


Replacing the Thermostat in a Gas Range with Standing Pilot IgnitionThe thermostat temperature sensing bulb is connected to the thermostat via a copper capillary tube. This tube is bonded with the thermostat body at the factory and pressure charged with a gas that expands in response to the temperature. OK, you can uncross your eyes now ‘cuz that’s about as techie as I’m gonna git in the article. The take-away point is that you cannot replace the thermostat separately from the sensing bulb and the new thermostat comes with a factory-fitted sensing bulb.

Notice how the thermostat capillary tube is routed through the top of the range and into the oven and the bulb is mounted on the side of the range. You’ll copy this when you install the new one.


Replacing the Thermostat in a Gas Range with Standing Pilot Ignition
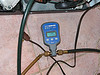
When working on an electric appliance, the first thing you do is unplug it before disassembling it. Similarly, when working on a gas appliance, you need to shut off the gas supply before taking it apart. In a properly installed gas range, the shutoff valve is located behind the range, as shown here. Note that the gas supply line here is copper. This is an older installation where this was the norm. Nowadays, the preferred practice is to use steel flex tube.


Replacing the Thermostat in a Gas Range with Standing Pilot IgnitionShown here I’m starting the disassembly. The burners are removed and the two aluminum gas tubes are unscrewed from the back of the thermostat body.


Replacing the Thermostat in a Gas Range with Standing Pilot IgnitionTo remove the thermostat body from the gas manifold, you’ll need to remove its mounting bolts. In this case, the mounting bolts are located underneath the thermostat. A piece of gasket material between the thermostat body and the manifold tube creates a gas-tight fit. Remember: any connection that passes gas () must be leak-checked when you’re finished.


Replacing the Thermostat in a Gas Range with Standing Pilot IgnitionHere’s the manifold with the old thermostat removed. The gasket material that I mentioned above is stuck to the underside of the old thermostat. The new thermostat kits usually come with a new gasket. That’s about it for the thermostat.


Replacing the Thermostat in a Gas Range with Standing Pilot Ignition
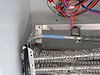
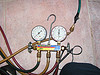
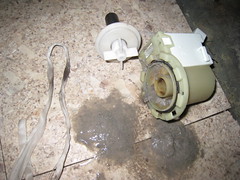
While we have this beast torn apart, let’s feast our bloodshot squinties on the gas valve as an enriching excercise. Here it be. Notice that it has its very own capillary tube and bulb. Wassup wit dat, yo? That’s the flame sensing bulb. It’s a safety feature that prevents the gas valve from opening (and letting gas through) if there’s no flame present. In other words, that bulb has to sense a flame before the gas valve can open. Does this sound like diagnostically useful information? Ya sure, ya betcha! Tuck that away and ponder it during your next morning constitutional.


Replacing the Thermostat in a Gas Range with Standing Pilot Ignition
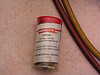
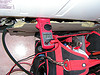
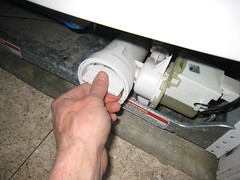
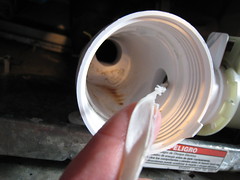
And here’s a closeup of the pilot assembly itself. This can be another source of problems, as mentioned in my prolegomena comments.


Replacing the Thermostat in a Gas Range with Standing Pilot IgnitionOn the back side of the pilot assembly is a plug with a small, precision drilled hole in the middle of it. If this hole gets dirty or partially clogged, which it will on occasion, then the pilot flame will not put out enough heat to open the gas valve.

If the pilot assembly seems to be in good shape otherwise, you can simply clean out this orifice with isopropyl alcohol and compressed air (about 50 psig will do it). Use an air nozzle with a rubber tip so can get a good seal when you squirt compressed air through it.

OTOH, if the pilot assembly looks too boogared up to use any longer, then just replace it.


Replacing the Thermostat in a Gas Range with Standing Pilot Ignition
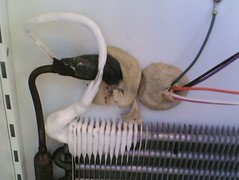
Here’s the pilot assembly reinstalled and re-connected to its gas supply tube.


Replacing the Thermostat in a Gas Range with Standing Pilot Ignition
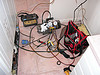
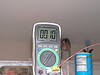
Here I’m checking my work by firing up the oven to make sure it fires the burner tube. This is an exciting action shot showing the pilot assembly in the ready position, just waiting for the oven thermostat to be turned on.

Needless to say, we had normal ignition and all systems were go. The Samurai whupped-up on another insolent appliance and restored its design function. Now, go and do likewise.


To learn more about your range/stove/oven, or to order parts, click here.

How to Repair a Leaking Evaporator in Your Refrigerator

Before you even think about undertaking this repair, you’ll want to read this excerpt from The Complete DIY Refrigerator Repair Reference:

If you’ve confirmed a Freon leak and you think you have the huevos to do the sealed system work yourself, you absolutely need this refrigeration service training DVD from Electrolux. (The compressor, its associated tubing, the evaporator, the condenser, and the Freon charge in the tubing are collectively referred to as the “sealed system.”) It takes you through all the procedures you’ll need to master in order to do your own sealed system work. If you have an older refrigerator, you may need to convert from R-12 to R134a.

“But, Samurai, shouldn’t we get an EPA license to buy the Freon so that we can be obedient to the gubmint and do everything they tell us to do?”

Ahh, Grasshoppah, your bootlicking question reminds me of a story… what was it?… ah yes, The Story of O.

For written sealed system service procedures and a list of tools you’ll need, download this reference.

And this topic in the Kitchen Appliance Repair Forum has a good discussion about recharging tips.

Note that the pictures included in this post are just thumbnail pics. Pop quiz: What are “thumbnail pics”? Anyone? Bueller? Bueller? Thumbnails are reduced-size versions of a full-scale picture. To see the full-size version, along with the illuminating annotations, click the thumbnails.

Armed with this essential background information, you’re ready to strut through a pictorial guide. Photos courtesy of my comrade-in-arms and brother-in-the-Craft, Jedi Appliance Guy.

Pinhole in the evaporator. This is a typical location for a pinhole leak in the evaporator. Can be very hard to spot visually; they’re usually located using a freon sniffer or bubble solution.

evaporator-patch.jpgOnce the leak is located, then you apply “The Patch.”

evaporator-patch-stuff.jpgAnd here’s the special patch goo that you use. This is a specialty item that you won’t find at your neighborhood hardware store. But I just happen to have an extra tube that I can spare– come git you one.

sealed-system-tools.jpgHere’s a look at some of the special toys, er, I mean, tools that you’ll need to do refrigeration sealed system work.

vacuum-gauge.jpgAfter the leak is patched, you have to pull a deep vacuum on the sealed system to remove as much water vapor as possible. If you don’t, you could clog the filter-dryer, create ice plugs at the junction where the capillary tube enters the evaporator, and all kinda other bad stuff that results in warm beer.

compressor-current-draw.jpgCheck the current draw on the compressor as the system is recharging. The current draw should increase as more refrigerant is added to the system. If not, well, something ain’t right. Could be another leak or a bad compressor. Either way, there’s trouble in Paradise (or, as we professional appliantologists like to say, “Vees badden”… that’s a little German lingo fer ya).

vacuum-gauge-set.jpgHere’s a closer look at the manifold gauge set that’s part of every refrigeration tech’s bag o’ tricks. In addition to recharging the sealed system, manifold gauges are essential for diagnosing sealed system problems. By measuring the high side and low side pressures, the highly-skilled yet woefully-underpaid appliantologist can draw various diagnostically-useful conclusions about what’s wrong with the refrigeration system.

thermocouple-temperature-sensor.jpgAfter the system is recharged, we run it and measure freezer temperature. Lookin’ good here. It’s Miller Time!

If you need a more detailed tutorial specifically on repairing and replacing refrigerator evaporators, download this file.

To learn more about your refrigerator, or to order parts, click here.

The Classic Ameedican Dilemma: Where to Run the Dryer Vent?

Jerry wrote:

We added a fourth story to our house, which is attached on both sides. There is a bathroom there with a washer and a gas dryer. The contractor wants to vent it into a “wet box.” It’s some sort of venting kit. The architect says it should be vented up through the roof. The contractor says you can’t vent a gas dryer up. What’s the best way to vent this gas dryer?

When your contractor says, “you can’t vent a gas dryer up,” he’s implying that the venting requirements for a gas dryer are somehow different than those for an electric dryer. This is false. All dryers, gas or electric, have the same venting requirements, details of which are discussed in this post.

In general, all dryers should be vented completely outside the building but especially gas dryers because of the poisonous by-products of combustion, notably the silent killer, carbon monoxide.

When your contractor says that “you can’t vent a gas dryer up,” what he’s really saying is, “Aww, geeze, I don’t wanna get up on the roof and drill a hole for a stinking dryer vent. I just wanna finish the job and go to the next one because I’m running behind schedule.”

I’d love to hear your contractor’s tortured reasoning for saying, “you can’t vent a gas dryer up” just so I could watch him squirm while his nose grows about two feet long. There is no reason whatsoever that any dryer exhaust, gas or electric, can’t be vented straight up through the roof… provided it’s done correctly, which I’ll explain in minute.

First, let’s take a moment and meditate on why we should even bother to properly exhaust dryers. And let’s not just take my word for it, either. According to Whirlpool, a company that manufactures more dryers than anyone else on the planet, there are at least four compelling reasons to exhaust a dryer through a properly configured vent that removes the dryer exhaust completely from the building:

Why exhaust dryers?

And for gas dryers, we have the additional reason mentioned above: to keep from waking up and finding yourself dead.

As for venting a dryer through a roof, as your architect wisely suggested, this is a perfectly legitimate configuration and, as in your case, may be the only practical way to exhaust a dryer to the outside. Once again, we turn to the Appliantology scriptures on this subject. Please open your dryer venting hymnal to the Book of Whirlpool, song 10… no, 11 (it’s one bettah) and sing along with me:

Venting a dryer through the roof.

Now go sing your admonishments to your contractor for talking out of his derrière. And give your architect a kiss from me (if she’s cute) or a manly nod of the head (if he’s not).

To learn more about your dryer, or to order parts, click here.

Ice Maker Ice Mold Flaking Off Crud into the Ice

Teflon Flaking off Icemaker Mold

Noticing some weird crud in the ice from your icemaker lately? You may have a defective mold, like the one shown here. A healthy ice maker should NOT look like this. This rough appearance is caused by the teflon coating on the ice maker mold flaking off, depositing Teflon flakes into your ice. Very hazardous to your long-term health! If yours looks like this, then you may be interested to know that ingesting Teflon causes systemic arthritis in all the joints. Think twice about using an icemaker with this affliction because eventually you’ll find your own body afflicted as well! The only cure is to replace the icemaker. Come git you one!

To learn more about your ice maker, or to order parts, click here.

How to Replace the Ignitor in a Gas Oven: A Pictorial Guide

If your gas oven isn’t firing up, start your diagnosis by checking the ignitor for the proper current draw. “Uh, do what?” you ax, with glazed eyes. Don’t be intimidated by techie-sounding procedures. This is simple stuff– if you can fog a mirror, you can measure current draw. This article explains how to make simple electrical measurements and this one explains what you’re looking for in the gas oven ignitor.

Once you’ve proven that the ignitor is drawing insufficient current (and, therefore, is the correct part to replace to fix the problem), use this handy pictorial guide to hepya change it out.

Looking Underneath with the Pots Drawer RemovedThe wiring for most range ignitors is accessed underneath the oven by removing the pots drawer, as shown here. Why do you need to access the wiring? Two reasons: 1) so you can measure the current draw and 2) it’s part of replacing the ignitor since the new one has to be wired in the same way as the existing one. Take note of where the wires go. The ignitor wires are not polarity-sensitive so don’t worry about “reversing” them.


Gas ControlsIn this particular range (a Maytag), I had to remove a covering panel to expose all the wires.


Using a Clamp-on AmpmeterHere, I have my clamp-on ammeter on one of the ignitor wires to make a current draw measurement. You can see the closeup of the meter in the next pic.


Measuring Current DrawYou can see the current draw reading is 2.4 amps. For a square ignitor, such as this one (you’ll see it in a subsequent picture), the minimum acceptable current draw is 3.4 amps, well above what I’m measuring here. Obviously, in order to make this measurement, the oven has to be turned on and the ignitor getting voltage. This is a LIVE test, meaning there’s live voltage on the circuit. Fire in the hole! Fry yo ace if’n you ain’t careful, Hoss, so… BE CAREFUL!


Rear Panel of the RangeOn some ranges, you’ll need to remove the back panel to get to wiring for one or both ignitors (there’s one each for bake and broil). Yes, this means the range needs to be pulled out from the wall. In the case of a wall oven where the freakin’ engineers didn’t bother to make it service-friendly, you’ll need to remove the entire wall oven from the cavity. If this is the case with yours, you’ll quickly understand why I abhor wall ovens.


Bake Ignitor Attached to the Bake Burner TubeHere’s a typical bake ignitor. Note that this one is square. Some ranges, such as older Whirlpools and GEs, use a round ignitor. These two types of ignitors have different current draw specs and are made to be used with different types of valves. This means they are not interchangeable. So, if your range uses the square ignitors, you can only replace it with another square ignitor. The brand doesn’t matter since, by convention, all square ignitors have the same current draw and all round ignitors have the same current draw. For replacement square ignitors, I find that the Maytag universal square ignitor kit is the most cost-effective and reliable. I use this kit in all brands that require a square ignitor.


Removing the Ignitor Retaining ScrewsNote the finesse with which the Master handles his ¼” nut driver. It’s such beautiful poetry in motion that it makes me all verklempt. Or maybe it’s just allergies…

Sometimes, the head breaks off one of the ignitor retaining screws or, worse yet, the retaining screws are phillips screws and they wallow out on you. That’s what we call a Plot Complication (PC). A PC can be any event that results in the failure of the voluntary nervous system to contain a spontaneous convulsion of the autonomic nervous system as it spews voluminous streams of choice adult language, causing any casual observers present to wet themselves uncontrollably.

I can usually work the screw loose using my little channel lock pliers on the threaded of the screw. I’ll then replace the screw with a slightly bigger diameter machine screw with a pointed end and course threads so it cuts itself into the bracket. It ain’t gotta be perfect or purdy, all it’s gotta do it securely hold the ignitor in position.


Bake Burner Tube Rear Retaining ScrewLots of times, you’ll need to remove the bake burner tube to allow enough room so you can run the wires for the new ignitor. You’ll usually find two screws securing the burner tube: one in back and…


Bake Burner Tube Front Retaining Screw…one in front.


Bake IgnitorHere’s the bottom of the oven, with the bottom pan, flame spreader, and burner tube all removed so we have unencumbered access to the bake ignitor wires.


Broil Ignitor Dangling FreeOn this range, I also removed the broil burner tube and the broil ignitor is left dangling, just itching to be replaced.


Wire Harness for the Broil IgnitorAgain, on this particular range, and maybe in the one you’re working on, you’ll have to remove the back panel behind the range. Shown here is the wire harness connector for the broil ignitor. so you just need to connect the new ignitor wires to this harness connector– no need to go all the way back down to the gas valve, like in the bake connector.


So, there you be, Buddy-ree. Easy as pie and 1-2-3. If’n you need parts for your range, come buy ’em from me. Merci!

To learn more about your range/stove/oven, or to order parts, click here.

Replacing the Wire Harness in the Maytag Dishwashers Included in the Recall

Several months ago, Maytag announced a massive recall on several dozen models of its Maytag and Jenn-Air branded dishwashers. You can see one of the reasons for the recall in this post. The corrective action in the recall was to replace the wire harness. This short video shows you how to do it.

To learn more about your dishwasher, or to order parts, click here.

War Story: Whirlpool Duet Sport Washer Full of Water and Won’t Pump Out

It was a lazy summer afternoon when the call came in on the Samurai Hotline. I awoke from my saké-induced slumber and reached for my iPhone.

“Who gave you this number?” I demanded and then immediately hacked up a hairball. Musta been playing with the cats again whilst I was under the influence of the saké. But being a consummate master of customer relations, I swallowed it back down instead of spitting it out. See, attention to detail like that can make or break a service bidness. Finesse, man, finesse– that’s the name o’ dis game.

“Uhh, hello? Samurai?” the voice asked. “It’s your neighbor, Lucretia. I’m having a problem with the washing machine at my shop in town but it sounds like this is a bad time to call so I’ll just call back after you’ve sober…, er, I mean, when you have more time.”

Ah, sweet Lucretia. She runs the local powder puff shop where high power executives and money managers go to get their bottoms powdered. As you can imagine, her bidness generates lots of towels that need to be washed throughout the day so the washing machine is a critical piece of equipment for her shop.

“No, no, I’m fine,” I croaked, hacking up another hair ball and reaching for a cigarette butt in the ash tray. “I was just performing the essential inner eyelid inspection, looking for pinholes, dontcha know?”

“Uhh, OK…” she sounded unconvinced but persevered anyway. “Anyway, my washing machine is filled with water and won’t pump out. The dirty towels are piling up and I need help! Can you come today and fix it for me?”

“Ain’t no thang, little lady,” I assured her in my smoothest lounge lizard voice. “Lemme take a leak and I’ll come over taco-pronto to whup that bad boy back into shape fer ya!”

“Oh, thank you, Samurai! I knew I could count on you,” she exclaimed. “And if you get here within an hour, I’ll have an ice cold oil can of Foster’s Special Bitter waiting for you.”

Shazzam! Nothing like an offer for free beer to really get the Samurai gears a-grindin’! I bolted out of my easy chair and stumbled down to the Samurai Fixit Mobile with the cigarette butt I rescued from the ashtray. I lit the cigarette as I was peeling out of the driveway so I could look real important to the neighbors. One of my neighbors was out doing yard work and waved her fist at me in a show of solidarity as I sped by. I waved back, realizing that I would have looked *really* cool if I had lit the correct end of the cigarette. When you’re running an appliance service bidness, you have to always be working on improving your image. Details, Hoss– it’s all about the details.

Water-logged Washer, Whirlpool Duet Sport WasherWhen I arrived at Lucretia’s powder puff shop, I found the washer just like she said: full of water and wouldn’t pump out. Since this was one o’ them fancy-pants Whirlpool Duet Sport front-loaders, I knowed that the problem was likely a jammed pump.

Pump Cleanout on a Whirlpool Duet Sport WasherSo I pulled off the toe panel underneath the door so I could get to the pump cleanout lid, shown here. Usually, I find all kinds of goodies in there: coins, bobby pins, ear rings, tongue studs, nails, pebbles, used condoms just to name a few of the cherished treasures I’ve recovered. But this time was a little different.

Clogged Pump on a Whirpool Duet Sport WasherI noticed a little piece of white ribbon sticking out of the pump suction port in the cleanout tube. “YES!” I thought to myself, in my best Engrish, “Easy fix! I’ll clear this, slap it back together and snag that cold Foster’s Bitter that Lucretia promised me.” Ahh, grasshoppah, but here is where the plot thickens.

I tugged on the ribbon and… it wouldn’t budge! Dayyam! The ribbon was wrapped around the pump impeller and, to remove it, the pump itself was going to have to taken apart and cleaned out. A simple three-minute repair just turned into an eight-minute nightmare! “AHHHH!” Don’t worry, I screamed inside my head so’s not to frighten Lucretia; after all, I *am* a professional! But all that screaming in my head made my ears ring. Or maybe it was from smoking the filter on that cigarette butt. Or could be more symptoms of the DTs.

But I digress. I was gonna have to pull the hoses off the pump, unbolt it and remove it completely from the machine so I could doctor on it up close and personal-like. It would take an extra five minutes and I was starting to get jazz hands from thinking about that Foster’s. In desperation, I summoned the gods of appliantology to steady my hands long enough to get the pump out to complete the repair.

Pump Disassembly on a Whirlpool Duet Sport WasherThe gods of appliantology made my hammer mighty and empowered me to remove the pump and pull it apart to unwind the ribbon from around the pump impeller. You can see the emancipated pump in its two main pieces here: the impeller on the rotor shaft and the pump housing with the stator winding. I reassembled the pump, slapped it back in the washer and checked for proper operation. Problem solved!

True to her word, Lucretia handed me a Foster’s Special Bitter that was so cold it almost cracked my last remaining tooth. After a few slugs, my hands steadied enough that I could drive the Samurai Fixit Mobile to the local brewpub and complete my fermentation therapy.

To learn more about your washing machine, or to order parts, click here.

Gas Oven Taking Longer to Pre-Heat

Dave wrote:

My maytag gas oven is taking longer to pre-heat. What do I check?

this universal oven ignitor works great in most ranges and ovens.  click it to git it, hoss, click it to git it.You need a new ignitor, such as the one shown here in the thumbhail pic. Click it to git it, install it and you’re good to go. Slam dunk.

Some background reading, if you want to know more:

Troubleshooting a Gas Oven That Won’t Fire Up

Making Basic Electrical Measurements

To learn more about your range/stove/oven, or to order parts, click here.

Replacing the Belt on a Maytag Dryer – Model LDE9824ACE

Sublime Master Trying to help offers some indispensable tips on this repair to a young apprentice in the Samurai Appliance Repair Forums, including a link to the service manual. Come on, let’s listen in…

If you need to buy the belt or any other part for your dryer, buy your appliance parts here. Domo!

To learn more about your dryer, or to order parts, click here.

Whirlpool Washer Won’t Spin

tony wrote:

my whirlpool washer do not spin, it is about two years old.

No model number given so I don’t know if this washer is a top-loader or a Whirlpool Duet front-loader. However, based on the improper conjugation of the verb “to do” in your problem statement and my razor-sharp Samurai insight, I intuit that you have a top-loading washer. Here, then, are some choice selections of past posts I’ve written on this very problem:

Whirlpool-Kenmore Direct-Drive Washer with a Lazy Spin

Haikus for Appliance Repair

Whirlpool Washer Won’t Spin

Is it Worth Replacing a Broken Coupler on a Whirlpool or Kenmore Direct Drive Washer?

Kenmore Washer Won’t Spin

Mailbag: Making Simple Repairs Complicated

Mailbag: Whirlpool Washer No Spin Problem

Once you figger out what’s wrong, you can come git your parts ratcheer. If you’re still confoosed and need more help, come see us in the Samurai Appliance Repair Forums and we’ll hepya some mo’.

To learn more about your washing machine, or to order parts, click here.

Oven Temperature Sensors

So, you’ve determined that your oven sensor is bad. You did this by getting an error code on the ERC and then looking up the code with a little help from your Master Appliantologist friends at the Samurai Appliance Repair Forums. As a dutiful Apprentice Appliantologist, your next step is to test the sensor resistance using this pearl of appliantological wisdom as your Spirit Guide. You know how to measure resistance with an ohm meter because you’ve read this basic primer on making simple electrical measurements. But now a new problem confronts you: which wires do you put your meter probes on to measure the resistance?

Ahh, grasshoppah, unfurl that brow and unbunch those panties while you swill your flavorite fermented beverage. Then let the Samurai take your trembling hand and gently guide you to Appliance Nirvana®.

Temperature Sensor on a RangeFirst, open the door to your oven and peer intently at the upper left hand and right hand corners of the oven cavity. There, nestled discreetly and out of the main view, ye shall find something looking like unto this picture (click it for a larger view). Behold the sensor! In this picture, it’s shown dangling from its wires because I already removed the two mounting screws. Normally, it’s pointing strait out toward the door. Notice the color and diameter of the two wires attached to the sensor. Notice also how they run back behind the oven cavity. On some models (most Maytags, for example), you can ever-so-gently coax the wires through the hole and a quick release connector will come through, allowing you easy access to the ends of the wires from which you can make your resistance reading and even replace the entire sensor without having to pull the range out from the wall.


Sensor Connections on a RangeOn other models, whose engineers were not as thoughtful (notably GE), you’ll need to pull the entire range out from the wall, presenting a significant scratching hazard to your floor and eliciting one or more adult words from your lips. After removing the back panel you’ll see where the sensor wires connect to another pair of larger wires that run up to the ERC in the control panel. The connection will either be a quick connect harness or wires nuts, like the ceramic ones shown here. Either way, simply undo the connection and then you have the free ends of the sensor wires on which to make your resistance measurements (and to replace the sensor).


If you need to buy a new sensor for your oven or range, come git you one ratcheer.

To learn more about your range/stove/oven, or to order parts, click here.

Fried Timer on a Maytag MDB5000AWW Dishwasher

So you’re happily running your Maytag dishwasher one day, getting the Alpo scrubbed off of your dinner plates when your nostrils are assaulted by a burning smell. You quickly check the pair of skivvies you’re wearing and, finding them to be (reasonably) clean, you discover that Da Schmeel is indeed wafting from your Maytag dishwasher. Your mind shifts from peering intently into your britches and snaps into troubleshooting mode as you open the control panel on the dishwasher, seeking the source of the burning smell. Your keen Vulcan squinties immediately spot a group of burnt wires on the timer harness, similar to what’s shown here:

Fried Timer on  Maytag MDB5000AWW Washer

“WTF?” you exclaim, in astonishment and horror.

Turns out that there is a recall on this dishwasher for a problem with the rinse aid dispenser. Although the depicted problem was not caused by this, but was instead due to loose connections at the timer wire harness, there’s still a good chance that Maytag will cover it for you. Worth a call, right? Here’s the number to the Maytag Recall Team: 1-800-675-0535.

And in case they don’t cover it, here’s the part link to the timer if you want to replace it yourself. Easy job, half a mug on the world-famous SUDS-o-meter.

To learn more about your dishwasher, or to order parts, click here.

High Altitude Service Call

Living up here in New Hampshire, I do service calls in some remote places. Here’s a picture of a service call I did at a high mountain cottage in the White Mountains. Carrying all my tools up the mountain was tough on my bad back. And then those hikes all the way back down the mountain to get parts out of my van… OY! I think maybe I’m getting too old for this bidness.

photo

Refrigerator Blowing Warm Air in the Icebox

Bob Kazmerchek wrote:

Hi,
My 2001 Whirlpool refrigerator has stopped cooling anything. It still runs and I believe the fan must be still working – but the air being blown into the icebox is not cold. Nothing freezes and nothing is cold in the main part of the refrigerator. Is it worth it for me to pay a repairman $65 just to come look at it or should I just buy a new one.
Thanks!
Bob K.
P.S. I vacuumed any dirt that was on the coils but that didn’t help.
7 years for a fridge seems so short.

My first move on this fridge would be to see if the compressor is actually running and not just doing the infamous hummm-CLICK. Once I verify that the compressor is starting and running normally, then it’s time to tear apart the freezer. Everything comes out and the back wall gets removed so I can feast my calibrated eyeballs lovingly upon the evaporator coil while the compressor is running. What I’m looking for here is the frost pattern on the coil. Based on your complaint, I’d expect to see one of three situations (doesn’t matter if your fridge is a side-by-side or top-and-bottom, the frost patterns are the same in all configurations so don’t let the variations in the pictures confuse you):

Evaporator Coil in a Side by Side RefrigeratorNo Frost At All
This is bad. Remember, we’re looking at this coil with the compressor running, so if everything was peachy, I’d expect to see a light sheen of frost on 2/3 of the coil. No frost at all means either the compressor is “plum wore out” (that’s a technical term, please don’t use it unless you have a valid EPA refrigeration certificate) or the freon has leaked out. Either way, for most refrigerators today, that means you’re going shoppin’.


Inefficient RefrigeratorSingle Glob of Frost or Iceball
This is also bad, and same deal as above. Same remedy, too.


Iced-over Evaporator from a Failed Defrost SystemHeavy Frost on the Coils
This is good! This indicates a defrosting system failure which is a simple control problem. It also means that the sealed system (compressor, evaporator coil, and all associated tubing) is fine as wine in summertime. Defrost system problems are easy fixes that anyone with a pulse can do with maybe just a little help from their friends. The problem will either be the defrost timer (or Adaptive Defrost Control board, if so equipped), the defrost thermostat, or the defrost heater. To locate these parts in your fridge, check out these cool, interactive parts diagrams.

If you’re still confoosed about disassembly or about what you’re seeing, come talk to us in the Samurai Appliance Repair Forums for personalized, interactive help from Master Appliantologists, including yours so very freaking truly.

To learn more about your refrigerator, or to order parts, click here.

Electric Clothes Dryer Power Cord Conversion

susan wrote:

I need to change the wiring on Electric clothes dryer from 4 wire to 3 wire plug. original 4 wire was color coded but the 3 wire is not. am i to assume that the middle one is the neutral and the other two can go on either post? Hope you can help me – thanks!

When it comes to electrical stuff, I follow this hard and fast rule: NEVER ASSUME ANYTHING! And the truth is that in this modern age of readily available, inexpensive (even after accounting for inflation), and easy-to-use multimeters, you don’t have to!

Let’s take a look at your three-wire power cord, like this one ratcheer. 3-Wire Dryer Power Cord, click it to git it, Slick. Notice that it has two straight spades set at an angle and the middle spade is L-shaped; this is so that it can only fit into special electric dryer outlets like this one. That L-shaped spade is for the neutral connection and should correspond to the middle conductor. Note that I said “should.” This is where we get to the part about not assuming anything; and we don’t have to ‘cuz it’s easy enough to verify using our multimeter.

What’s that you say, you don’t even have a multimeter much less know how to use one? Well, now, that’s a problem that’s easily remedied! Kommen zie hither, bittë, and grok ye on my world-famous quick ‘n eazy guide to making basic electrical measurements. Go on, click it and read it over real quick-like, I’ll wait. Pay particular attention to the part about making continuity measurements ‘cuz that’s where we’re going with all this.

See? Was easy, da tovarish? Now, just take your multimeter and set it to measure resistance so we can do a continuity check. With one probe on the L-shaped spade and the other probe on the middle terminal at the other end of the cord, you should read full continuity. If you do, then you’re good to go– you have just verified that the middle wire of the cord is the neutral wire.

To learn more sweet mysteries of dryer cord wiring, come hither. And if you need parts, repair manuals, or accessories for your dryer, come git you some!

To learn more about your dryer, or to order parts, click here.