Monthly Archives: May 2007

Whirlpool Duet Sport Dryer: Gut Check

The Whirlpool Duet Sport is skulking around the Ameedican market. The one schweet thing about this dryer is that you can get to all the guts via the top or front panels– no need to pull it out from the wall in violation of the 10th Law of the Prophecy.

Whirlpool Duet Sport Dryer:  Guts

Disassembly follows the same procedure as for the Whirlpool-built dryer with the lint filter in the door, see this page.

BONUS: Here’s a field report from Sublime Master of Appliantology Nickfixit on a recent service call he did on one of these dryers:

Hi Guys,

By some stroke of luck I got to work on a Whirlpool yesterday. It was a Duet Sport Dryer about 3 months old. The drum belt was broken, and I was lucky enough to have it on the truck.

My first observation is that it’s sort of a pain to install. I had to take the console and front off to do it.

The second issue is the spring on the idler pulley. I could not believe how strong that idler pulley spring was. It takes both hands and major strength just to push it back enough to get the belt installed. I’m serious, it really is monstrously strong. I’d guess that spring is at least 5 times stronger than the regular Duet.

I’ll bet if you left 100 new ones in the box for 6 months, you would find most had broken belts just from the spring pressure on the idler.

I’ll bet we will be doing a lot of these belt jobs in the near future.

Nick

How to Re-Calibrate the KitchenAid Dual-Fuel Ranges

This tech tidbit applies to the K/A dual-fuel ranges with steam, models KDRP707RSS00, KDRP707RSS01, KDRP767RSS00, or KDRP767RSS01. If you’re having temperature control problems with this range, here’s whatcha need to do:

1. Foist, make sure the oven control is off.

2. Next, turn the Selector knob to Bake, Convection Roast or Convection Bake. For your calibrating pleasure, calibrating in Bake will not affect Convection Roast or Convection Bake temperatures. To ensure that this little chore is comfortably tedious for you, they set it up so that you gotta calibrate each cooking mode separately.

3. Press and hold the CANCEL key; the display will show STOP. While still holding the CANCEL key, press and hold the ENTER key until the display shows a flashing “0.”

4. Now turn the set knob to increase or decrease the temperature in increments of 5°F. You can go a maximum of 30°F either up or down. A minus sign means the oven will be cooler by the displayed amount. The absence of a sign means the oven will be warmer by the displayed amount.

5. Press the ENTER key to accept the change and STOP will be displayed.

6. Turn the Selector knob back to “Reset” to end this joyous calibration procedure.

Appliance Deconstruction Techniques Illustrated

Appliance deconstruction is a technique sometimes used in the ancient martial art of Fixite Do. Since deconstruction is terminal for the appliance, it is only used as a last resort.

An Apprentice Appliantologist at the repair forums posted a nice demonstration of appliance deconstruction using the Impact Technique. One thing to notice in this demonstration is that the washer has an electronic user interface board, which has been a troublemaker on this model and which was the problem in this case. It’s not surprising that it ended up in deconstruction since this washer model violates the 5th Law of the Prophecy.

The Percussion Technique is another method which is quicker and more thorough but requires a larger work area and some specialized appliance deconstruction tools.

Adventures of a New Appliance Technician

Appliance Tech, Grizzly, a new brother-at-arms in the ancient martial art of Fixite Do, shared some of his more vivid experiences and observations of his first few months of practicing the craft of Appliantology.

Interesting (well, not really) observations I’ve made in the larval stage of my appliantology career. Five months may not be long enough to have a truly mature and time tested opinion on stuff, but here goes anyway….

Observation 1. As a profession, servicers are treated by customers with somewhat more suspicion than I was expecting. I’d say the average customer is more guarded with me than they would be with, say, a census taker or perhaps a meter reader. Having said that, I haven’t received much in the way of the immediate cold shoulder and scornful treatment with which, say, an ambulance chasing trial attorney has likely become used to. I’m thinking a spectral analysis of professions would peg appliance servicers several notches up the scale from car salesman, but lagging a few rungs south of dental hygienists.

Observation 2. The plural form of servicer is not present in the OpenOffice.org spell check, whereas the singular form is.

Observation 3. Appliances, like most consumer products, have a sweet spot at which the best long term value can be derived by purchasing items towards the middle of the price scale. Sure don’t see many catastrophically expensive repairs with 600 to 1000 dollar Whirlpool washers. Can’t say the same about Sam’s Club spec GE appliances nor for many uh dem der fancy pants Yourapeen brands.

Observation 1 reprise. Some customers seem to have an over simplified view of the profession and are pre conditioned to think that anyone who works with their hands must have a Forest Gump level IQ. Here’s some quotes I’ve heard so far:

From a passively aggressive/somewhat condescending dishwasher customer, I think she must have thought she was talking to her 8 year old: “now, I know the dishwasher water goes into my garbage disposal, so if you need to get under the sink to look at it, you will need to be careful, there are c-h-e-m-i-c-a-l-s down there, like Comet and Dawn, those can harm you, so please be careful”. I felt like playing along by dawning a puzzled expression and telling her “Oh, yessum mam, dey done told us in skoo dat Comet ain’t duh same ting as sugar. You can’t eat Comet, you can only clean stuff wit it. But sugar, dats ok to eat, my momma puts sugar on her grits and she’s as fit as a possum. My cousin Billy once ate a whole can of Comet, and his pee smelled good for a month, but I ain’t gonna eat none of your Comet, I like tha yellow smell my pee has better anyhow.”

Or how about this quote from a dryer customer, “what do you mean you need the wiring diagram? I read my owner’s manual this morning, and it doesn’t say anything about wiring diagrams, so you must be trying to make this more difficult than it needs to be so you can charge me more”.

Observation 4. This work involves a perfect blend of both mental and physical skill. After sitting at a desk all day for eight years programming mainframes, the actual act of getting to move about is quite a refreshing change, but the one thing about programming that I actually enjoyed (solving logical problems) is present here too! Very similar approach to the problem solving and analysis, just a different subject matter.

Observation 5. This work is freaking fun! For the first time in years, I no longer dread going to work each day. Hell, when 5:30 comes around, most days, I don’t want to leave the shop.

How to Replace the Mounting Stem/Seal and Tub Bearing in a Maytag Dependable Care Washer

This washer is an oldie but goodie, manufactured by Maytag back in the days when Maytag earned a reputation for quality and dependability (unlike the junk being cranked out today with a Maytag label on it).

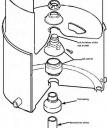
Mounting Stem and Tub Bearing in a Maytag Dependable Care WasherA sure sign that you need to do this repair on your trusty old Maytag is if you see water leaking from the center of the tub onto the transmission. To check this, you’ll need to remove the front panel. Other indications may be a tub that’s reluctant to spin (or burns belts) or makes a ghostly howling noise during spin. The diagram shown here to the right will explain what’s happening (click the pic for a larger view).

You may be thinking, “Oh, but it’s so old, I’ll just buy a new washer and get another 20 years out of it.” Oh, feckless grasshopper, you would be in for a rude awakening.

OK, proceeding on the assumption that you are one of the thinking grasshoppers and not one of the brainless masses being manipulated by the purdy pictures of shiny new appliances dangled in front of your nose by the savvy marketing teams of the manufacturers, let’s get into the nuts and bolts, so to speak, of doing this repair.

I. Essential Tools

Spanner wrench (to remove the inner basket).
– Sockets: 1/4″, 5/16″, 3/8″, and 1/2″
– Straight-slot screwdriver
– Allen wrench or torx set (depending on the set screw used on the replacement part).
– Beer. Lots of beer. About four, 16 oz. mugs, to be exact.

II. Required Parts

Mounting Stem and Seal Kit
Tub Bearing Repair Kit

III. The Procedure

1. Unplug washer and Remove two Philips head screws holding front panel in ( newer models have clips on the bottom and no screws )

2. Remove front panel, lift panel from sides, has two “tabs” on top

3. Remove two 3/8ths hex head screws holding top down

4. Lift up top, it’s somewhat hinged, careful lid doesn’t smash against wall or pipes

5. Disconnect water tube on left side to top cover

6. loosen the two screws on the steel band… straight or 5/16th ( newer washers have a plastic tank cover, pry out the tabs and lift up to remove the plastic tank cover )

7. gently but forcefully remove the top cover

8. careful not to bend the band or cut the gasket

9. *remove the agitator by grasping firmly and pulling up towards your chin, carefully!
*( many have 1/4 hex head screw on agitator, down the side near the base, older ones have a rubber ring on transmission shaft )

10.using a hammer and your spanner wrench remove or cut off the spanner nut, it is a left hand thread so it must come off clockwise, careful not to chip the tub

11. remove the inner tub,, it’s heavy with the concrete counter balance

12. take the Allen wrench screw (or torx) out of the mount stem ( see one of the 4 dimples for the set screw )

13. using your hammer and spanner wrench take the mount stem off, mount stem is a left hand thread so it must come off clockwise

14. now grasp the seal and remove, careful you can slip

15. put a 1/2″ socket on the nut on the front and 1/2″ box wrench or adjustable wrench on the inside bolt, and loosen using the socket on the outside, but not remove entirely the front nut

16. then using the same two tools remove the left and right bolts and nuts and lock nuts and plate, noticing the fiber washer

17. then remove the front one

18. remove tub to pump top hose clamp and pull off up 1/2 of that hose, now work the outer tub loose and lift up but not out entirely

19. remove the pressure hose on your rear right side

20. take out the tub

21. stomp (using your foot) out the tub bearing housing from inside the outer tub

22. remove the “metal sleeve collar” on the transmission shaft

22A. you’re half started

23. turn the outer drum over

24. take the new tub bearing and “stomp” it into the outer tank…flush, take your time and double/triple check yourself on these steps, (takes less time to recheck and verify than to tear down and start over)

25. put the new collar over the transmission

26. put the outer tub back on and reattach the pressure hose and pump hose

27. line up the front hole and put the front (short) bolt in, making sure you have the fiber washer on the outside of the tub

28. put the rectangular flat washer on, then the lock washer and the nut by hand…
thread it on a couple of turns but leave loose

29. put the right and left bolts and stuff on, tighten well

30. tighten up the front one

31. Put the seal on next, careful not to tear the seal, but it needs to be all the way down. One side has a special edge of carbon or something like that and that needs to be UP towards you. Sometimes taking a little bit of liquid laundry detergent and lining the inside bottom lip of the seal with it can help with the installation of the seal onto the tank.

32. take the torx screw out of the new mount stem, and screw down the stem mount, tighten with spanner wrench ( don’t over tighten! ), install the torx screw

33. put the inner tub on

34. check the spacing around the top of the inner tub (making sure that the tub is not listing one way or another)

35. put the metal cover on and spanner nut

36. put the top cover on and push it all the way down

37. check and clean the gasket and put it back on

38. put the clamp back on over the gasket

39. tighten to a moderately firm but not tight setting

40. carefully with a long straight screwdriver pry up the top part, bit by bit
run your fingers around the clamp to make sure the gasket didn’t pop up

41. when you think you have a good position, take your index finger and on the inside put it between the top cover and top of the inner basket and make sure you have this space all round so that the inner basket doesn’t rub against the top cover

42. tighten the clamp

43. reinstall the hose from the injector to the top cover

44. plug unit back in and turn to spin

45. let it spin for a couple of minutes

46. turn timer to fill and put water in

47. water test before securing top and reinstalling front panel

To learn more about your washing machine, or to order parts, click here.

GE Recalls 2.5 Million Dishwashers

Yet another appliance recall notice *yawn*.

According to CPSC, this recall is due to a faulty liquid rinse-aid dispenser. Apparently, the dispenser can leak rinse aid onto the dishwasher’s internal wiring which can cause an electrical short and overheating, posing a fire hazard to consumers. Read the sordid details ratcheer.

I wonder how much of this is just hype. OK, how many of you have actually had your dishwasher catch fire because of this? Raise your hands. No one? Yep, sounds like yet another gubmint make-work project to me.

Something else verrry interestink about this recall is that it sounds suspiciously like the recently-announced Maytag and Jenn-Air dishwasher recall, which was for the exact same reason!

Hmmm… even though all the manufacturers are in bed with each other, seems like we’re the ones getting screwed.

Getting to the Lid Switch in a Kenmore Top-Loading Washer

what is the best way to get to the lid switch on a kennmore washer, model # 110.28812790. It looks as if I need to remove the whole outer shell.

_______________________________
The above message was sent when you were offline, via your Timpani site.

Message sent from IP: 12.24.236.162

You are correctum! The technique is illustrated below. If you need more verbose instructions, come hither.

Opening up Whirlpool (or Kenmore) Direct-Drive Top-Loading Washer

To learn more about your washing machine, or to order parts, click here.

Love Means Never Having to Say Goodbye… to Your Appliances

It’s the ultimate First World problem: how to stay in touch with your appliances even if you’re away from home. Well, Pilgrim, you git down on yer knees and thank the Lord Fixus because now you can do just that! Daf right, Nappy– Whirlpool, Hewlett Packard, Microsoft, Panasonic and Procter & Gamble are all test marketing this in Hotlanta even as you feast your bloodshot peepers on these hallowed photons. Read on…

Having completed a pilot program that tested how an Internet- connected kitchen can ease meal preparation, the Internet Home Alliance (IHA) is shifting its attention to the laundry room. IHA’s Laundry Time study, like the earlier Mealtime study, will investigate how “Smart Home” technologies can simplify and shorten the time required to wash and dry clothes in an average household. Consumer attitudes toward remote access and control of home laundry appliances also will be probed.

A test home in the Atlanta area will be equipped with devices that link washers and dryers to a home network that will enable owners to receive text messages on the progress of the laundering process through computers, cellphones or TV receivers. For in- stance, a family member can put a load in the washer and watch TV. When the load is completed, a “Wash Complete” alert pops up on the screen, instructing the person to move the load to the dryer and perhaps put a new load in the washer. A similar alert will appear when the drying cycle is finished.

Through instant messaging on computers, cellphones or TVs, consumers also will be alerted to possible problems with their laundry appliances. If the problem is that they failed to activate the machine, a remote access system enables the appliances to be turned on without walking to the laundry room. This latter feature also can be used while out of the home (through cellphone or computer) to activate a washer or dryer so the load will be completed upon arrival home. If the return home is delayed, the dryer can be instructed to fluff the load again to eliminate potential wrinkles.

Participating in the study are Whirlpool, Hewlett Packard, Microsoft, Panasonic and Procter & Gamble. Whirlpool is provid- ing each test home with front-loading regular-capacity washers and dryers, while Microsoft is providing the “Smart House” and remote-access control systems.

Results of the study will be published early next year by IHA, a home research group based in Boston.

Kenmore Dryer Stopped Working

My Kenmore Dryer stopped working. It gets power because the cycle dial turns when plugged in. I keep reading about tripped circuit breakers on dryers in the forum but have no idea where they are located. Please help. Thank you

_______________________________
The above message was sent when you were offline, via your Timpani site.

Message sent from IP: 68.37.6.13

Sounds like your dryer has a case of what we professionals call thermal fusitis. That is, the failure of the autonomic nervous system to respond to normal nerve impulses thus preventing the bowels from releasing… oh, wait, sorry, that’s constipation. Thermal fusitis is a malfunction characterized by a thermal fuse which has become electrically open thus disrupting the motor power circuit. This page will help you locate the thermal fuse and this page will help you test it. You can buy the replacement part here. If you’re still tho berry, berry confoosed, come talk to us in the Samurai Appliance Repair Forum.

Appliance Repair Mental Therapy Session

MESSAGE SENT THROUGH YOUR WEBSITE

This form was submitted: May 08 2007 / 21:23:21
by a visitor with this IP Address: 208.106.65.164

name = Aloysius Terego
country =   USA

I have only two words to say (add to) your disclaimer;

Don’t Panic!

C’mon, man, someone as twisted as you MUST have read Hitchhiker’s Guide to the Galaxy?

Well then you should.

But seriously, I have this dryer, see, with a reeeeally annoying squeak and I’m pretty handy but before I started randomly unscrewing things I thought I’d see what the Whirrled Why Dweb had to offer by way of advice other than “No User Servicable Parts Inside” (which I usually take as a challenge to be mocked). So to make a long story short (too late) I happened upon your site and, yeah, sure, the pictures of taking apart the dryer were exactly what I was looking for but you shot yourself in the foot, dude, because, thanks to your TOTALLY SUPERFLUOUS and yet strangely enticing web content whatever momentum I started out with (and believe me, it wasn’t all that much) has been transferred into heat energy where my butt hits the chair seat and it’s now two hours later and I don’t feel like working on the friggin’ dryer even though all the detritus that accumulated around and on top of it since 1986 has been carefully strewn elsewhere and the dryer is pulled out into the middle of the garage/laundry area/workshop/music room.

Whew!

There. I feel better now.

Great session, Doc. How much do I owe you?

Al

A buck two-eighty should cover it.

After reading that, I feel like I should smoke a cigarette. And I don’t even smoke.

The Greatest Website Ever!

This is the greatest website ever. Thanks for showing my how to fix my pos maytag range with the f1 error. Now if I can find the part on your site i will gladly pay three times for it……

_______________________________
The above message was sent when you were offline, via your Timpani site.

Message sent from IP: 68.70.131.75

Thanks for the good word, m’main man. For help finding parts for your range, step right this way. 8)