|
Author Archives: Samurai Appliance Repair Man
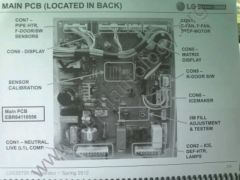
New LG tech training info on their new washers and refrigerators
One of the fine Master Appliantologists at the Appliantology Academy, Grand Master Funk appl.tech.29501, recently attended an LG tech training session on their new model front-load washers and bottom-mount and top-mount refrigerators. He was gracious enough to take photos of the training handouts and send them to me. I’ve uploaded them to a couple new albums in the Gallery at the Academy and briefly explain them in a short screencast posted at my blog there. Check it out:
Warning: Using the self-clean feature on your oven may be hazardous to your health
Dennis wrote:
my neigbors fridgidaire oven caught on fire during selfcleaning, the fire totally destroy their house and my house, do you have any information about any fridgidaire range malfunctioning during self cleaning mode?
Using the self-clean feature on ANY oven or range is just asking for trouble. What happened with your neighbor’s Frigidaire range is one of the worst-case scenarios. More commonly, something just breaks in the oven: door lock motors seize up and won’t unlock the door, shoddily-made (but expensively-priced) electronic range control boards fail from being exposed to high temperature and humidity that they were never designed to withstand, even though they are included in self-cleaning ranges. Idiotic? You betcha! Welcome to the low-budget underworld of appliance manufacturing.
If you spend any time at all reading topics in the Kitchen Forum at the Appliantology Academy, you’ll see warning after warning to never ever ever use self-clean on your oven… unless you just like fixing broken stuff and buying appliance parts, which I have no problem with as long you’re buying your parts here! 8)
As to your specific question about Frigidaire ranges blowing up during self-clean, I don’t know of any repeating pattern of this problem unique to Frigidaire-built ranges. However, as I’ve said, ANY range is vulnerable to this during self-clean. Fun fact to know and tell: oven temperatures can exceed 900F during self-clean. At those temperatures, the volatilized carbon from the food soils would explode on contact if they were to mix with ambient air if, for example, the door was opened during self-clean. It is for this very reason that the door locks during this process. So I’m wondering if the door lock was disabled on this oven or if the door gasket was badly damaged or missing, allowing enough ambient air in to fuel an explosion.
If your oven is broken from using the self-clean or for some other reason, we can help you fix it in the Kitchen Forum. Just create a free account at the Appliantology Academy and start a new topic. We’ll help you whup up on it.
To learn more about your range or oven or to order parts, click here.
A Peek Inside the Samurai’s Dojo
Replacing the tub bearings in a Maytag Bravo / Whirlpool Cabrio / Kenmore Oasis washer
Yep, they’re all three the same ezzact washer, all made by Whirlpool.
Two ways to go on this job: replace just the tub bearings or replace the entire tub with the bearing pre-assembled at the factory. Pro’s and con’s with each method. See this topic at the Appliantology Academy for more info ==> http://appliantology.org/topic/37050-maytag-bravo-washer-model-loud-roar-during-spin-tub-bearing-replacement/
To learn more about your washing machine, or to order parts, click here.
How to silence a Maytag Atlantis washer that makes a loud clunk and screech when it stops
Typical model number: MAV7600AWW
This topic in the Laundry forum at the Appliantology Academy has a short video clip that shows the problem. It’s basically a brake job. The needed parts are posted along with another video that show exactly how to do it. There’s also some tips on upgrading to the new, improved bearing.
http://appliantology.org/topic/36781-maytag-mav7600aww-washer-loud-cluck-after-spin-cycle/
To learn more about your washing machine, or to order parts, click here.
Appliantology Newsletter, February 2012: Screencasts, Blog Morph
Another steamy issue of *Appliantology* comes streaking across the Internet like skid marks across the sky and explodes into your inbox! Konnichiwa, my friends, Samurai Appliance Repair Man here bringing you yet more pearls of appliantological wisdom. Let us attend!
First, I want to tell you about an exciting change in our newsletter: we’re gonna be sending ’em out more often. Up ’till now, I’ve been sending out issues of *Appliantology* about quarterly. But there’s just so much going on over at the Appliantology Academy, www.Appliantology.org– more on that in a minute– that we thought we really needed to send out more frequent issues of our newsletter, *Appliantology*, if it was going to still be worthy of being called a newsletter. So we’re looking to send out two issues of *Appliantology* per month, about every other week. They’ll be in this format: all text, mobile-friendly, featuring news and links to recent content at the site that we think you’d want to know about.
In case you’re not already familiar with the Appliantology Academy (or even if you are), come take a guided tour of the Academy campus grounds with Mrs. Samurai in her debut rock opera screencast ==> http://goo.gl/SucQb (I’m using the Google URL shortener because it’s a long, hairy link that looks really ugly and takes up way too much screen space on a mobile phone. But the links all go to various pages and sections at www.Appliantology.org – no weird stuff, I promise).
We’ve made five screencasts so far with plans to make many more. Here are a couple of our latest that may be especially interesting to you:
How to use the Downloads section at the Appliantology Academy ==> http://goo.gl/m7fGM
Learn how to create an account at the Appliantology Academy ==> http://goo.gl/M6FZZ
We’ll post new episodes to our screencast page ==> http://goo.gl/VXtuh
Changing gears here… If you’ve been following my long-time blog, Fixitnow.com, you may have noticed that I haven’t posted there since December. Well, there’s a very good reason for that: I’ve moved my blogging efforts over to the Appliantology Academy where I’ve been having far too much fun for the past few months!
Appliantology.org is a huge site with lots of different areas to explore. Whereas Fixitnow.com is a single blog, Appliantology.org is a bustling campus featuring active repair forums, an illustrative photo gallery, Master’s chat room, service manual file sharing, and multiple blogs!
Yours so very truly and Mrs. Samurai each keep very active blogs at the Appliantology Academy. My blog is mostly about– surprise!– appliance repair but with other stuff thrown in. Mrs. Samurai’s blog is about lifestyle, food, and health-related issues. Here are the links to each of our blogs:
Samurai’s blog ==> http://appliantology.org/blog/1-samurais-blog/
and Mrs. Samurai has her own web address ‘cuz she’s little miss fancy-pants ==> http://MrsSamurai.com – that link takes you right to her blog at Appliantology.org.
Kanpai!
Samurai Appliance Repair Man
http://www.Appliantology.org
Perfect Appliance Gift Ideas
The Samurai has scoured both the Innernet AND the Outernet rounding up those perfect Christmas, Hanukah, Kwanzaa, and Festivus gift ideas for that special Fixer Dude or Dudette in your life. Click the photos for more info or to purchase.
Stay warm AND safe with this Pocket Air Check combustible gas leak detector. Works with Natural and LP gas.
Multimeter. The indispensable tool for every DIYer. Specs: Volts AC 750 , Volts DC 1000, Amps AC 10, Resistance max. (Ohms) 2M, Continuity, Temperature -4 °F to 2498° F, Display (Counts) 2,000, Operating Temperature 32° F to 74° F (0°C to 23°C), Fuse Protection mA: 0.2A/ 250V, Power 9 V Battery (included), Size 5.5″L x 3″W x 1.5″. Temp probe included.
Non-contact A/C voltage detector. Test for voltage without touching any bare wires. This detector works by sensing voltage through the wire’s insulation. Detector has an audible beeper and visible flashing light indicator.
3 in 1 tool for splicing wires. Has wire strippers for stripping off insulation from the wire. Crimpers for crimping solderless connectors and bolt cutters for cutting small bolts. High quality.
240 Volt 240 Volt outlet checkers for checking the outlets on electric ranges and dryers.
Dryer Vent Tester for testing the backpressure on a dryer vent. Excessive backpressure is the single most common cause of overly long dryer times, repeatedly blowing thermal fuses and poor dryer performance. A vent can be free of lint and still be bad! Use this spiffy tool to check your dryer vent. A must-have if you’re a pro in the trade.
Microwave leakage detector.
Refrigerator and freezer thermometer, temps from -20 to 80 degrees Fahrenheit. Thermometer face has special markings to show where food is safe and where it is at risk of spoilage.
The Kill-A-Watt Energy Usage Meter. This plug-in meter allows you to track total power consumption by hour, day, week, month, or year. Also displays Voltage (V), Line Frequency (Hz), and Power Factor (PF). 15 amp maximum. No batteries required. Accepts standard 110 volt plugs, 2 or 3 prong.
Freezer alarm, sounds if freezer temperature goes above 15 degrees. Never lose expensive frozen foods again!
Gasohol tester. Used to test the alcohol content in the fuel.
Polder 3 function thermometer: large LCD read out displays the temperature of food during cooking. Presettable HI/LOW and inside the range temperature alert. Timer: 24 hour count down and count-up. Clock: Real-time clock. Stainless steel probe. Temperature chart and battery included.
Glide n Guard floor protector for appliance moving.
Affresh HE Washer Cleaner Pack – Use once a month to keep your HE (high efficiency) washer clean and odor-free! 3 Power Puck tablets and 4 Grit Grabber cloths per box.
Affresh Dishwasher and Disposal Cleaner – 6 Tablets.
Glisten dishwasher cleaner
Refrigerator and freezer condenser coil cleaning brush with instructions. Also works great for dryer lint.
Solid-surface range element cleaner (Sponge no longer included).
Vacuum cleaner attachment for condenser and dryer cleaning – This long vacuum cleaner attachment will help to clean dust and lint build-up in and around your refrigerator condenser coils underneath the refrigerator and dryer lint in the area where the lint filter is inserted. Fits 1-1/4 inch vacuum hose.
Dryer vent cleaning brush. For 4″ diameter round ducts. 20 feet long.
Complete Ceramic Cooktop Care Kit – contains a 10 ounce Cooktop Cleaner to clean and polish all glass or ceramic cooktops. A 4 ounce bottle of Cooktop Protectant. Six small cooktop cleaning pads and one larger Cooktop Protectant applicator.
Stainless steel cleaner.
Gas grate cleaner.
Rust remover – Removes rust stains from clothes, dishes, glassware, kitchen and bathroom fixtures, painted surfaces, concrete and water softeners. 16-ounce bottle.
Testing a Microwave High-Voltage Rectifier
When you’re troubleshooting a no-heat complaint in a microwave, one of the components you may need to check is the high-voltage rectifier (called a “rectumflyer” in the trade. ![]() )
)
Trouble is, the junction resistance on these rectumfliers is so high that doing a standard forward and reverse bias test with an ohm meter won’t tell you anything because it’ll just read open in both directions. This video shows an easy method for testing these special critters:
To learn more about your microwave oven, or to order parts, click here.
How to remove a stuck agitator from a washing machine without getting agitated
If you ever need to remove the inner basket to do a repair on a top-loading washer, one of the first things you’ll need to do is remove the agitator. For some older machines with years of accumulated gookus and crudus caked up under the agitator, this seemingly simple and mundane task can be one of the most frustrating and lumbar-damaging experiences for the tender neophyte.
Chief Master Appliantologist DurhamAppliance has put together a nice compendium of illustrated methods for removing a stubborn agitator from a top-loading washer and posted it in the Appliantology appliance repair forums. Grab a cold one and come feast your bulging peepers on the wisdom of the Masters ==> LINK.
To learn more about your washing machine, or to order parts, click here.
The first step in snowblower repair: getting the full and correct model number of your snowblower
Well, bubbalouie, if you live up in the northern latitudes, chances are pretty good that you own a snowblower or have a neighbor who does. Up here in Yankee Land, we’ve already got our snow covering for the winter and they’s sure to be more to come.
When– not if– your snowblower breaks, it’s usually gonna be something simple that most DIYers can do themselves with just a little bit of information. A world of snowblower replacement parts and repair help, including excellent, professionally-produced how-to videos for snowblower repair, awaits you right here.
As with any appliance repair, the one indispensable piece of information about your snowblower that you will absolutely need to know is the snowblower model number. HINT: do not use the model number listed on the owner’s manual because these are usually incomplete to cover several model variations and is not useful for finding parts for your specific machine. Well, don’t you fret none, ‘cuz we even have a video to help you with that!
To learn more about your snowblower, or to order parts, click here.
How to test a dryer cycling thermostat
When you run your dryer, whether gas or electric, the heat will turn on and off to maintain the temperature within the range selected on the control panel (cottons, permapress, knits, etc.). The temperature is controlled by a device called a cycling thermostat. If your dryer isn’t heating at all or is staying too hot for the entire cycle, one of the things you’ll want to check is this cycling thermostat. It’s easy! This slick how-to video shows you ezzacly how to to do it:
To learn more about your dryer, or to order parts, click here.
How to disassemble an LG dryer to remove a sock or something stuck in the blower
So your dryer powers up, you select a cycle and push start and the dryer hums for a coupla seconds and then goes quiet for a while. This usually indicates something is blocking the drum from rotating. A sock stuck in the blower would do it.
A quick test to see if you have a drum blockage problem is to simply open the door and try to turn the drum by hand. If you can’t turn the drum manually, ain’t no way that dinky motor in there is gonna turn it, ether! Can I hear an, “A-freakin-men?”
If you need to get inside the dryer to remove a sock stuck in the blower or some other rolling problem, Sublime Master john63 over at the Appliantology appliance repair forums steps us over the rice paper without a single tear or wrinkle ==> LINK
To learn more about your dryer, or to order parts, click here.
GE Refrigerator Appliantology: Dampers and Thermistors
This is the next in a series of posts I’m doing about the technology used in GE refrigerators. Understanding the basics of how these refrigerators work will give you a lot of troubleshooting insight when you’re trying to track down a problem.
For the previous post in this series on controlling and operating the fan motors in GE refrigerators, see this page.
This post gives useful tips and Fun Facts to Know and Tell for diagnosing the Damper Door and Thermistors.
Damper Door
The Damper Assembly has two motors: one to open the Damper Door and another to close it.
The Damper Door should always be either fully open or fully closed; if you ever see it in a halfway state, there’s a problem. Check it in diagnostic/self-test mode where you can run a test to open and close the damper door.
Thermistors
Thermistors are basically variable resistors whose resistance changes with temperature. They come in two flavors: Positive Temperature Coefficient (PTC) and Negative Temperature (NTC). In the PTC thermistors, the resistance increases with increasing temperature whereas in NTC thermistors, the resistance decreases as the temperature increases. All thermistors used in GE refrigerators are NTC.
Most of the side-by-side units will have four thermistors:
– attached to the evaporator coil
– freezer space
– beer section space
– damper
You can see a diagram showing thermistor locations in side-by-side units here ==> LINK
Units with the Custom Cool feature will have a fifth thermistor for the Custom Cool compartment. Lower end units will just have three thermistors.
In all units, the thermistor attached to the evaporator coil is the most troublesome.
There was a rash of problems with one of GE’s old thermistor suppliers a while back where they weren’t sealed properly so moisture got into ’em and knocked ’em out of calibration. More about that here ==> LINK
The refrigerator control has a self test for the thermistors, but it only tests if they’re open or closed. In real life, the thermistors rarely fail that way– usually they simply go out of calibration resulting in poor temperature control.
To learn more about your refrigerator, or to order parts, click here.
GE Refrigerator Appliantology: Fans, Evaporator and Condenser
This is the first in a series of posts I’m going to do about the technology used in GE refrigerators. Understanding the basics of how these refrigerators work will give you a lot of troubleshooting insight when you’re trying to track down a problem. This post explains how the fans in GE refrigerators are controlled and operated.
Like most other refrigerators, GE refrigerators have at least two fans:
– the evaporator (freezer) fan
– the condenser fan (the hot coil in the back, underneath the refrigerator)
Some up-line GE models may have an additional fan:
– in the beer section if it’s a dual evaporator unit
– in the Custom Cool® compartment, if so equipped
All fan motors used in current model GE refrigerators (includes Hotpoint brand) operate on 12 vdc. The motor speed is controlled using a technology called Pulse Width Modulation (PWM). Simple explanation of PWM: take a square wave and vary the width of the upper side of the pulses according to how fast you want the motor to turn- the longer the pulse, the faster the speed. For details on how PWM technology works, see this page ==> LINK
Currently, the condenser fan is single speed (although that’s gonna change in upcoming models) and the evaporator fan is multispeed.
Fan Wire Harness Color Code
– Yellow: PWM signal (input)
– Blue: Tachometer (output from motor)
– Red: +12 vdc supply (input)
– White: Common Ground! Can I hears an “A-freakin-men?”
The PWM wire on the fan motor harness is always the yellow wire– this is the wire that carries the signal telling the fan how fast to spin. Don’t bother trying to measure the voltage on the yellow wire with a conventional meter because the results will be meaningless.
Quick n’ Sleazy Fan Test
– White wire to the negative battery terminal
– Connect BOTH the Red and Yellow wires to the positive battery terminal.
Do not reverse the leads or you’ll blow out the sensitive electronics built into the motor assembly!
Quick Fan Diagnostic Test
– you should never hear the the fan making speed varying sounds in side-by-side units
– on top-mount units, you can sometimes hear the fan making pulsing noises
Fan Circuit on the Muthaboard
Some of the Muthaboards used in these boxes have resistors in the power circuit for the fans. These will be two resistors coming off the J2 plug on the board. If you’re looking straight at the board, the top resistor is for the evaporator fan and the bottom one for the condenser fan. They’re designed to burn out in case one of the fan motors shorts out. If this happens, you’ll need to replace BOTH the affected fan motor as well as the Muthaboard.
Part Links for Your Shopping Pleasure 😉
Evaporator and Condenser Fans ==> LINK
Muthaboard ==> LINK
To learn more about your refrigerator, or to order parts, click here.


