Category Archives: Appliance Repair Posts

All appliance repair categories.

How to replace the Hall Sensor in an LG front-loading washer

So, you tested the Hall Sensor in your LG washer and determined that it’s toast. Now the big questions: 1) Where to get the new sensor? and 2) How to install it?

1. Where to get the new Hall Sensor?

Right here, of course! With fast shipping and a 365-day return policy, the choice of part vendor is clear! Part Link ==> Hall Sensor.

2. How to install the new Hall Sensor?

I’ll let Master john63 from the Samurai School of Appliantology explain that:

1. Unplug washer

2. Remove the rear access panel (4 phillips screws)

3. Remove the large 17mm bolt at the center of the ROTOR
Pull off the ROTOR (has magnetic tension)

4. At the bottom of the STATOR ASSY (Motor Coil) remove the phillips screw on the
metal wire harness-plate. This will allow slack when removing the STATOR ASSY.

5. Remove all of the 10mm bolts from the STATOR ASSY.
Carefully lower the STATOR ASSY & disconnect the HALL EFFECT SENSOR plug.

6. Unclip the *single* tab of the HALL EFFECT SENSOR to remove it from the STATOR.

7. Install new HALL EFFECT SENSOR—verify that all 4 snap/lock tabs are securely
attached to the STATOR ASSY.

8. Re-assembly in reverse order.

To learn more about your washing machine, or to order parts, click here.

How to handle and store food safely during power outages

With Hurricane Irene and earthquakes cranking up along the East Coast and the ensuing power outages that are sure to follow, here’s some timely info on safely storing and handling food during weather emergencies and power outages.

We practice basic safe food handling in our daily lives, but obtaining and storing food safely becomes more challenging during a power outage or natural disasters such as hurricanes and floods.

Steps to Follow to Prepare for a Possible Weather Emergency:

Keep an appliance thermometer in the refrigerator and freezer. An appliance thermometer will indicate the temperature in the refrigerator and freezer in case of a power outage and help determine the safety of the food.

Make sure the freezer is at 0 °F (Fahrenheit) or below and the refrigerator is at 40 °F or below.

Freeze containers of water for ice to help keep food cold in the freezer, refrigerator, or coolers after the power is out.

Freeze refrigerated items such as leftovers, milk, and fresh meat and poultry that you may not need immediately-this helps keep them at a safe temperature longer.

Plan ahead and know where dry ice and block ice can be purchased.
Store food on shelves that will be safely out of the way of contaminated water in case of flooding.

Have coolers on hand to keep refrigerator food cold if the power will be out for more than 4 hours. Purchase or make ice cubes and store in the freezer for use in the refrigerator or in a cooler. Freeze gel packs ahead of time for use in coolers.

Group food together in the freezer—this helps the food stay cold longer.

Steps to Follow During and After the Weather Emergency:

Never taste a food to determine its safety!

Keep the refrigerator and freezer doors closed as much as possible to maintain the cold temperature.

The refrigerator will keep food safely cold for about 4 hours if it is unopened. A full freezer will hold the temperature for approximately 48 hours (24 hours if it is half full and the door remains closed).

Food may be safely refrozen if it still contains ice crystals or is at 40 °F or below.

Obtain block ice or dry ice to keep your refrigerator and freezer as cold as possible if the power is going to be out for a prolonged period of time. Fifty pounds of dry ice should hold an 18-cubic-foot full freezer for 2 days.

If the power has been out for several days, then check the temperature of the freezer with an appliance thermometer or food thermometer. If the food still contains ice crystals or is at 40 °F or below, the food is safe.

If a thermometer has not been kept in the freezer, then check each package of food to determine its safety. If the food still contains ice crystals, the food is safe.

Discard refrigerated perishable food such as meat, poultry, fish, soft cheeses, milk, eggs, leftovers, and deli items after 4 hours without power.

When in Doubt, Throw it Out!

SOURCE: http://www.fsis.usda.gov/factsheets/Severe_Storms_and_Hurricanes_Guide/index.asp

How to test the Hall Sensor in an LG front-loading washer

A common symptom of a bad Hall Sensor in your LG washer is the LE error code (read more). A disconnected or damaged motor harness and even a bad main control board can cause the LE error, too, so you may want to check the Hall Sensor itself to see if it’s working. Here are two ways to test the Hall Sensor in an LG front-loading washer.

Ohm Testing the Hall Sensor

Start with an ohms test because it’s easy. But be aware that an ohms test is not conclusive– it’s merely preliminary. The Hall Sensor (and any other electrical component for that matter) can test good on ohms but still be bad because it can fail under load (when voltage is applied). That’s why ohms testing is just preliminary: if it fails the ohms test, it’s bad; replace the Hall Sensor (same for all LG models).

OTOH, if it passes the ohms test, this does not prove the Hall Sensor is good– you have to go on to the voltage test to prove that.
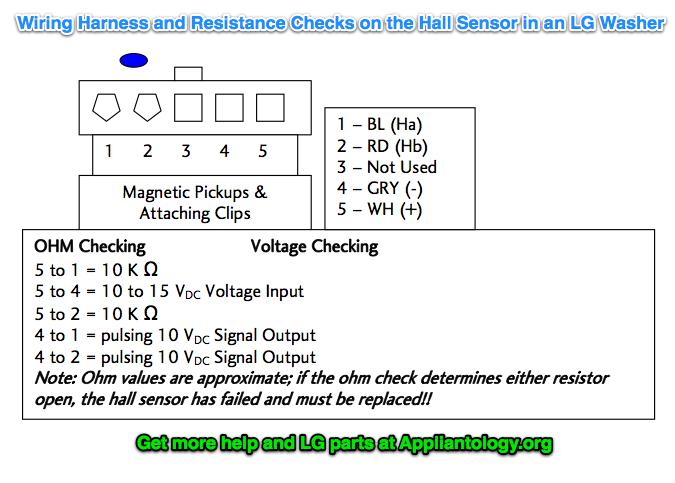
Wiring Harness And Resistance Checks On The Hall Sensor In An LG Washer

If tested off the stator using the diagram above, ohm check the resistors from pin 5 to pin 1 and pin 2. If the hall sensor is good, you should measure approximately 10 KΩ from pin 5 to pin 1 and 10 KΩ from pin 5 to pin 2. If either test shows an open (infinity) the Hall Sensor is defective and must be replaced.

Part link for the Hall Sensor (standardized for all LG models; includes a video showing how to replace it) ==> Hall Sensor

Voltage Testing Hall Sensor at Stator
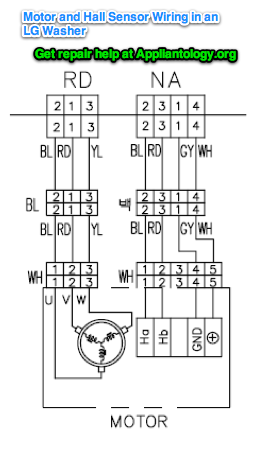
Motor And Hall Sensor Wiring In An LG Washer

If measuring voltage from the control board to the Hall Sensor, follow the following steps:
1. Unplug the power cord.

2. Remove the rear washer panel.

3. Locate the Hall sensor connector on the stator behind the rotor.

4. Place the meter leads on terminals 5 to 4,white to gray.

5. Plug in the power cord,close the door,and press the power button. DO NOT PRESS START!

6. You should measure 10 to 15VDC. If 10 to 15VDC is present,the control board is OK! If not, replace the control board (look up the correct board using your model number).

7. To measure output signal voltage from the Hall Sensor, carefully move test leads to terminals 4 (gray) to 1 (blue). Slowly rotate the motor rotor by hand. You should read a pulsing 10 VDC. If 10VDC is measured from 4 to 1, move the lead on the blue wire to the red wire, terminal 2. Repeat rotating motor rotor by hand. You should read a pulsing 10 VDC.

8. If pulsing 10VDC is measured from pin 4 to pin 1 and pin 4 to pin 2, the hall sensor is OK! If either test netted only 9 to 10 VDC without changing (no pulsing) the hall sensor is likely defective; replace the Hall Sensor (same for all LG models).

To learn more about your washing machine, or to order parts, click here.

How to fix your gas oven that doesn’t get hot enough and save $800!

Amanda wrote:

Hello,
Just wanted to thank you for the great advice on forums. My 5 year old viking oven wouldn’t heat beyond 250. Per your advice, I replaced the ignitors (following your great video/picture demo). Viking service quoted me $900 to fix! I spent $112 on the ignitors and did it myself with your help. Working great now! Thank you thank you thank you!

That’s what Fixitnow.com is all about: Fix it yourself and save Big Bucks!

Here’s the page that Amanda used to help her replace the ignitor ==> http://fixitnow.com/wp/2008/08/06/how-to-replace-the-ignitor-in-a-gas-oven-a-pictorial-guide/

And here’s a tip for saving even more $$ in this repair. All oven ignitors are made of the same material: carborundum. The real variable is the length of the ceramic insulator and the type of wire connections. Here’s another fun fact to know and tell: Viking ignitors suck. They basically take the Maytag universal ignitor kit rejects, slap a Viking label on it and jack the price up almost three times. Next time, cut out the middle man (Viking) and get the Maytag universal ignitor kit:

Maytag universal ignitor kit

I have successfully used this ignitor on many other brands of ranges including Viking and Garland. This ignitor is less than half the price and lasts far longer.

To learn more about your range/stove/oven, or to order parts, click here.

How to locate the thermal fuse in a GE Profile “Hydrowave” washer

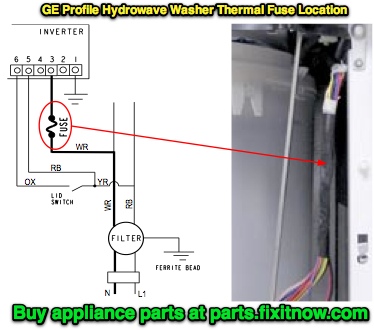
You know you have a blown thermal fuse in this washer when the control panel lights up but the motor doesn’t run; you check the status LED on the motor (see this post for more on that) and it’s dead, no lights, nuttin’. That’s a blown thermal fuse. Here’s where it lives:

GE Hydrowave Washer Thermal Fuse Location

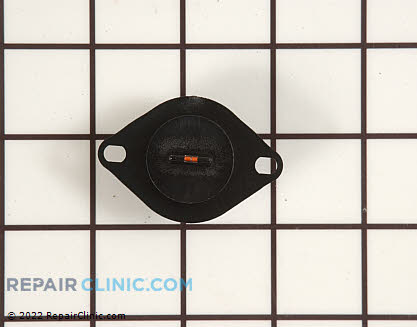
Here’s what it looks like:

Thermal Fuse
(click image to purchase)

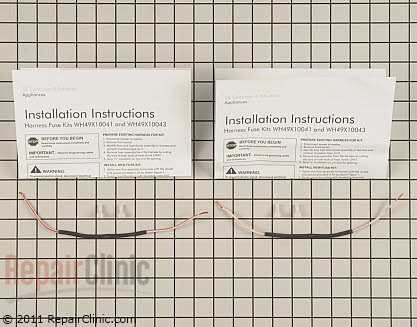
And you can buy the replacement right here ==> Thermal Fuse. The replacement kit comes with complete destructions.

To learn more about your washing machine, or to order parts, click here.

Why does a new-ish Bosch 500 WFMC front-load washer make a ratcheting sound during spin?

Listen to a few seconds of this video (don’t listen to the entire thing because it’ll eat your brain):

Sounds remarkably similar the sound that bad tub bearings will make. This particular washer is only three years old– very early for tub bearing failure.

The actual problem turned out to be something very simple: a loose concrete counterweight mounted to the front of the tub. A few minutes with a wrench and problem solved– no parts needed for this repair!

To prevent the problem from happening again, add Loctite to each of the counterweight mounting bolts.

To learn more about your washing machine, or to order parts, click here.

Tech sheet location and thermistor information for Samsung dryers

Sublime Master of Appliantology john63 at the Samurai School of Appliantology enlightens us on two key aspects of Samsung dryers: tech sheet location and thermistor operation.

On the rear/back of the dryer—there’s a TECH SHEET in a plastic pouch.

On the sheet—you’ll find the test values for various components.

THERMISTORS can fail and still not trigger an error display. Check the OHMS value (at room temperature) with a test meter.

Also, the thermistor is not in series with the heat element, the thermostat is.

The thermistor detects temp changes in the dryer by changes in resistance, which are interpreted by the control determining when to turn the heat on and off…

The THERMISTOR has a *coating* on it that becomes scratched/chipped over time by tiny particles in the blower housing. The salty air then corrodes the THERMISTOR (no heat at all).

Read more: Samsung DV337AEG Repair


(click image to purchase – 365-day return policy)

To learn more about your dryer, or to order parts, click here

Whirlpool Duet Sport Washer stops mid-cycle and display beeps and blinks, relay chatter on CCU

The surprisingly simple solution is revealed in this topic at the Samurai School of Appliantology – http://appliantology.org/topic/32407-whirlpool-duet-washer-wfw9150ww00-literally-on-the-blink/

To learn more about your washing machine, or to order parts, click here.

How to disassemble a Whirlpool Duet Sport dryer (also sold under the Kenmore label)

You may need to tear down this dryer for a variety of reasons: replace the belt, drum rollers, heating element, etc. This video shows you how to do it the right way:

Common replacement parts in the Whirlpool Duet Sport dryer (click to see photo and/or purchase):

Heating Element Assembly

Thermal Fuse

Door Latch

Thermistor

Idler Pulley

Lint Filter

Drive Belt

Thermal Fuse and High Limit Thermostat

Drum Roller

Drive Motor

Blower Wheel

To learn more about your dryer, or to order parts, click here.

Tips for adjusting the thrust bearing on a Maytag Atlantis or Performa washer

Grand Master appl.tech in the Samurai School of Appliantology shares with us some pearls of wisdom on the finer points of adjusting the thrust bearings in the Maytag Atlantis and Performa washers ==> http://appliantology.org/topic/32360-pav2300aww-not-spinning/

To learn more about your washing machine, or to order parts, click here.
How to tell if you have a worn tub bearing or a broken drum suport in your front loading washer

Got a front-load washing machine that’s making a ruckus during spin and you’re trying to figure out what’s wrong? Best case scenario is a broken shock absorber or the washer is simply off balance. Worst case scenario is a bad tub bearing or broken drum support spider. Sublime Master KurtiusInterupptus in the Samurai School of Appliantology explains how to tell the difference:

Do this test…
open washer door and grab the top edge of the inner wash basket
push straight up on the basket while steadying the outer drum with your other hand
is there any lateral movement? Or is it tight and secure?
hope for the latter, because the former is the telltale sign of a worn bearing, a broken support spider or both…not worth repair if this is the case.

If all is good here, go around back and take off the cover. Look for a loose pulley on the basket shaft. (read more)

To learn more about your washing machine, or to order parts, click here.
How to troubleshoot an F28 error code in a Whirlpool Duet Sport washer

Example model number: WFW9200SQ00

The F28 error code will be accompanied by no drum movement. The drain pump may be inop as well.

Sublime Master Strathy from the Samurai School of Appliantology shares this kata for troubleshooting an F28 error code in a Whirlpool Duet Sport (also sold under the Kenmore label) washer.


OK … going by memory here.


– First ohm out your motor. You should have approx 6 ohms between 1-2,1-3 and 2-3. You should also get 120 ohms on 5-6 which is the tach on the motor. If that is good …

– Open up the little flap on the MCU board. Start a regular wash cycle and check for voltages at the MCU. On the pink wires you should get 120v. (With the wires connected to the MCU – don’t disconnect them to check the voltage.) On the connector with the little blue wires – you should have 5 vDC.

– If you are getting the correct voltages at the MCU and the motor ohms out good, then you have a bad MCU.

– If you are not getting those readings at the MCU, then check continuity on the blue wires and the 2 pink wires from the CCU to the MCU.

– If you have continuity on all wires and the connections look good, then you have a bad CCU.


Part links (click images for larger view and purchase info):

Motor Control Unit - Part #1257029
Motor Control Unit – MCU

Control Module - Part #1257028
Central Control Unit – CCU

To learn more about your washing machine, or to order parts, click here.
Tips for Removing a Stuck Tub in a Whirlpool Cabrio / Kenmore Oasis / Maytag Bravos Washer; OL error code

If you have a Whirlpool Cabrio / Kenmore Oasis / Maytag Bravo Washer that’s throwing an OL error code, the problem is most likely a stuck tub. If the tub isn’t free to float, it causes the motor to draw excessive current that generates the OL (over load) error code.

BTW, this problem is usually caused by using non-HE detergent or too much HE detergent in these machines, read more here. The excess detergent residue forms a cement-like gookus that builds up on the drive shaft and sticks to the outer tub. It can also kill the tub bearing in which case you’ll need to replace the entire outer tub assembly because the bearing comes factory assembled into the new tub.

Here’s the part link for the new tub assembly ==> Drum Assembly

To fix the problem, you’ll need to remove the outer tub and clean the gookus off the drive shaft. This Cabrio washer teardown guide will help with that.

The teardown will all go like a breeze until you get to the part where you actually need to pull the tub out of the cabinet. Then the hernias, dislocated spinal disks, and spleen venting begins. Here are some tips that’ll help you get the tub out:

Tips for removing a stuck tub in a Whirlpool Cabrio washer

To learn more about your washing machine, or to order parts, click here.
Misdiagnosing a cooling problem in a GE refrigerator: A hack job case study

dsiebler wrote:

Hello Samurai! I have a GE side x side fridge that is driving me crazy. Started not cooling correctly, nothing freezing on the freezer side. Repair guy replaced main board. He said the coils were only icing up to about the 3rd coil. Main board didn’t fix the problem, he came back out and charged the system with freon. That seemed to work for a week but the defrost cycle would still cause all ice in freezer to melt. But at least I was still happy that fridge was getting cold. Then, freezer stopped getting cold again. I changed the 2 thermistors in the freezer last night, pulled plug and let sit for 15 minutes. Turned back on and same thing. The first 2 or 3 coils start getting iced up and then defrost comes on and melts. Even if the defrost doesn’t come on it seems like the coils will not ice up. Any ideas on this one?

The appliance parts changing monkey who hacked on your refrigerator is exactly the kind of butcher who gives the venerable appliance repair trade a bad name. Let’s parse out the butcher’s blunders:

Repair guy replaced main board. He said the coils were only icing up to about the 3rd coil. Main board didn’t fix the problem…

If the evaporator coils– the coils in the freezer behind the inside back panel– were only partially frosted as you describe, this is a clear indication of a sealed system problem.

Early Stage Refrigerator Evaporator Leak

Most commonly, either some of the refrigerant has leaked out or the compressor has become weak. This has nothing to do with the muthaboard as both you and the parts changing monkey found out. Further testing would need to be done to determine what the exact problem is in the sealed system. But for most home refrigerators, sealed system work usually doesn’t make sense to do because of the expense involved in doing it right. Which brings me to the next piece of butchery:

…he came back out and charged the system with freon. That seemed to work for a week…

If the unit was really low on refrigerant, which seems like it may have been the case based on the short-lived improved temperatures, then it would have gotten that way due to a leak in the refrigerant tubing somewhere. So, simply adding more refrigerant is not repairing the problem at all and, in fact, is illegal under EPA regulations.

It is illegal to simply add refrigerant to a refrigeration system that has leaked without locating and repairing the source of the leak because the refrigerant will simply leak back out into the environment.

The correct procedure would have been to locate the source of the leak using various techniques, repair the leak, pull a deep vacuum on the system and then recharge it with the correct refrigerant in the amount specified on the model number tag.

Now you see why I said that the expense of doing sealed system work correctly (and legally) usually doesn’t make sense for most home refrigerators unless it’s a built-in unit, like a Sub-Zero, where you paid so much that you’re married to it. For most other types of home refrigerators, if there’s a sealed system problem, that’s usually a terminal event and it’s time to go shopping.

If a real Master Appliantologist were on the job and saw the deficient frost pattern on the evaporator coils, he would first verify that the condenser fan was running at full speed and that the condenser was clean. If both of those things were true, he would have recommended that you junk that box and go buy a new one, no muthaboard, no “recharge.” The only expense would have been the basic service call fee.

To learn more about your refrigerator, or to order parts, click here.