Not just another pretty face, this funky roboappliancebabe with the multi-harmonic voice has some valuable repair tips for your washing machine.
To learn more about your washing machine, or to order parts, click here.

Not just another pretty face, this funky roboappliancebabe with the multi-harmonic voice has some valuable repair tips for your washing machine.
To learn more about your washing machine, or to order parts, click here.
Maytag washer has
incontinent leak from tub;
Replace the tub seal.

To learn more about your washing machine, or to order parts, click here.
Whirlpool washer throws
conniption fit during spin.
The Masters explain.
To learn more about your washing machine, or to order parts, click here.
An F06 fault code in a Whirlpool Duet washer (the Kenmore HE3/4t’s are also made by Whirlpool) usually means a motor-related problem. It usually pops up when the drum won’t rotate at all or only very sluggishly. Here’s the excerpt from the Whirlpool Duet Service Manual on this:
Drive Motor Tachometer Error
The control is unable to properly detect motor speed and the machine will shut down. If a failure occurs during high-speed spin the door will be unlocked after 3 minutes.
Potential Causes:
- Check wire harness connections between the Drive Motor/Tachometer and the Motor Control Unit (MCU), and between the MCU and the Central Control Unit (CCU)
- Check the Drive Motor
- Check the MCU
- Check the Wire Harness
 In accordance with the 6th Law of the Prophecy, begin troubleshooting right at the motor. Why start there? Because the motor is one of the prime suspects and it’s easy to check. Remove the back panel and unwind the belt from the drum pulley. Now turn the motor pulley (sans belt) by hand. If it doesn’t turn smoothly and easily, you have a bad motor. Come git you one.
If the motor pulley turns smoothly and easily by hand, next step is to run the motor with the belt still removed from the motor pulley. If the motor seems to run fine that way, put the belt back on and run it again. If the motor won’t run under load (with the belt on), then that’s another sign that the motor is bad. Come git you one.
Suppose the motor turns easily and freely by hand but won’t run either with or without the belt. This is a more subtle condition because we’re probably dealing with a bad MCU or flakey wire harness somewhere between the motor and MCU, or between the MCU and the CCU.
One trick that often works at this point is to remove and reinsert all wire connections at the board and motor. This tends to clean the small amount of corrosion that will build up on the connections. After you do this put the machine into a service cycle (see the instructions in the tech sheet found inside the unit or you can borrow mine). Part of the service cycle is running the motor at certain set speeds which checks the tach.
 If you’ve removed/reinserted the wire harnesses and still no joy, then usually the problem is the MCU. Come git you one.
If you’re still confoosed, then come see your friends in the Samurai School of Appliantology.
To learn more about your washing machine, or to order parts, click here.
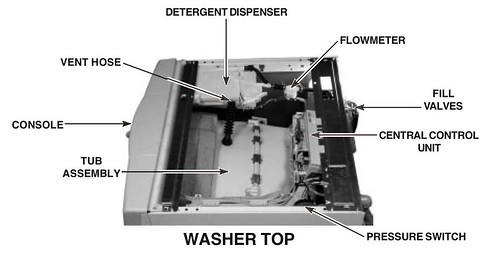
Hey, Bubba, you got you a Whirlpool or Kenmore direct-drive washer where the top part of the agimutator just wallows around and does nothing important anymore? Well, well, well– you got what we professional appliantologists call, “bad dawgs.” Agimutator dawgs, that is. Really, I shi’ite thee not! The pictures below from the gen-u-wine Whirlpool washer DIY repair manual will show how to do it to it.
And you can buy the agimutator dawg kit ratcheer.
How ’bout them dawgs? 

Click Image Above to Enlarge

Click Image Above to Enlarge

Click Image Above to Enlarge

Click Image Above to Enlarge
Step 12: Place the new agimutator on the shaft.
Step 13: Rotate the agimutator until the grooves in the agitmutator match the grooves on the shaft, then push the agimutator down.

Click Image Above to Enlarge

Click Image Above to Enlarge
To learn more about your washing machine, or to order parts, click here.
Atlantis washer
Won’t agitate during wash.
Read this topic now.
To learn more about your washing machine, or to order parts, click here.
Machine gun in my
Amana washer. Replace:
Helix and Pulley.
To learn more about your washing machine, or to order parts, click here.
This is one of the simplest katas in the ancient martial art of Fixite Do. All is revealed in this parchment of Appliantology scriptures.
To learn more about your washing machine, or to order parts, click here.
This problem is a good illustration of how there’s just no substitute for actual hand-to-hand combat with broken appliances. Here’s an excerpt from the service manual on this fault code:
EXPLANATION AND RECOMMENDED PROCEDURE
F21 LONG DRAINIf the drain time exceeds 8 minutes the water valves turn off.
NOTES:After 4 minutes the “Sd” error will be displayed, then
4 minutes later the “F/21” error code will be displayed. Press
PAUSE/CANCEL two times to clear the display.Possible Causes/Procedure
1. Check the drain hose and make sure it is not plugged or
kinked.
2. Unplug washer or disconnect power.
3. Check the electrical connections at the pump and make sure
the pump is running.
4. Check the drain pump filter for foreign objects.
5. Plug in washer or reconnect power.
6. If the above does not correct the problem, go to step 7.
7. Unplug washer or disconnect power.
8. Replace the pump.
I’ve worked on dozens of these washers and have only found the above service manual solution to apply once or twice. The vast majority of the time, I’d arrive and all the washer would do is drain and flash F-21 in the display. I couldn’t even get the control board to go into diagnostic mode.
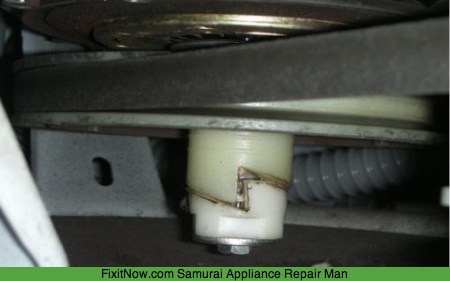
Using my keen Samurai Insight®, I unplugged the washer and removed the molex connector from the water level switch (also called a pressure switch). To get to it, remove the top panel by taking out the three screws in the back of the washer. The pressure switch is right there on top, as seen in the picture below:
Anyway, I plugged the washer back in and, lo!, the washer did enter diagnostic mode and the people did sing and the Lord did grin. And there was much rejoicing. Especially after I replaced the water level switch whereupon appliantological harmony was restored.

To learn more about your washing machine, or to order parts, click here.
A common complaint about front loading washers is mildew odor, or Das Schmeel. We professional appliantolgists refer to this condition as Funk from Within Syndrome (FFWS). So, here are some causative factors and other Fun Facts to Know and Tell (FFTKAT) about FFWS:
1. Using conventional detergent instead High Efficiency (HE) detergent.
Why would someone spend the extra money to buy an expensive front loading washer and then try to pinch pennies using conventional detergent? Even though you and I immediately recognize this as the penny-wise, dollar-moron type thinking so in vogue among the Great Unwashed, this is exactly what many people do. I dunno, I reckon they think they’re being clever and wise by disregarding the manufacturer’s explicit instructions about this. Open your Appliantology Hymnal to the Book of Washers and sing along with me now:
But the truth is that the ichiban killer of drum bearings in any front-loading washer is non-HE detergent. HE: High Efficiency. And no, using a smaller quantity of conventional detergent is not the same as using HE detergent, as explained below.
Y’see, HE detergent is not simply a concentrated formulation of the regular stuff. Since front loaders use much less water than top loaders (about 12 gallons per wash load vs. about 56 gallons in a conventional top-loader), front-loaders require a detergent with a whole different chemistry. So let’s answer some common questions and dispel common myths about front-loaders and HE detergents. [read more]
Ahh, nothing like a good, rousing hymn to really get me going on my soapbox (I know, I know, but I just couldn’t resist).
So, using the wrong kind of detergent in your fancy front loader is a great way to funkify your washer and impart some o’ dat funk onto your clothes. And it accelerates the mechanical deterioration of your washer. Smooth move, Ex Lax!
2. Using too much fabric softener and/or detergent.
Liquid fabric softener does not break down very well in cold water and the residue collects on the outer tub and basket along with the lint left from the wash. We professional appliantologists refer to this accumulated grunge as Gookus (that’s a professional term, please don’t use it at home as I cannot be responsible for your safety). Once formed, this gookus collects ever more additional soap, dirt, grease, human waste, mites, flea doo-doo, parasites… and then some really bad stuff.
As it turns out, this gookus makes a perfect substrate for microbial life forms. Over some time– not very much time in warmer climates– those little bacterial colonies build up lots of microbial sewage, just like we do (bacteria are kinda like people that way) until one day you open the door to the washer and exclaim, “Lord, he stinketh!”
Bonus FFTKAT: Using too much fabric softener will waterproof your clothes. Pop Quiz: How clean do you think your clothes will get if they repel water inside the washing machine?
3. Doing all your wash loads in cold water only.
Detergents don’t dissolve as well in cold water. As a result, cold water washes leave behind more gookus. So… do an occasional wash in hot water. OK, maybe more than occasional. Like, I hope you at least wash your skivvies in hot water. Oy!
4. Leaving clothes in the washer at the end of the cycle.
Front loaders don’t have as much access to open air as top load machines. Consequently, leaving clothes in the washer for more than eight hours will increase mold and mildew build up. Think warm, dark, moist and you’ll get inside the brain of a mold spore. Visualize the spore; BE the spore!
:::
Now that we have a vast and awesome under-stinking-standing of FFWS, I’ll offer some of the preferred Samurai-Approved Maneuvers for Front-Loader Olfactory Bliss (SAMFOB). These sacred techniques are three ancient Hot Bath Washer Purification Rituals (HBWPR) referred to as Ichi, Ni, and San:
1. Ichi: Add one additional gallon of hot water to the unit before sending it into a hot wash. This will raise the water level high enough to remove the Gookus Hiding Behind the Basket (GHBB).
2. Ni: Same as Ichi, but with bleach added to all dispensers. Clean the fabric softener cup with a rag first (bleach will not break up fabric softener since it is introduced in the rinse cycle with the fabric softener).
3. San: Same as Ichi and Ni but with a cap full of pine cleaner added to the wash water (NOT the dispenser). Add some old rags (they don`t need to be dirty) and select the extra rinse cycle. The wash action will help remove the accumulated gookus from the components
Once again, make sure you’re only using high efficiency (HE) detergents in your front loader. See this page for the gory details on why dis be.
And here’s a bonus tip from a loyal reader of these hallowed pages:
Jo, moderate fix-it-myselfer, maximum beer drinker, wrote:
If it please the Samurai, a great way to keep front load washers smelling sweet and also clean is to add up to one cup of vineagar every couple of loads. Economical, and a nice mild disinfectant as well. Can be added during wash cycle, or rinse if you don’t mind a mild vineagar smell.
Awwite, go whup up on some stanky! 

To learn more about your washing machine, or to order parts, click here.
It was a lazy summer afternoon when the call came in on the Samurai Hotline. I awoke from my saké-induced slumber and reached for my iPhone.
“Who gave you this number?” I demanded and then immediately hacked up a hairball. Musta been playing with the cats again whilst I was under the influence of the saké. But being a consummate master of customer relations, I swallowed it back down instead of spitting it out. See, attention to detail like that can make or break a service bidness. Finesse, man, finesse– that’s the name o’ dis game.
“Uhh, hello? Samurai?” the voice asked. “It’s your neighbor, Lucretia. I’m having a problem with the washing machine at my shop in town but it sounds like this is a bad time to call so I’ll just call back after you’ve sober…, er, I mean, when you have more time.”
Ah, sweet Lucretia. She runs the local powder puff shop where high power executives and money managers go to get their bottoms powdered. As you can imagine, her bidness generates lots of towels that need to be washed throughout the day so the washing machine is a critical piece of equipment for her shop.
“No, no, I’m fine,” I croaked, hacking up another hair ball and reaching for a cigarette butt in the ash tray. “I was just performing the essential inner eyelid inspection, looking for pinholes, dontcha know?”
“Uhh, OK…” she sounded unconvinced but persevered anyway. “Anyway, my washing machine is filled with water and won’t pump out. The dirty towels are piling up and I need help! Can you come today and fix it for me?”
“Ain’t no thang, little lady,” I assured her in my smoothest lounge lizard voice. “Lemme take a leak and I’ll come over taco-pronto to whup that bad boy back into shape fer ya!”
“Oh, thank you, Samurai! I knew I could count on you,” she exclaimed. “And if you get here within an hour, I’ll have an ice cold oil can of Foster’s Special Bitter waiting for you.”
Shazzam! Nothing like an offer for free beer to really get the Samurai gears a-grindin’! I bolted out of my easy chair and stumbled down to the Samurai Fixit Mobile with the cigarette butt I rescued from the ashtray. I lit the cigarette as I was peeling out of the driveway so I could look real important to the neighbors. One of my neighbors was out doing yard work and waved her fist at me in a show of solidarity as I sped by. I waved back, realizing that I would have looked *really* cool if I had lit the correct end of the cigarette. When you’re running an appliance service bidness, you have to always be working on improving your image. Details, Hoss– it’s all about the details.
 When I arrived at Lucretia’s powder puff shop, I found the washer just like she said: full of water and wouldn’t pump out. Since this was one o’ them fancy-pants Whirlpool Duet Sport front-loaders, I knowed that the problem was likely a jammed pump.
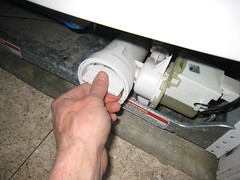 So I pulled off the toe panel underneath the door so I could get to the pump cleanout lid, shown here. Usually, I find all kinds of goodies in there: coins, bobby pins, ear rings, tongue studs, nails, pebbles, used condoms just to name a few of the cherished treasures I’ve recovered. But this time was a little different.
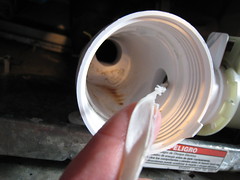 I noticed a little piece of white ribbon sticking out of the pump suction port in the cleanout tube. “YES!” I thought to myself, in my best Engrish, “Easy fix! I’ll clear this, slap it back together and snag that cold Foster’s Bitter that Lucretia promised me.” Ahh, grasshoppah, but here is where the plot thickens.
I tugged on the ribbon and… it wouldn’t budge! Dayyam! The ribbon was wrapped around the pump impeller and, to remove it, the pump itself was going to have to taken apart and cleaned out. A simple three-minute repair just turned into an eight-minute nightmare! “AHHHH!” Don’t worry, I screamed inside my head so’s not to frighten Lucretia; after all, I *am* a professional! But all that screaming in my head made my ears ring. Or maybe it was from smoking the filter on that cigarette butt. Or could be more symptoms of the DTs.
But I digress. I was gonna have to pull the hoses off the pump, unbolt it and remove it completely from the machine so I could doctor on it up close and personal-like. It would take an extra five minutes and I was starting to get jazz hands from thinking about that Foster’s. In desperation, I summoned the gods of appliantology to steady my hands long enough to get the pump out to complete the repair.
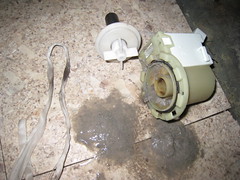 The gods of appliantology made my hammer mighty and empowered me to remove the pump and pull it apart to unwind the ribbon from around the pump impeller. You can see the emancipated pump in its two main pieces here: the impeller on the rotor shaft and the pump housing with the stator winding. I reassembled the pump, slapped it back in the washer and checked for proper operation. Problem solved!
True to her word, Lucretia handed me a Foster’s Special Bitter that was so cold it almost cracked my last remaining tooth. After a few slugs, my hands steadied enough that I could drive the Samurai Fixit Mobile to the local brewpub and complete my fermentation therapy.
To learn more about your washing machine, or to order parts, click here.
tony wrote:
my whirlpool washer do not spin, it is about two years old.
No model number given so I don’t know if this washer is a top-loader or a Whirlpool Duet front-loader. However, based on the improper conjugation of the verb “to do” in your problem statement and my razor-sharp Samurai insight, I intuit that you have a top-loading washer. Here, then, are some choice selections of past posts I’ve written on this very problem:
Whirlpool-Kenmore Direct-Drive Washer with a Lazy Spin
Is it Worth Replacing a Broken Coupler on a Whirlpool or Kenmore Direct Drive Washer?
Mailbag: Making Simple Repairs Complicated
Mailbag: Whirlpool Washer No Spin Problem
Once you figger out what’s wrong, you can come git your parts ratcheer. If you’re still confoosed and need more help, come see us in the Samurai Appliance Repair Forums and we’ll hepya some mo’.
To learn more about your washing machine, or to order parts, click here.
william pearson jr wrote:
Have a kenmore front load washer that will not start only fill with water model # 41741042000 can you help me
The first thing I’ll help you with is punctuation. Start with this handy, concise punctuation guide; go ahead a bookmark it now. In particular, focus your bloodshot squinties on the first step in the guide:
The question mark ( ? ), used at the end of a sentence, suggests an interrogatory remark or inquiry.
This is especially important when you’re writing to someone at their website and requesting their expert advice. Contrary to the opinion of the Great Unwashed Illiterati (GUI), the Internet is still largely a written medium despite the proliferation of Youtube and porn sites.
And commas are nice, too.
As for your washer, the problem could be one of several things. But rather than write a bunch of techno-twaddle that no one bothers to read, I’m going to tell you how to start troubleshooting this yourself and how you can get more help if you need it.
If you’ll remove the bottom quarter panel from the front of the washer (two 1/4″ hex screws at the very bottom) and then peer intently into the dark compartment using appropriate artificial illumination, you’ll find a large envelope pasted to the inside of one of the side walls. Therein ye shall find detailed tech sheets, complete with troubleshooting guide and wiring schematics. Extract from envelope using your preferred hand and grok said material intently whist consuming your flavorite fermented grain beverage.
If, after consuming sufficient quantities of aforementioned beverage, you find yourself no closer to a solution, come ye hither and pour out your love-libation to the Samurai Appliance Repair Forum, start a new topic in the Laundry Appliance Repair Forum and we shall gladly assist you. And ye shall know the truth, and the truth shall make you free.
To learn more about your washing machine, or to order parts, click here.
paul cowan wrote:
I have a Sears 417.42142100 front loading washer. I have the tech sheet and I have followed it. I am pretty sure that I have a problem with the door switch.
How do i replace it? Getting the back off and performing electrical checks is easy, How do I get the front off to get at the door switch?
Ahh, Grasshoppah, this is one of those repairs where less is more. If you were to actually remove the front panel, you would find yourself wallowing in the Pit of Perpetual Despair (POPD) and lamenting the resulting mess that you had created.
Come with me now on a Journey of Grand Illumination (JOGI) and observe the Technique of the Master (TOTM)…
You mentioned that you have already procured the Door Switch Assembly (DSA) for your model. For others reading this post, you should use your model number and look up the door switch assembly for your specific model since there are a couple different versions out based on model number.
 Wisdom! Let us attend! Here, now, I present the TOTM that you’ve all been longing and panting for. Wallah! Uhhh… you know you can click the little pic to enlarge it and read the illuminating commentary, don’t you? Oy! Anyway, once you remove the Top Panel (TP) and peel back the Door Boot (DB), it’s all plug n’ chug. Reattach the DB to the front panel with a couple strategically-placed dabs of rubber cement.
 Now, if Allah has not grinned down upon you and it turns out you have the older style DSA for this machine, well, let’s just say that there ain’t no virgins waiting for yo azz in Paradise, if’n you get m’drift, Slick. Nawsir, you’re in for a bit of Weeping and Gnashing of Teeth (WAGOT). You’ll have a bunch of wire chasing to do and chances are you’ll screw it up the first five tries. The DSA kit comes with instructions but, of course, they suck. The anatomy layout picture shown here will hepya but, dayyam, I’m glad I ain’t you. Been there, done that.
To learn more about your washing machine, or to order parts, click here.
cl jansen wrote:
I have an almost 6 yearold kenmore frontload model 907C4106200 that has just in the last month started leaving grease or somthing on my clothes and gets very loud in the spin cycle. I was told that is was the rear bearing? cost 800.00 to fix. this was diagnosed over the phone. What do you think?
I think it’s time to stop relying on phone or Internet diagnoses and do your own!
 Remove the back panel. If you see a scat-job looking mess back there, like shown in the thumbnail (click to enlarge), then you have the infamous failed drum bearing. This is one whopper of a job, even for seasoned techs. Now may be a good time to go shopping. But, if you’re looking to indulge your inner masochist, this topic in the repair forum will get you started with the repair.