Mailbag: Why has the ice maker in my Whirlpool Gold refrigerator stopped making ice?

Graeme wrote:

I have a Whirlpool Gold 2 Door Refrigerator with an indoor Icemaker. There was no water coming into the icemaker so I removed it to see if I coild figure out why it was not getting water and my Daughter rotated the “ice ejector” you know the thing that says “Do not rotate manually”!! SIGH!! How do I figure out how to get this back into its correct alignment and how do I figure out why there is no water coming upto the ice maker. There is water coming to the water dispenser so that means there is water coming into refrigerator. thanks for your help

Well, budrow, you’re into it for a new ice maker kit right off the bat– if it wasn’t broken before, it is now. A bad ice maker may also be the reason there’s no water getting to it. It’s the ice maker’s job to call for water.

The water inlet valve on your fridge is a dual coil valve: one side for the ice maker and the other for the dispenser. The ice maker coil could be burned out. Check the resistance with your multimeter. If it reads open, it’s bad.

You can find whatever appliance part you need through the parts search box at my website. No harm in buying and trying with our 365-day, no-hassle return policy, even on electrical parts that were installed!

Samurai Appliance Repair Man
The Samurai Appliance Repair Forums – http://appliantology.org

– Posted using BlogPress from my iPad

Whirlpool Duet Sport Washer powers up, locks door, but drum doesn’t tumble or spin; F21, F26

Here’s a typical problem description for this particular failure:

sundevil6 wrote:

My Whirlpool Duet Sport washer won’t run. Washer has power and turns on. When I start it the door will lock and then nothing else will happen. Push cancel and the the add a garment light blinks and washer won’t do anything and the door stays locked. I have to unplug it to get control of the functions again. Went through codes and found 3 of the F21’s and one F26. Tried to run the diagnostic test but it will only lock door and the light blinks continually for the rinse/spin cycle and will not advance the test.

Replaced the door switch and still the same problem. I had the tech sheet and have already tried to run diagnostic test, and it tells me nothing. I had just cleaned the pump out a month ago and when I had the original drain problems the pump would run, but loud like it was cavitating. It did have alot of blockage in it then, but none now. The pump never even comes on when I try to start, nothing happens but the door locks.

Okay, this is an interesting one and illustrates an important point about error codes and how you can’t just blindly follow them.

According to the tech sheet for this washer (located inside the washer; get it by removing the front bottom panel), F26 is “Door Switch Error: If the door has not been opened for 3 consecutive cycles or the door switch is open while the door is locked for more than 5 seconds.” The tech sheet lists these possible causes and procedures:

■ Door not opened during 3 consecutive cycles.
1. Open and close the door.
2. Verify CCU operation by running a Diagnostic Test or any cycle.

■ Door switch open while door is locked.
1. Push the door and check if it is completely closed.
2. Verify CCU operation by running a Diagnostic Test or any cycle.

Not very helpful and, as we’ll see shortly, not even close to the real problem with the machine.

F21 is the “Long Drain” error and this code could have been stored in the control from the pump problem that was fixed previously. Still not relevant to the present problem.

In any front load washer where the drum doesn’t tumble or spin, you want to keep in mind three key components in your troubleshooting: door latch assembly, motor, motor control board. Usually, the problem will be one of these three parts.

In this case, the door latch has already been replaced so scratch that one.

About the only way to test the motor is to measure the resistance of the motor windings and compare to the specification on the tech sheet.

And matt1 from the Samurai Appliance Repair Forums shares with us this technique for checking out the motor control board:

I’ve seen this problem before. Let’s do this:

– Get access to main control board.
– Find MS2 white connector with two pink wires.
– Use your volt meter to check the AC voltage supply to the board: power up then press Start.

If you see 120 vac for a few seconds but the voltage drops back 0 vac, then you have a problem with motor control. On this model, if the drum won’t turn within a few seconds at start up, the unit will freeze and door will stay locked with no water coming in.

But wait! Don’t take my word for it: you can get access to motor control board from the back of the unit– it’s easier that way– remove the motor control board and do a visual inspection. Just looking at it from the outside, you will think there is not thing abnormal. But if you actually removed the board itself from the plastic casing and look on the back, you will notice the burnt mark on the three transistor area right away. You can purchase the motor control board from this web site. I hope this helps.

Part link for the Motor Control Unit ==> Click Here

If you’re still confoosed and need more free help fixing your washer, come start a new topic in the Laundry Forum at the Samurai Appliance Repair Forums and we’ll confoose you some mo’!

To learn more about your washing machine, or to order parts, click here.

How to test the bake or broil element in an electric oven to see if it’s good or not

Everyday I get at least one email about an electric oven that won’t heat up. Many times, the person emailing me had already bought a replacement element hoping that was the problem because they didn’t know how to test their element to see whether or not it was bad in the first place.

This video shows you how to test the bake or broil element in your range so you’ll know whether you need to buy a new element or if the problem lies somewhere in the power supply circuit to the element.

BTW, the technique demonstrated below applies to anything where you’re trying to measure its resistance, whether it’s a heating element or a heat probe.

To learn more about your range/stove/oven, or to order parts, click here.

GE JTP18 convection oven door won’t open after clean cycle; DOOR error on control panel

Don wrote:

GE convection oven model # JTP18WOW1WW Oven has blinking light “door locked” Enter in any temp for oven and DOOR comes up on screeen

Thank you
Don

Issues:

1. Door will not open after self clean cycle due to motorized latch motor stuck in closed position or

2. Grinding noise during motorized lock operation.

Both issues are caused by interference of the inner vent trim slot with the latch arm as it travels to the closed position.

Correction:

Replace both the door lock motor assembly and inner vent trim.

To learn more about your range/stove/oven, or to order parts, click here.

Appliantology Newsletter, August 2011: Appliances and Disasters

Appliantology Newsletter, August 2011: Appliances and Disasters

0. Introduction
1. Can I use my appliances during a disaster?
2. Does it hurt my appliances to run them or have them plugged in while the power is blinking on and off?
3. Can running my appliances off a generator damage them?
4. What about water?
5. How do I store food safely while the power is out?
6. Epilogue

### ### ### ###

0. Introduction

With Hurricane Irene rampaging up the East Coast and record-breaking earthquakes off the coast of Virginia (or a nuclear detonation in a sea bed bunker, depending on who you’re listening to), disaster prep seemed like the obvious topic du jour for this Special Irene Edition of *Appliantology*.

### ### ### ###

1. Can I use my appliances during a disaster?

Using appliances during a storm or other disaster can be risky to the appliance because of the power going on and off, voltage spikes (more on that below), trees falling on power lines, etc.

Even most gas appliances need electricity. For example, the spark module for your gas stove burners won’t work though the burners are still usable by manually lighting the gas, which is perfectly fine; it’s safe and doesn’t hurt the appliance. Just don’t use the gas stove to heat your house!

Most modern gas ovens with hot surface ignition require 120vac to heat up the ignitor and there’s no manual bypass for that so, without a power source, you won’t have an oven.

### ### ### ###

2. Does it hurt my appliances to run them or have them plugged in while the power is blinking on and off?

Absolutely! Every time that power blinks off and goes back on, it slams your appliances with transient voltage spikes. Depending on the severity of the spikes, these can fry control boards right away or slowly degrade them over time through a process called electronic rust. After getting slammed with a finite number of such spikes, the electronic control board(s) will eventually fail (at great expense and inconvenience to you).

To prevent this unhappy and completely avoidable scenario, any appliance with an electronic control board in it– which is most of ’em today– should be plugged into a surge suppressor, not directly into the wall. Surge suppressors for common household 120vac outlets are inexpensive and you can get ’em at your local hardware store. This will provide reasonable protection for all your 120vac appliances. Read more about surge protection for your appliances here… http://fixitnow.com/?p=1523

To protect your 240vac appliances with fancy control boards during a storm, such as an electric range with a digital display, you should switch off the circuit breaker to that appliance until the coast is clear.

### ### ### ###

3. Can running my appliances off a generator damage them?

If you haven’t purchased a generator by now, it’s probably too late for the Irene event. But in case you can (or already have a generator you’re planning to use), here are some fun facts to know and tell about using generators with appliances.

For appliances with electronic control boards– which is most appliances today– you should only use generators that produce a pure sine wave output.

Most generators produce a modified sine wave output, which is not a pure sine wave but more of a stylized square wave. This is fine for motors but not good for the AC-to-DC rectifiers in appliances. The modified sine wave messes with the rectifier, making it overheat and crank out off-spec voltages for the control board. The result is often burned out rectifiers and fried control boards.

Producing a pure sine wave output requires much more sophisticated circuitry in the inverter and usually only comes with more expensive, higher-end generators. It’s a big selling point, too, so if a generator doesn’t specifically say it’s a pure sine wave generator, then it’s safest to assume that it only puts out a modified sine wave.

So, if you do not have a generator that produces a pure sine wave output, be careful to only run appliances that do not have the electronic control boards.

Oh, and one point of safety: don’t run your generator inside the house. I know, it sounds crazy to even say it but there are knuckleheads out there who do that kind of thing. Like this guy… http://fixitnow.com/?p=693

### ### ### ###

4. What about water?

Flood waters in urban areas are a lethal cocktail of sewage, petroleum products, and just about every kind of chemical you can imagine. Simple disinfection (e.g., boiling, chlorine drops, iodine drops, etc.) is woefully inadequate for this water. You can treat the water so it’s safe from pathogens and it can still be lethal because of the gasoline, mercury, or any one of thousands of other contaminants commonly found in urban Ameedika.

The other problem is that coastal flood waters will also be either salty or brackish which, in itself, renders the water undrinkable.

The best treatment for making flood waters potable is distillation. Reverse osmosis is the next best thing. If you can’t treat flood waters using either of these two methods, don’t drink it at all!

Bottled water is the best bet but there are logistical limitations on how much you can store.

### ### ### ###

5. How do I store food safely while the power is out?

I posted some information on food preservation and safety during disasters. You can read it here: http://fixitnow.com/?p=6515.

### ### ### ###

6. Epilogue

As we say in Fukushima, “Rots of ruck, GI!”

Samurai Appliance Repair Man

The Samurai Family of Appliance Repair Websites

The Samurai School of Appliantology
http://appliantology.org

Find and Buy Appliance Parts
http://parts.fixitnow.com

How to replace the Hall Sensor in an LG front-loading washer

So, you tested the Hall Sensor in your LG washer and determined that it’s toast. Now the big questions: 1) Where to get the new sensor? and 2) How to install it?

1. Where to get the new Hall Sensor?

Right here, of course! With fast shipping and a 365-day return policy, the choice of part vendor is clear! Part Link ==> Hall Sensor.

2. How to install the new Hall Sensor?

I’ll let Master john63 from the Samurai School of Appliantology explain that:

1. Unplug washer

2. Remove the rear access panel (4 phillips screws)

3. Remove the large 17mm bolt at the center of the ROTOR
Pull off the ROTOR (has magnetic tension)

4. At the bottom of the STATOR ASSY (Motor Coil) remove the phillips screw on the
metal wire harness-plate. This will allow slack when removing the STATOR ASSY.

5. Remove all of the 10mm bolts from the STATOR ASSY.
Carefully lower the STATOR ASSY & disconnect the HALL EFFECT SENSOR plug.

6. Unclip the *single* tab of the HALL EFFECT SENSOR to remove it from the STATOR.

7. Install new HALL EFFECT SENSOR—verify that all 4 snap/lock tabs are securely
attached to the STATOR ASSY.

8. Re-assembly in reverse order.

To learn more about your washing machine, or to order parts, click here.

How to handle and store food safely during power outages

With Hurricane Irene and earthquakes cranking up along the East Coast and the ensuing power outages that are sure to follow, here’s some timely info on safely storing and handling food during weather emergencies and power outages.

We practice basic safe food handling in our daily lives, but obtaining and storing food safely becomes more challenging during a power outage or natural disasters such as hurricanes and floods.

Steps to Follow to Prepare for a Possible Weather Emergency:

Keep an appliance thermometer in the refrigerator and freezer. An appliance thermometer will indicate the temperature in the refrigerator and freezer in case of a power outage and help determine the safety of the food.

Make sure the freezer is at 0 °F (Fahrenheit) or below and the refrigerator is at 40 °F or below.

Freeze containers of water for ice to help keep food cold in the freezer, refrigerator, or coolers after the power is out.

Freeze refrigerated items such as leftovers, milk, and fresh meat and poultry that you may not need immediately-this helps keep them at a safe temperature longer.

Plan ahead and know where dry ice and block ice can be purchased.
Store food on shelves that will be safely out of the way of contaminated water in case of flooding.

Have coolers on hand to keep refrigerator food cold if the power will be out for more than 4 hours. Purchase or make ice cubes and store in the freezer for use in the refrigerator or in a cooler. Freeze gel packs ahead of time for use in coolers.

Group food together in the freezer—this helps the food stay cold longer.

Steps to Follow During and After the Weather Emergency:

Never taste a food to determine its safety!

Keep the refrigerator and freezer doors closed as much as possible to maintain the cold temperature.

The refrigerator will keep food safely cold for about 4 hours if it is unopened. A full freezer will hold the temperature for approximately 48 hours (24 hours if it is half full and the door remains closed).

Food may be safely refrozen if it still contains ice crystals or is at 40 °F or below.

Obtain block ice or dry ice to keep your refrigerator and freezer as cold as possible if the power is going to be out for a prolonged period of time. Fifty pounds of dry ice should hold an 18-cubic-foot full freezer for 2 days.

If the power has been out for several days, then check the temperature of the freezer with an appliance thermometer or food thermometer. If the food still contains ice crystals or is at 40 °F or below, the food is safe.

If a thermometer has not been kept in the freezer, then check each package of food to determine its safety. If the food still contains ice crystals, the food is safe.

Discard refrigerated perishable food such as meat, poultry, fish, soft cheeses, milk, eggs, leftovers, and deli items after 4 hours without power.

When in Doubt, Throw it Out!

SOURCE: http://www.fsis.usda.gov/factsheets/Severe_Storms_and_Hurricanes_Guide/index.asp

How to test the Hall Sensor in an LG front-loading washer

A common symptom of a bad Hall Sensor in your LG washer is the LE error code (read more). A disconnected or damaged motor harness and even a bad main control board can cause the LE error, too, so you may want to check the Hall Sensor itself to see if it’s working. Here are two ways to test the Hall Sensor in an LG front-loading washer.

Ohm Testing the Hall Sensor

Start with an ohms test because it’s easy. But be aware that an ohms test is not conclusive– it’s merely preliminary. The Hall Sensor (and any other electrical component for that matter) can test good on ohms but still be bad because it can fail under load (when voltage is applied). That’s why ohms testing is just preliminary: if it fails the ohms test, it’s bad; replace the Hall Sensor (same for all LG models).

OTOH, if it passes the ohms test, this does not prove the Hall Sensor is good– you have to go on to the voltage test to prove that.

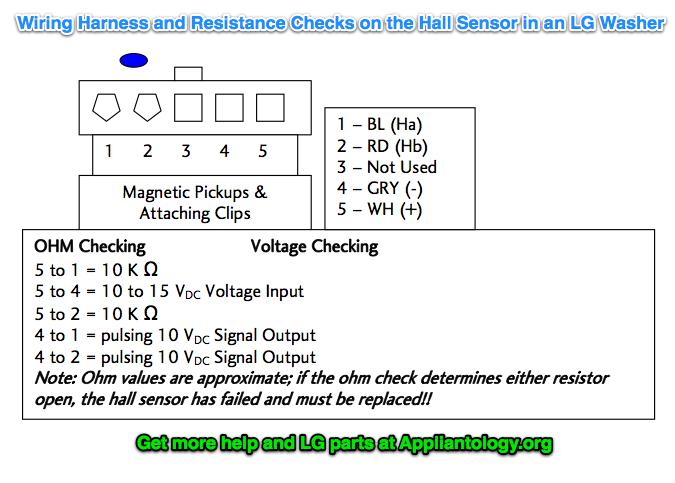
Wiring Harness And Resistance Checks On The Hall Sensor In An LG Washer

If tested off the stator using the diagram above, ohm check the resistors from pin 5 to pin 1 and pin 2. If the hall sensor is good, you should measure approximately 10 KΩ from pin 5 to pin 1 and 10 KΩ from pin 5 to pin 2. If either test shows an open (infinity) the Hall Sensor is defective and must be replaced.

Part link for the Hall Sensor (standardized for all LG models; includes a video showing how to replace it) ==> Hall Sensor

Voltage Testing Hall Sensor at Stator

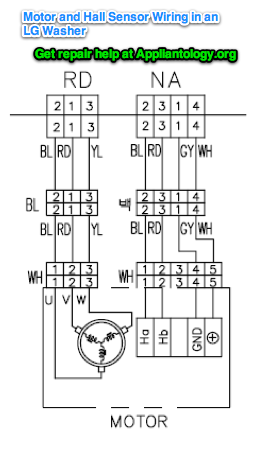
Motor And Hall Sensor Wiring In An LG Washer

If measuring voltage from the control board to the Hall Sensor, follow the following steps:
1. Unplug the power cord.

2. Remove the rear washer panel.

3. Locate the Hall sensor connector on the stator behind the rotor.

4. Place the meter leads on terminals 5 to 4,white to gray.

5. Plug in the power cord,close the door,and press the power button. DO NOT PRESS START!

6. You should measure 10 to 15VDC. If 10 to 15VDC is present,the control board is OK! If not, replace the control board (look up the correct board using your model number).

7. To measure output signal voltage from the Hall Sensor, carefully move test leads to terminals 4 (gray) to 1 (blue). Slowly rotate the motor rotor by hand. You should read a pulsing 10 VDC. If 10VDC is measured from 4 to 1, move the lead on the blue wire to the red wire, terminal 2. Repeat rotating motor rotor by hand. You should read a pulsing 10 VDC.

8. If pulsing 10VDC is measured from pin 4 to pin 1 and pin 4 to pin 2, the hall sensor is OK! If either test netted only 9 to 10 VDC without changing (no pulsing) the hall sensor is likely defective; replace the Hall Sensor (same for all LG models).

To learn more about your washing machine, or to order parts, click here.

How to fix your gas oven that doesn’t get hot enough and save $800!

Amanda wrote:

Hello,
Just wanted to thank you for the great advice on forums. My 5 year old viking oven wouldn’t heat beyond 250. Per your advice, I replaced the ignitors (following your great video/picture demo). Viking service quoted me $900 to fix! I spent $112 on the ignitors and did it myself with your help. Working great now! Thank you thank you thank you!

That’s what Fixitnow.com is all about: Fix it yourself and save Big Bucks!

Here’s the page that Amanda used to help her replace the ignitor ==> http://fixitnow.com/wp/2008/08/06/how-to-replace-the-ignitor-in-a-gas-oven-a-pictorial-guide/

And here’s a tip for saving even more $$ in this repair. All oven ignitors are made of the same material: carborundum. The real variable is the length of the ceramic insulator and the type of wire connections. Here’s another fun fact to know and tell: Viking ignitors suck. They basically take the Maytag universal ignitor kit rejects, slap a Viking label on it and jack the price up almost three times. Next time, cut out the middle man (Viking) and get the Maytag universal ignitor kit:

Maytag universal ignitor kit

I have successfully used this ignitor on many other brands of ranges including Viking and Garland. This ignitor is less than half the price and lasts far longer.

To learn more about your range/stove/oven, or to order parts, click here.

How to locate the thermal fuse in a GE Profile “Hydrowave” washer

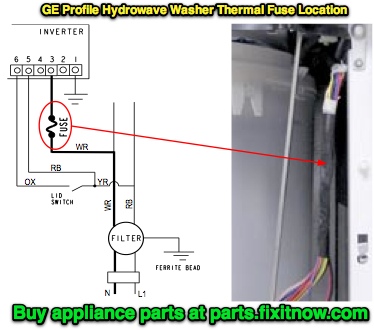
You know you have a blown thermal fuse in this washer when the control panel lights up but the motor doesn’t run; you check the status LED on the motor (see this post for more on that) and it’s dead, no lights, nuttin’. That’s a blown thermal fuse. Here’s where it lives:

GE Hydrowave Washer Thermal Fuse Location

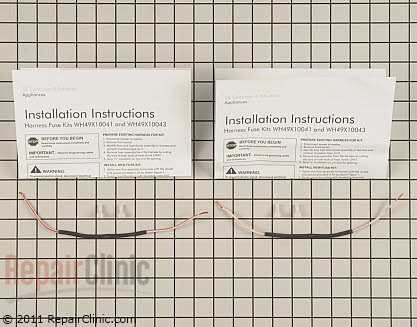
Here’s what it looks like:

Thermal Fuse
(click image to purchase)

And you can buy the replacement right here ==> Thermal Fuse. The replacement kit comes with complete destructions.

To learn more about your washing machine, or to order parts, click here.

Why does a new-ish Bosch 500 WFMC front-load washer make a ratcheting sound during spin?

Listen to a few seconds of this video (don’t listen to the entire thing because it’ll eat your brain):

Sounds remarkably similar the sound that bad tub bearings will make. This particular washer is only three years old– very early for tub bearing failure.

The actual problem turned out to be something very simple: a loose concrete counterweight mounted to the front of the tub. A few minutes with a wrench and problem solved– no parts needed for this repair!

To prevent the problem from happening again, add Loctite to each of the counterweight mounting bolts.

To learn more about your washing machine, or to order parts, click here.

Tech sheet location and thermistor information for Samsung dryers

Sublime Master of Appliantology john63 at the Samurai School of Appliantology enlightens us on two key aspects of Samsung dryers: tech sheet location and thermistor operation.

On the rear/back of the dryer—there’s a TECH SHEET in a plastic pouch.

On the sheet—you’ll find the test values for various components.

THERMISTORS can fail and still not trigger an error display. Check the OHMS value (at room temperature) with a test meter.

Also, the thermistor is not in series with the heat element, the thermostat is.

The thermistor detects temp changes in the dryer by changes in resistance, which are interpreted by the control determining when to turn the heat on and off…

The THERMISTOR has a *coating* on it that becomes scratched/chipped over time by tiny particles in the blower housing. The salty air then corrodes the THERMISTOR (no heat at all).

Read more: Samsung DV337AEG Repair


(click image to purchase – 365-day return policy)

To learn more about your dryer, or to order parts, click here

Whirlpool Duet Sport Washer stops mid-cycle and display beeps and blinks, relay chatter on CCU

The surprisingly simple solution is revealed in this topic at the Samurai School of Appliantology – http://appliantology.org/topic/32407-whirlpool-duet-washer-wfw9150ww00-literally-on-the-blink/

To learn more about your washing machine, or to order parts, click here.

How to disassemble a Whirlpool Duet Sport dryer (also sold under the Kenmore label)

You may need to tear down this dryer for a variety of reasons: replace the belt, drum rollers, heating element, etc. This video shows you how to do it the right way:

Common replacement parts in the Whirlpool Duet Sport dryer (click to see photo and/or purchase):

Heating Element Assembly

Thermal Fuse

Door Latch

Thermistor

Idler Pulley

Lint Filter

Drive Belt

Thermal Fuse and High Limit Thermostat

Drum Roller

Drive Motor

Blower Wheel

To learn more about your dryer, or to order parts, click here.