Monthly Archives: August 2003

Mailbag: Error Codes on a Whirlpool Calypso Washer

Warren Wood wrote:

Why can’t Sears figure out how to repair my Calypso washer? They have been out here three times, replaced all the boards and claimed that the long drain pipe their guys installed was siphoning water out of the machine.
The problem: machine runs fine in “normal” mode until it moves out of the first cycle then the “CA” warning comes on and the machine stops. When we open the lid, the machine stops completely (ie. it is off, not in standby).
Any ideas?

_______________________________
The above message was sent when you were offline, via your LivePerson site.

Message sent from IP: 4.46.185.116

Because they didn’t bother reading the manual.

The CA code means that the average current draw at the motor winding has exceeded 5.55 amps for more than two seconds. This could mean a problem with the drive motor, the thermal protector, or the motor controller board. Overloading the washer can also cause this fault. Page 57 of the manual gives specific tests for the drive motor and wiring harness. Start there.

Mailbag: Wiring an Electric Stove

JANE wrote:

CAN YOU TELL ME HOW TO WIRE AN ELECTRIC STOVE, WHAT WIRES GO WHERE?????

_______________________________
The above message was sent when you were offline, via your LivePerson site.

Message sent from IP: 207.40.91.193

A deliciously nebulous question! And the Samurai has some deliciously nebulous answers.

If you’re trying to wire the three-prong outlet for your electric stove, this page should help.

If you’re trying to wire the four-prong outlet for your electric stove, this page should help.

Mailbag: Opening a Whirlpool or Kenmore Direct Drive Washer

kathy wrote:

I figured out that my kenmore washer(110.26292695) needed a new lid switch,bought one(and a manual), and came home to install it. The manual said there should be clips in front to open the top of the washer. Not on my model How do I get to the screw to get the green ground wire?(I don’t know if that’s what it is)off the wall of the washer? Please help.. my husband is not mechanical AT ALL!!! I have a one year old, tons of laundry, and Sears can’t come out until next Sat. I’m so close to fixing it I can taste it!!!

_______________________________
The above message was sent when you were offline, via your LivePerson site.

Message sent from IP: 151.199.152.97

This is a Whirlpool-built direct drive washer. It opens up a little differently from what you might expect. Many people, thinking the top panel pops up, begin ruthlessly prying on the seam between the top and front panel and only end up with a disfigured washer. I’ve seen more adventurous types actually remove the entire back panel, getting them no closer to what they were trying for. Let the Samurai enlighten you.

The entire cabinet removal procedure is illustrated in this diagram. Even though the procedure is very straight forward, a couple of fine points are worth mentioning:

  • Some Kenmore-branded versions of this washer use plastic endcaps to cover the console screws. Just remove the console end caps and the console retaining screws are right there. This technique is illustrated in this photo.
  • Once you’ve removed the console screws, flip the entire control console up and back to reveal the cabinet retaining braces, shown here.
  • After you pull the cabinet back and away from the washer, here’s an illustrated anatomy of your naked washing machine. The lid switch is screwed to the inside of the cabinet top panel and is easily accessible with the cabinet removed.
  • Replacing the cabinet is usually very straight forward but sometimes little snags can arise. Some helpful hints for replacing the cabinet are explained here.

With the washer cabinet removed, you have easy access to the lid switch. You may find that the actuator lever is broken. If the actuating lever looks ok, then you should use your ohm meter to check the continuity of the lid switch. Many times, if the switch is bad, it will no longer make a clicking sound when you actuate it. Your lid switch can be replaced using one of the kits below, most likely the older style. But you can easily confirm this by feasting your Vulcan squinties on your washer’s lid switch.

Older-style Lid Switch
Older style lid switch and plunger assembly for a Whirlpool or Kenmore direct drive washer--click for larger view.
Newer-style Lid Switch
Newer style lid switch for a Whirlpool or Kenmore direct drive washer--click for larger view.

Ok, tear ’em up!

UPDATE: There is at least one other variation on the lid switch used in this washer. For example, this one. Be sure to look up the exact one you need using your model number.

To learn more about your washing machine, or to order parts, click here.

Appliance Tip of the Day [Encore]: Preventing Washer Floods

this is you, grasshopperYou put a load of dirty clothes in your washer, start it up and walk away to watch Jerry Springer just like you have a thousand times before. Only this time, something goes wrong…very wrong!

After the booing and cheering on the Jerry Springer show stops, you hear an unfamiliar sound of running water coming from the laundry cubby just down the hall in your trailer. You set the bag of Doritos aside, grab your can of Old Milwaukee and grunt your way out of your Lazy Boy as you exhale the last drag of your Marlboro and shuffle down the hall to investigate. You don’t get 10 steps before your pink bunny slippers are sloshing through a huge pool of water. Now the bile starts burning the back of your throat and you feel your sphincter dilate as you prepare to do battle with the single greatest horror of your lifetime: a washer flood out.

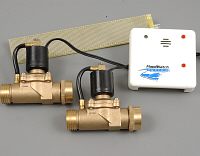
FloodstopYes, it finally happened: your washer dutifully filled with water and then…it just kept right on filling, and filling, and filling… Turns out that the water level control switch in your washer decided to take a permanent vacation and so never told your washer to stop filling with water. Hi. Welcome to my world. Oh! But if only you’d listened to that nice appliance repair guy not long ago who told you that you really, really needed to have a Floodcontrol on your washer and that it was cheap insurance against a devastating washer overfill. But that money was earmarked for that Dish TV you’ve been lusting after for so long and, besides, you’re not sure you trust people who can throw around fancy words like "devastating." Damn straight! Well, Bubba, now you’ve got one helluva mess to clean up in your trailer, ain’t ya? Hey, newsflash: do yourself a favor and come git you some o’ dis.

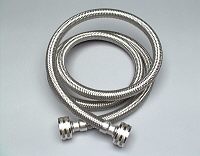
Universal Stainless Steel Water Fill HoseAnd while you’re at it, go ahead and upgrade those cheesy 12-year old rubber fill hoses on your washer to the steel braided hoses. What, you’re gonna wait for those to burst and find water spraying out from behind your washer like a firehose on that ’71 Cutlass you got parked out front? Haven’t we learned our lesson by now? How long? How long? I say, how long must this bullshit go on? How ’bout when we do a job, we go ahead and do it right? Ok then, come git you some steel braided hoses, too.


grasshoppers watching jerry springer with the master while they do a load of wash confident that their trailer won't get flooded out on them because they just installed a floodcontrol.

Pearls from the Field: Gettin’ Hosed

I was out on a service call for a washer the other day and noticed that the fill hoses were in pretty bad condition. I pointed this out to the customer and recommended that she install steel braided fill hoses with stainless steel fittings to avoid these problems in the future.

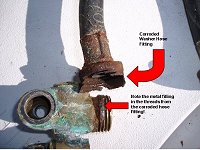
flood waiting to happen--click for larger viewWhen I removed the rubber fill hoses with the badly deteriorated fittings, at least a quarter of the cheap brass fitting on the washer fill hose had rust-welded onto the water valve, shown here: (click the picture for a larger view)


steel braided fill hoses for peace of mind.  come git you some.Admittedly, this is an extreme case, but here’s the kicker: your washer hoses can be in much better condition than the hose shown above and they can still burst! How ’bout we avoid this unhappy event by installing steel braided fill hoses?


Want more pearls of wisdom on preventing washer floods? Ok, read this.

Mailbag: F7 Error Code on a GE Built-In Oven

Freda Criscione wrote:

Have GE Built in oven. Model:JT910BOA1BB Ser:AV625749Q After baking at 350 for 3 hours and then self cleaning oven for 4 hours, had F7 error code. Pushed clear/off – got F7 again. Turned off power to unit – got F7 again. Ordered electronic control unit from RepairClinic.com. Replaced control. Tested oven – heated up, turned off, self-clean started, door locked, etc. – looked fine. Used oven 3 days later (heated at 350 for 2 hours), that night F7 displayed again AND oven heated on its own. Pls advise. Do I have a key pad problem instead??

_______________________________
The above message was sent when you were offline, via your LivePerson site.

Message sent from IP: 65.43.161.155

I worked on one of these recently, exact same problem: intermittent F7 error code. I couldn’t even get it to do the F7 error while I was there. There’s a pretty good tech service sheet inside the control panel. I followed its procedure for testing the keypad (which was nothing more than pressing all the buttons and hearing it go “BEEP!” ).

But the tech sheet did mention that intermittent F7 problems are usually caused by poor connections. So I pulled the ribbon connector off the control board and cleaned the copper connectors using a pink pencil eraser. That whupped that puppy!

But then I went out on another service call, same oven, different house. The pink pencil eraser trick didn’t work on this one so I had to apply some of that famous Samurai gray matter. To identify the problem on this one, I cut power to the range and disconnected the ribbon connector that connected the touch pad to the electronic range control (ERC) board. Then I re-applied power and let it sit that way for 24 hours after which the customer was instructed to call me and report on the error code status of the oven. If no error code was reported, I knew the touch pad was the problem. If, on the other hand, the F7 error code came back, then I knew the (ERC) was the culprit. In this case, the error code did not come back during the test period and, using my keen, Vulcan-like powers of deduction, concluded that the touch pad was defective. I replaced the touch pad and problem solved!

It’s important that you don’t skimp the disconnect test because there’s a big difference in price between the ERC and touch pad. So, you want to be right on this one. Ok, after you do this test and determine which part you need to replace, come and get it here.

To learn more about your range/stove/oven, or to order parts, click here.

Mailbag: Stove Burner Indicator Light Stays On

Ed wrote:

My GE JBP22GR2 range cooktop burner-on indicator light stays on after the burners are off. It’s a little brighter when a burner’s on. Is there a sensor or something that needs to be replaced?

_______________________________
The above message was sent when you were offline, via your LivePerson site.

Message sent from IP: 68.165.198.14

The pilot light terminal on one of the infinite switches is shorted. The infinite switches are the ones you’re turning when you turn on the surface elements. You’ll need to open the control panel to access the switch wiring. Here’s what the back of the switches look like and how to test them.

To learn more about your range/stove/oven, or to order parts, click here.

Mailbag: Maytag Atlantis Washer Squeals

Keith wrote:

My Maytag Atlantis washer began making this horrendous metal-on-metal type grinding sound in between the wash and rinse cycles. Water still in the tub. Maybe a belt??

_______________________________
The above message was sent when you were offline, via your LivePerson site.

Message sent from IP: 207.40.147.32

That’s probably the brake. More good info on that in this Appliance Tip of the Day.

Appliance Tip of the Day: Icemaker Water Filters

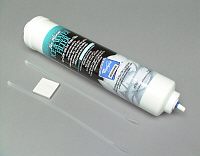
appliance tip of the day archiveicemaker water filterIn-line water filters installed on your icemaker water supply line can remove bad taste and scale from your ice as well as protect the water inlet solenoid valve, saving on annoying and costly repairs later on. But did you know they should be changed every three to six months? Yes, my icy grasshoppers, it is true.

As the filter removes the impurities from your water, it not only becomes saturated with those very impurities, but it is transformed into a veritable metropolis for bacteria. These little creatures multiply and grow to such an enormous extent that they actually begin to clog up the filter with their dead corpses. New little bacteria babies begin living and feasting on the rotting corpses of their fallen parents and cousins, clogging the filter, causing low water pressure, and the resulting hollow ice cubes. At this point in the filter’s life, millions of dead and living bacteria, the mixture variously called scum or puss, normally not visible but in extreme cases may cause the ice cubes to appear cloudy, begin sloughing off and traveling with the water to your icemaker. As you use the ice, you ingest these little creatures where they attempt to make their new home deep inside your intestines. The results could range from simply bad tasting ice, to a feeling of a sour stomach, to mild nausea, to violently vomiting up the entire contents of your stomach along with much bile and other slimey secretions.

Most refrigerators today with ice makers or water through the door have water filters built in, which is much more convenient than installing one in the water supply line from your water source. Your refrigerator water filter is most likely located either inside the refrigerator cabinet, near the top or in the grill at the bottom of the unit. Use this handy list to find the filter you need for your fridge:

If you don’t see yours listed above, come browse the complete selection of icemaker water filters.

Ok, go buy your icemaker water filter now and don’t forget to change it at least every six months.

grasshoppers sitting down with the master to sip margaritas made with pure, clean ice from their new filtered water supply