Author Archives: Samurai Appliance Repair Man

International Acclaim for the Samurai

From: “TWO WELSH APPLIANTOGISTS”
Subject: When you were offline (via LivePerson)

Thanks from two happy appliantologists in Cardiff Wales. Great diagrams and instructions. You’ve saved the day twice now, once with an F1 fault (in July) and now installing a new inlet hose for the 603.
You’re the best!
T


_______________________________
The above message was sent when you were offline, via your Timpani site.

Message sent from IP: 86.140.245.26

Like our motto says:

Our silly motto... eh heh.

😎

How to Clean Out the Blower Chute in a Whirlpool-built Dryer

From: Carol
Subject: When you were offline (via LivePerson)

We have an old kenmore gas dryer (model # 110-77884100). The lint trap screen is about 2 feet long by 6-8 inches wide. As I was putting it back into the slot after cleaning the screen off, I pushed some plastic part (about 2 inches long) off of my child’s car seat into the lint trap. I turned on the dryer thinking it was a enclosed box (the lint trap) but it didn’t sound like that after turning it on. I know, most important thing to remember is to not keep stuff on top of the dryer. Now I’ve learned the hard way! My question is how to get to that long lint trap without having to take apart the whole dryer (if possible). Please send me some good news soon as I have two loads of wet clothes sitting in a damp basement and I have no where to hang them!!! Thanks.
Sincerely, Carol

_______________________________
The above message was sent when you were offline, via your Timpani site.

Message sent from IP: 71.63.150.208

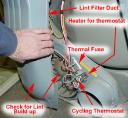
Blower Wheel Access on a Whirlpool-built DryerPiece of pie, tovarish! Just remove the back panel (a dozen or so ¼” hex screws around the perimeter, they’re obvious) to expose the blower wheel chute. Then, remove the chute retaining screws and, WALLAH! there you be. Remove the offending debris and you’re back in bidness. Click the thumbnail pic shown here for a closeup shot of this appliantology technique. If you need parts for your dryer, come git you some!

Still confoosed, Grasshoppah? Come see us in The Samurai School of Appliantology.

Replacing a Bad Heating Element in an Electric Dryer

From: Jeffery P.
Subject: When you were offline (via LivePerson)

Quick Question.

I have a Roper Drier and the Heating element is bad. I tested it by disconnecing all wires and check continuity and there is infinite resistance so it is no good. The question is if I replace that, is there anything else I should replace along with that?

_______________________________
The above message was sent when you were offline, via your Timpani site.

Message sent from IP: 64.252.209.91

Quick Answer:

No.

Perspicacious Caveat:

Use all wires and connectors, if any, included with the replacement OEM heating element kit.

Valorous Parts Guidance:

If your Roper or Whirlpool electric dryer is less than 12 years old, this is probably the replacement element you need. And regardless of the brand or age of your dryer, you can find replacement heating elements or any other part, as well as dryer disassembly help ratcheer.

To learn more about your dryer, or to order parts, click here.

GE Wall Oven with F7 Error

From: Mary
Subject: When you were offline (via LivePerson)

We have a GE electric wall oven with a F7 error, can you help us repair?

_______________________________
The above message was sent when you were offline, via your Timpani site.

Message sent from IP: 151.207.246.4

Yeah, us old timers remember back in aught-three when this problem was in vogue. Now, four years later, it’s been relegated to the memory banks of appliance repair. However, luckily for you, the ancient wisdom for this problem has been preserved in this scroll from the Appliantology archives.

Unlocking the Appliance of Love

From: lee
Subject: When you were offline (via LivePerson)

thank you master you helped me unlock my mistery (control lock)

_______________________________
The above message was sent when you were offline, via your Timpani site.
Message sent from IP: 74.116.149.101

Whether you’re trying to unlock the heart of your mistery or your missestery, the Samurai has the key.

Samurai Appliance Repair Man: puttin’ the love back into appliance repair.

The Rational Art of Troubleshooting

This email from one of my Live Help disciples is a great illustration of the kind of attention to detail and concentration you need to have while troubleshooting. I like to call troubleshooting the “rational art.” Yes, there are techniques and cause-and-effect relationships that you need to know but, as illustrated in this repair story, there’s also something more, something supra-rational that isn’t learned in text books; this is the Edge of the troubleshooting katana.

In this repair story, my apprentice, Chris, is struggling with a GE wall oven that kept throwing an F3 code while in use. Typical of most F-codes, the manual simply says to check the sensor and its connector. Chris did this and found nothing unusual. The sensor resistance at room temp was normal. We talked about it on the phone and I recommended that he get another sensor resistance reading at a higher temp to rule out the possibility of a non-linear response from the sensor. This is where the story picks up.

Samurai Appliance Repair Man

The Samurai Family of Appliance Repair Websites

Sent from my iPhone

Begin forwarded message:

From: Chris H.
Date: September 13, 2007 6:18:20 PM EDT
To: Samurai Appliance Repair Man
Subject: success!

Scott,

FYI I did test the oven sensor. It was perfect at boiling water. So I set it in a pan of cooking oil and used my turkey fryer thermometer, cranked the oil up to 500 degrees with the sensor in it, hooked to my multimeter.

Its supposed to do ~2 ohms for every degree F above room temp. So at 212 in water it drew almost exactly 1380 OHMS, could even watch it go up with the heat. Same with the oil at 400 degress it was supposed to draw 1756 ohms and at first it was perfect at about 1790 OHMS. I was bummed at first and gave up but after a few more minutes, actually as I turned it off it jumped to 2400 ohms around 440 degrees! This is incorrect, it should be 1836ohms at 440. As it cooled, the ohms stayed in the 2400 range until around 300, then jumped back down to 1550 or so. Interesting. Not sure what went wrong in the sensor to be so erratic. Its 11 years old and get heavy use.

A new sensor has been placed and all is functioning well. The new one did come with ceramic wire nuts BTW.

another samurai success story.

CH

Troubleshooting a No-Spin Problem on a Maytag Atlantis Washer

Your Maytag Atlantis washer isn’t spinning. Is it the lid switch? Pulley? Riser cam? Thrust bearing? So many possibilities! Alas, how’s a sensitive, New Age grasshopper to know which one it is? The lid switch is easy enough to confirm by doing a simple continuity test on it. But mechanical problems with the transmission and drive pulley assembly can be more elusive and downright baffling to the uninitiated.

Well, you just unbunch those panties, budrow, ‘cuz several Master Appliantologists have dispensed precious pearls of wisdom in the repair forum on how to diagnose this problem. Oh, taste and see the wisdom of the Masters!

Fault Codes for the Whirlpool Duet Sport Washer

This machine uses an electronic beep-beep board for the user interface (in violation of the 5th Law of the Prophecy). So, you can bet your sweet derriere that you will be seeing fault codes in the display. In rare instances, fault codes give useful diagnostic information; usually, however, it’s just more infuriating techno-blather that’s about as helpful as a poke in the eye with a ca-ca stick.

All fault codes for this washer start with an “F,” which ostensibly stands for “fault” but I’ll let you fill in your own favorite F-word. So, for example, you might see F01, which means the CCU is FUBAR.

When you see an F-bomb flash in your Duet Sport’s control console, you’ll want to have this list of fault codes handy so that you can enhance your confusion but still feel like you’re doing something, anything!, to get the damn thing fixed.

Need more help? Come see us in the repair forum.

Washer Fills and then Makes a Humming Noise

From: Molly
Subject: When you were offline (via LivePerson)

Hello,

My direct drive Whirlpool washer filled up and started making a humming noise. What should I look at first? (I’m a girl, please give me directions with that in mind 🙂

Thanks!

_______________________________
The above message was sent when you were offline, via your Timpani site.

Message sent from IP: 24.22.149.166

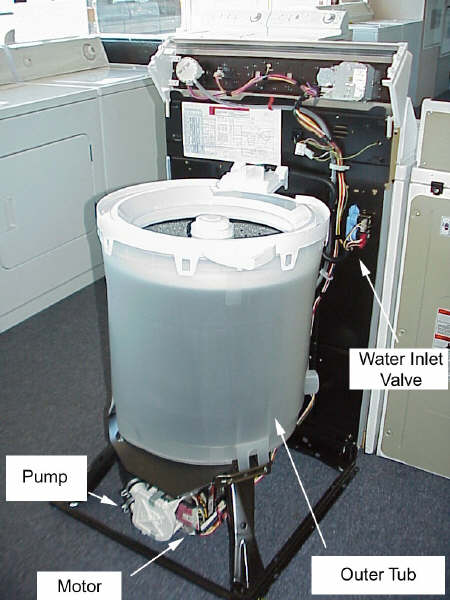
Like, OMG, I would SO be looking for something caught in the pump, fer sher, you know? The pump on this washer is directly connected to the motor; so if the pump is jammed, the motor is jammed, too. Fortunately, this is one of the easiest washers to work on. The entire washer cabinet comes off, giving you easy access to all the guts; it’ll look like this…

Whirlpool Direct Drive Washing Machine with the Cabinet Removed

… and you’ll see the pump right down in front, as shown above. Pry off the two clips on the pump, pull it off the motor, and tie it back.

Now bypass the tan and gray wires on the three-wire lid switch harness using a length of insulated 12 gauge wire as a jumper wire. If the motor runs after the tub fills, then you know you need a new pump. Come git you one!

Dryer Takes Forever to Dry a Load of Clothes

From: Janice
Subject: When you were offline (via LivePerson)

I am renting a condo which has a Kenmore stackable washer & dryer, model no. 88752. The dryer does not dryer my clothes in 40 minutes, I end up having to run the load another 30-40 min. And I am not overstuffing the dryer. I have cleaned the lint filter, what else could be the problem. Meanwhile, my elec. bill is climbing, I have resorted to an old-fashioned clothes line which actually works well in the Florida sunshine but not always practicable on rainy days. Plus I am a working gal. Please help. My landlord is sending a repairman over but I have a feeling he will say it’s heating okay. Never gets super hot. What do you think?

_______________________________
The above message was sent when you were offline, via your Timpani site.

Message sent from IP: 67.132.198.254

This is a classic case of a bad dryer vent.

Let’s start with a quick, simple review of how dryers work. Dryers get clothes dry by doing two things: 1) heating them up so the water can evaporate and 2) moving lots of air to get rid of that evaporated water so that more can evaporate.

See, you can heat the clothes all day long but if the air above those clothes is already saturated with water vapor (i.e., at 100% relative humidity), then all you’re gonna have is warm, wet clothes because the air can’t hold anymore water vapor. Now you begin to understand why the dryer vent is so crucial… and so misunderstood.

“Yeah, nice theory, Samurai Poindexter, but what does this mean about MY dryer; I, ME, MINE!”

Oh, take a pill already. Pull your stacked dryer monstrosity out from the wall and look behind there. I’ll bet you’ll find that collapsible, spiral wound duct material for your dryer vent. What happens to that material when you push the dryer back against the wall? Right: it gets crushed. And what does that do the air flow through the dryer? Hey, is that a light bulb I just saw go on over your head or is it the light of my own brilliance?

With this enlightened understanding of how dryers work, you are ready to grok the Ultimate Dryer Venting Guide.

Kenmore Dryer Dead

From: Jerry
Subject: When you were offline (via LivePerson)

my kenmore dryer will not do anything. it is getting correct voltage and the door switch checks good. from what i have read here, it could be a thermal fuse. however i can’t find it. it is a 110.63012101

_______________________________
The above message was sent when you were offline, via your Timpani site.

Message sent from IP: 72.150.96.56

You’re on the right track– an open thermal fuse kills power to the motor circuit in most dryers. To drive this nail home, all you need to do is go to my dryer disassembly page, look up your dryer (Whirlpool-built, with lint filter on the top panel), and sing along with the disassembly instructions.

Once you locate the thermal fuse and have it nestled in your furry palm, test it with your multimeter to see if it’s open or closed; open = bad, closed = good. For common replacement parts, including the thermal fuse, come check out this convenient page, thoughtfully constructed with YOU in mind.

To learn more about your dryer, or to order parts, click here.

How to Open the Control Panel on a Jenn Air or Maytag Slide-In Range

From: brownging
Subject: When you were offline (via LivePerson)

I would like directions to replace the touch panel on the front of our Jenn-Air stove #svd48600. The part number is #695500
Thanks
_______________________________
The above message was sent when you were offline, via your Timpani site.
Message sent from IP: 151.203.164.27

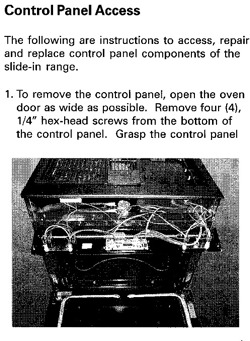
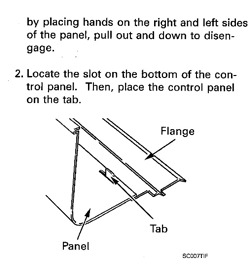
Ahh, Grasshoppah, ax and ye shall receive!

Opening the control panel on a Jenn Air or Maytag slide-in range, 1 of 2

Opening the control panel on a Jenn Air or Maytag slide-in range, 2 of 2

Now, go and do likewise; give to those who ask of you. If you don’t have anyone to give to at the moment, then how ’bout giving to my flavorite charity?

How to Get Help in the World-Famous Samurai Appliance Repair Forum

From: hottip
Subject: When you were offline (via LivePerson)

I want to post a problem with my GE GSS25LGMB CC. Da Refrig side freezes da fud and da Moose Drool. Where do I start. I Have big sledgehammer and chainsaw tools. ready to order da parts now. While sunning wife in tropics, water filter froze and spray lots water in house. House fixed but GE still broke may need wrecking crew soon. Frozen beer to chewey. HELLLLPPPP
_______________________________
The above message was sent when you were offline, via your Timpani site.
Message sent from IP: 24.113.76.230

Whether you’re working on a GE refrigerator, an Asko Oh-NO! dishwasher, or a Scrotilia scrotum scrubber, the procedure for posting a problem in the world-famous Samurai Appliance Repair Forum and getting help from a Master Appliantologist is the same. Sing along with me now…

1) Cut a hole in the box.

2) Put your junk in that box.

Whoops! Sorry, guess I had Christmas on my mind already because I was thinking of that touching video, “A Special Christmas Box.” Alrighty then, let’s try that again.

To get help in the repair forum…

1) Register at the forum.

2) Make a love-offering to the forum.

3) Post your question in the appropriate forum (eg., Kitchen Appliance Forum, Laundry Appliance Forum, etc; don’t even try to start a new topic in the General Appliance Forum because you can’t. Why? Because. )

And then await appliantological wisdom from on high. If you need more verbose instructions, komen zie hither, bitte.

OK, see you on Hollywood Squares!

Draining Problem with a Kenmore – Whirlpool – KitchenAid “PowerClean” Dishwasher

From: patty
Subject: When you were offline (via LivePerson)

Hi there. hope you can help me. I have a kenmore dishwasher that is having drainage issues. it was draining slow so my husband rather than first checking hoses for clogs decided to take apart the assembly inside the dishwasher that spins and sprays the water on the dishes. he got it back to gether but now it doesn’t drain at all. there were 2 little white balls that he couldn’t figure out where they go. i’m guessing that might be the trouble. we did check the hoses and there was a clog that is now cleared. the model number is 655-16765691. I would apprieciate any help you can give. thanks

Patty
_______________________________
The above message was sent when you were offline, via your Timpani site.
Message sent from IP: 71.216.0.141

Sounds like you’re wrestling with the flavor of Whirlpool dishwasher (despite the “Kenmore” label, your dishwasher was manufactured by Whirlpool) that has the famous PowerClean module. These are the nuclear bomb of dishwashers and were some of the best dishwasher pump assemblies ever made. All dishwashers made today are limp-wristed little bedwetters made to comply with the Gubmint’s Energy Star requirements– for more about this, see my narrowly-acclaimed screed, “Any Good Dishwashers Today?

Anyway, if you are fortunate enough to have one of the venerable PowerClean beasts, then it sounds like hubby has misplaced his balls… the two little check balls you referred to in your email, that is. Eh hem. The correct placement of these check balls in the pump assembly is muy grande essential to the proper water pressure development and distribution in this machine. I won’t bore you with the details here because it’s all spelled out in this repair forum topic, complete with annotated and custom-made illustrations. Go git ’em!