Author Archives: Samurai Appliance Repair Man

Kitchenaid Dishwasher Goes Through the Cycles Really Fast

JKJK65 wrote:

Kitchenaid undercounter dishwasher KUDM01TJWHO

When you press start the normal and wash light comes on and sounds like water starts for about 5 seconds then water heating light comes on for 2 seconds then rinse light then the dry light and then the clean light all for about 2 seconds each then the clean light goes right out instead of staying on. It basically goes through all the cycles in about 11 seconds. If I press one of the special options the light will not stay on. The motor all sounds a little like it is binding, but not sure. This all started when my son was pushing all the buttons. Not sure if it is a coincidence or he did something. Any help would be appreciated, Thanks

Sounds like your son managed to put the dishwasher in sales demo mode. There’s a keypad dance to change it’s tune.

Press the following key sequence in less than 3 seconds:

High Temp – Air Dry – Air Dry – High Temp – Air Dry – Air Dry

To learn more about your dishwasher, or to order parts, click here.

Important Things You Need to Know About Buying Appliance Parts Online!

Fixitnow.com offers a complete line of appliance parts for all brands and models through our parts partner, RepairClinic. We could have partnered with any number of other appliance parts retailers on the web, but we chose RepairClinic. You won’t find a more complete selection of appliance parts, better customer service, or a more lenient return policy anywhere else. And all at great prices! By clicking through to RepairClinic using the links below or anywhere else at Fixitnow.com or ApplianceGuru.com, a small percentage of your purchase goes to supporting this website without costing you one penny more for the parts you order. So, if you’re going to order appliance parts anyway, how ’bout using the links on this website to ensure that the Samurai will be here the next time you need appliance repair help? Rock on!

Like to shop locally?  Hey, you can’t get anymore local than right here on your compooter screen!     

And does your "local" parts house give you a 365-day no-hassle return policy?  Even on electronic control boards that you already installed?  No?  So… why do you buy there?

I‘ve got some convenient parts search tools right on this page, too. You can either use the yellow parts search box at the top of the page or browse by brand below:

Browse by Brand


Admiral

Airtemp

Amana

Aprilaire

Asko

Auto-Flo

Bemis

Bosch

Broan

Caloric

Climatrol

Crosley

Dacor

DCS

Duracraft

Edison

Estate

Fedders

FiveStar

Frigidaire

Garland

GE

Gibson

Goldstar

Hamilton

Hampton Bay

Hardwick

Hitachi

Holmes

Hotpoint

Humid-Aire

Insinkerator

JC Penney

Jenn Air

Kelvinator

Kenmore

Kitchen Aid

Klein

Litton

Lobb

Magic Chef

Marta

Marvel

Maytag

Modern Maid

Montgomery Wards

Norge

Panasonic

Quasar

RCA

Roper

Samsung

Sanyo

Scotsman

Sears

Sharp

Signature

Sinkmaster

Skuttle

Speed Queen

Sub-Zero

Sunray

Tappan

Thermadore

Toshiba

U-Line

Viking

Wards

Waste King

West Bend

Westinghouse

Whirlaway

Whirlpool

White-Westinghouse

Wolf

Common Gas and Electric Dryer Problems and Solutions

Problem: Dryer warm but clothes take too long to dry.

Solution: Dryer is dirty with lint inside, vent is excessively long, or filled with lint. FIRE HAZARD!

Dryer disassembly help.

The house dryer vent line is notorious for being neglected and most people don’t even think about cleaning it out periodically. You’ll wanna clean that sucker out about every two to three years. There are services that specialize in dryer vent cleaning. Or come git you a vent cleaning brush on a 12 foot wire wound coil, and you can get ‘er done yourself.

Other things besides poor venting that can cause this problem: Intermittent burner coils, faulty thermostats, reduced airflow through machine (poor vent). If dryer is electric, make sure you’re getting 240vac at the wall outlet. Check both rails of the 240 VAC supply… may be getting only 120 VAC. I’m just sayin’.

Problem: Drum turns but no heat at all.

Solution:

Gas dryers— Maybe a burner component failed. Check coils, flame switch, igniter, motor centrifugal switch, thermal fuse, thermostat, hi-limit thermostat, belt switch.

Electric dryers— Centrifugal switch (built into the motor), heating element, thermal fuse, thermostat, hi-limit thermostat, broken belt switch. I have a special page just for you on things that can cause an electric dryer to not heat.

Problem: Drum wont turn.

Solution: Is the motor turning? “But, Samurai, I am but a Grasshoppah, how am I supposed to know these things?” Use your earballs, Slick; do you hear the freakin’ thing running? Could be a broken belt, seized belt idler wheel, foreign crapicus jammed in drum.

Problem: Dryer makes a scraping sound.

Solution: Worn rollers; worn drum glides or drum bearing (especially common on Frigidaire dryers); crapicus jammed in the drum; cheesey idler pulley.

Problem: Dryer getting too hot.

Solution: Stuck thermostat, airflow backing up from restricted vent. WARNING WILL ROBINSON: FIRE HAZARD! DANGER! DANGER!

Problem: Rumbling sound (particularly noticeable when the dryer starts).

Solution: Worn out blower wheel— especially common on Maytag models, also some Frigidaire. I’ve yet to see this problem on a Whirlpool model, though I suspect the models with the lint filter in front are susceptible to this.

Problem: Dryer runs normally then shuts down for about 10-15 minutes then starts back up again by itself.

Solution: Drum motor over-current or thermal relay is tripping. May be due to hot air being blown against the motor or just a motor that’s old and drawing too much current. Check vent connections, clean out dryer / house vent.

And many, many more more dryer problems and solutions await you in the Online Dryer Diagnostic Guide and the Complete Compendium of Dryer FAQs.

To learn more about your dryer, or to order parts, click here.

Visualize Your Appliance Repair Experience

Appliance Breakdown Diagrams

Grok on these mind-expanding, interactive breakdown diagrams of various appliances so you can see how they’re put together. An indispensible troubleshooting and repair aid! Just click on the appliance you’re working on and run your mouse over the diagrams. It’ll popup pictures of the various key components inside as well as give you insight into how to disassemble. It’s the miracle of Flash!

If you need more detailed help, start a new topic in the Samurai Appliance Repair Forum and we can get you more info.

Air Conditioning

Dehumidifiers

Dishwashers

Disposals

Dryers

Freezers

Ice Makers

Microwave Ovens

Ovens, Ranges, and Stoves

Refrigerators

Trash Compactors

Washing Machines

Schematic and Wiring Diagram for the GE JKP36G004BG Double Wall Oven

A common problem you run into when working on older appliances is that the schematic and wiring diagram are missing– usually because the slimeball who worked on it before you stole it. This happened recently to a tech in the Samurai Appliance Repair Forum where Sublime Master of Appliantology Pegi was able to locate it for him. Such is the power of the forum! In his case, he needed diagrams for a GE JKP36G004BG double wall oven. They’re posted below; if you need it, go ahead and download it.

Schematic and Wiring Diagram for the GE JKP36G004BG Oven

To learn more about your range/stove/oven, or to order parts, click here

Troubleshooting Drive Motor Problems in a Frigidaire Front Loading Washer

(Also applies to Kenmore washers with a model number prefix of 417.)

Note: Begin troubleshooting a no-spin condition by checking the door latch switch. If it checks good, then proceed with this flowchart. See the tech sheet with your washer for the door latch switch test procedure. The procedures described below assume that the door latch switch tests good.

The most common motor problem with this washer is no-spin; the drum may tumble, but it either never goes into spin at all or or just never ramps up to high speed spin. The tech sheet supplied with the washer (inside the cabinet, in a big envelope pasted to an inside wall– remove bottom front quarter panel to get to it) gives troubleshooting instructions but they are poorly written and difficult to follow, even for sage and battle-hardened appliantologists. The troubleshooting flowchart below from the service manual is mo’ bettah:

Frigidaire-built Frontload Washer Motor Troubleshooting Flowchart
(click for larger image)

As noted in the flowchart, it’s pretty rare for the motor to fail in this washer, although I have seen it. The motor winding continuity checks are done through the motor wire harness at the speed control board (for convenience). If you get an open reading there, don’t take it as gospel that the motor is bad– repeat the test at the motor itself so that you’re not reading through the motor wire harness. The wire harness itself, specifically the molex connector, is a more common troublemaker than the motor.

A more common failure item causing a no-spin condition in this washer is the speed control board.

To learn more about your washing machine, or to order parts, click here.
Front Loading Washer Corrosion Contagion: A Menagerie of Metallic Misery

Been seeing a rash of galvanic corrosion-induced failures of the drum support spiders in various brands of front loading washers. Affected brands include GE, Whirlpool, and Frigidaire. Since Sears Kenmore brand outsources everything with a Kenmore label, all Kenmore washers are manufactured by one of the three aforementioned companies and will also manifest this same problem (see this topic for more info on who makes Kenmore appliances).

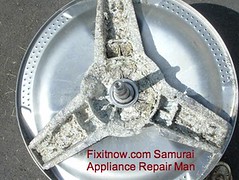
Kicking off the Washer Corrosion Hall of Shame is this bit of metallic misery from a Frikkidaire washer:

Frigidaire Washer Drum Spider Extreme Corrosion

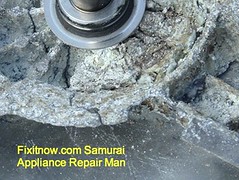
Closeup of Corroded Drum Spider on a Frigidaire Front Loading Washer

The drum support spider in this Frigidaire washer had corroded so much that the hub and drive shaft actually broke off. Note the pitting in the metal. You can see in the closeup that the metal seems to turn into powder. That’s the galvanic corrosion that I be tawkin’ aboot, you dig? It weakened the spider structural strength so much that it failed during use. Ah, Grasshoppah, can you stand with me, our mouths agape at the raw power of chemistry?

Next up is this drum from a GE washer:

GE WCVH6260FWW Front Loading Washer Corroded Spider

Not to be outdone by their competitors, here’s an advanced case of galvanic corrosion in a Whirlpool Duet washer (also sold as the Kenmore HE2/3t):

Whirlpool Duet Washer Drum Spider CorrosionWhirlpool Duet Washer Drum Spider Corrosion: Hub Closeup
(click images for larger view)

Whence cometh this galvanic corrosion? Most likely because of dissimilar metals between the spider assembly and the drum setting up a galvanic cell inside the washer. The drum is stainless steel and the spider is aluminum. In the wet environment, the aluminum acts as a sacrificial anode, like the zinc rod in a water heater. Some combinations of detergents, fabric softeners, and water quality conditions may create electrochemical conditions which exacerbate this problem. Can you say, “Design flaw?”

I think the engineers at one of these companies figgered out a way to save a buck two-eighty by using an aluminum drum support spider and the engineers at the other companies just brainlessly copied it without applying gray matter. My Momma always telled me that stupid is as stupid does. I rectum now I see what she be sayin’.

To learn more about your washing machine, or to order parts, click here.
Help for Determining the Age of Common Appliance Brands

First thang you’ll need to do is get the serial number off the model number tag. Armed with this key information, proceed to the appropriate section below:

For Whirlpool, Kitchenaid, Roper, Estate, Maytag, and Magic Chef appliances, use the Appliance Age Finder to find out how old it is.

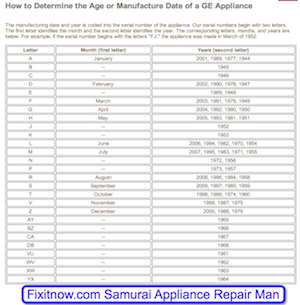
For GE appliances, use the table below:

ge-appliances-age-thmb.png
(click for larger image)

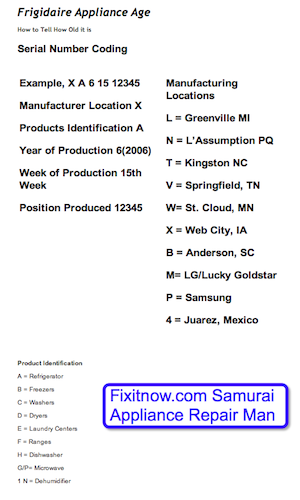
For Frigidaire appliances, use this table:

frigidaire-appliances-age-thmb.png
(click for larger image)

Troubleshooting Flowchart for the Whirlpool-built Modular Icemaker

Here it is, the flowchart you’ve been painfully waiting for while laying awake at night knotted up with anxiety: the Internet’s first systematic troubleshooting flowchart for the Whirlpool-built modular (that means “in your freezer”) icemaker. Go ahead, steal this pdf and share with all your friends… and your enemies, too!

http://fixitnow.com/wp-content/uploads/2009/10/21562311-Troubleshooting-the-Whirlpool-Modular-Icemaker.pdf

To learn more about your ice maker, or to order parts, click here.