Author Archives: Samurai Appliance Repair Man

Maytag MGR5755QDB Range Sabbath Mode

Most modern ranges have the ability to be programmed for Sabbath mode. This is a mode of operation based on Jewish requirements for holidays and Sabbaths. On Sabbaths, devout Jews cannot operate any machinery, including appliances, because this is considered work, which is prohibited on the Sabbath Day. To accommodate this, the range can be placed into Sabbath mode where only the bake and timed bake modes are functional.

If you see a 5Ab code on the control panel of this Maytag range, it means the range is in Sabbath mode (the “5” is used to represent an “S”) and only the bake and timed bake functions will work. Don’t ax me why these functions are kosher but broil apparently is not– I am but a gentile Samurai.

Here’s how to get into and out of Sabbath mode:

Hold CLOCK pad for 3 seconds to activate Sabbath mode.

“5Ab” will be displayed and flash for 5
seconds.

______________________________________________________

Hold CLOCK pad for 3 seconds to disable Sabbath mode.

Display will go back to time of day.

To learn more about your range/stove/oven, or to order parts, click here.

GE Triton Dishwasher Makes Weird Rumbling Sound while Washing

Your GE Triton dishwasher is making a weird sort of rumbling sound when it’s washing, sort of sounds like the spray arm is loose. In your befuddled poking around, perhaps you pulled the lower spray arm out and ran it but, lo, it still makes the noise when washing. You don’t hear the noise during the drain cycle.

Sublime Master of Appliantology Pegi offered this appliance repair wisdom in the Samurai Appliance Repair Forum. Ahh, grasshoppah, can you snatch this pebble from her hand?

The sound is almost always caused by a worn docking cone “O” ring on the main conduit. When the docking cone “O” ring wears, the mid level spray arm conduit is no longer constrained and it can vibrate against the docking cone, making the “growling” or vibrating sound. The recommended repair for this problem is to replace the titanium or gray docking cone.

More Posts on GE Triton Dishwashers

To learn more about your dishwasher, or to order parts, click here.

Entering Service Diagnostic Mode in a GE Triton Dishwasher

ge-triton-dishwasher-service-mode.pngService diagnostic mode is one of those indispensable troubleshooting tools built into some appliances with electronic controls. Although electronics on wet appliances, such as dishwashers, is a flagrant violation of the 5th Law of the Prophecy, this is somewhat mitigated by having a service diagnostic mode to help troubleshoot it.

In service mode, you can do things like make the dishwasher fill with water and nothing else. Or make it pump out and nothing else. Real handy if you’re trying to track down the cause for a no fill or no pump out complaint.

Applies to the following GE dishwasher models:

EDW4000

EDW4060

GSD6200

GSD6300

GSD6600

GSD6660

GSD6700

PDW7300

PDW7700

PDW7800

PDW7880

To learn more about your dishwasher, or to order parts, click here.

LG Front Load Washer Won’t Tumble

Ahh, LG: Life’s Good. Except when your stinkin’ LG washer won’t tumble! Fills with water and pumps it out fine, but that drum just won’t budge. What’s a grasshoppah to do? First thing is to unbunch them panties and unfurl that brow as you grok on this sacred repair wisdom from the Samurai Appliance Repair Forum, the Web’s behemoth of appliance repair help! Come with me now on a sublime journey of appliance enlightenment as Sublime Masters of Appliantology RegUS_PatOff and NCSU_laundry_tech dispense their pearls of wisdom to an apprentice in the forum and help him whup up on his motionless LG washer…

LG Front Load Washer No Tumble

To learn more about your washing machine, or to order parts, click here.

Frigidaire and Kenmore Smoothtop Electric Ranges Recalled Due to Fire Hazard

Right on the heels of their washing machine recall (also due to fire hazard) and their unserviceable 12 c.f. refrigerators, Friggidaire is recalling their smoothtop electric ranges for, that’s right, fire hazard. Also sold under the Kenwhore brand. They’re on a roll!

FrigidaIre Smoothtop Electric Range Recall

To learn more about your range/stove/oven, or to order parts, click here.

Repair Goodies for the Dacor RSD Gas Range

Got you one o’ them fancy-pants RSD Dacor ranges that needs some Fixite Do? Well, you came to the right place, budrow! The Samurai has pulled together these precious scrolls from the Appliantology scripture archive to illumine you. May your hammer be mighty!

Appliantology Scrolls for the Dacor RSD Range:

Circuit Path Drawings

Field Service Bulletins

Bezel Replacement Instructions

Diagnostic Manual (for all models)

Parts Manual and Diagrams

Buy Genuine Dacor Replacement Parts

To learn more about your range/stove/oven, or to order parts, click here.

Service Update: Non-serviceable Frigidaire Refrigerators

Sublime Master BrntToast posted a heads-up in the Samurai Appliance Repair Forum. Friggidaire (not a typo) sent out a service bulletin recently on their furrin’-built, 12 c.f. refrigerators, model numbers FRT125GW and FRT125GWK. Usually, service bulletins explain how to repair a particularly weird problem with an appliance. In this case, the problem is repeated loss of cooling in the beer compartment. The repair procedure in this bulletin was simple: don’t bother. Yep, Friggidaire doesn’t want servicers going out on these boxes, not even to look at them, if the serial number is before RA91. They’re just going to arrange an exchange.

Seems the problem is that frost builds up in the air channel that supplies the beer compartment with cold air, eventually choking it off and causing the beer to get warm. That just ain’t raht! And Friggidaire has no fix for this problem!

So, if you have one of these bad boys that’s not under warranty and it’s not a typical defrost system problem, call Friggidaire (800-374-4432) with your model and serial number to arrange for an exchange.

To learn more about your refrigerator, or to order parts, click here.

Repair Forum Server Migration Update

Been struggling through a server migration with the repair forum this weekend. It’s a big database, over 1 GB, and migrating it to another server is no trivial task. I’ve been working closely with my webhost, Data1Systems, throughout the whole ordeal. After a false start, I thought it was mission accomplished yesterday– forum was back up and running on the new server and zipping along, question were being posted and answered. So I laid my silly butt down to bed with an unfurled brow and unclenched gut. But when I got up this morning to check in with the repair forum, all I got was a blank white screen. Oh, foul, bane iniquity! So… we’re hot on it and hope to have it back up and running today. I’ll keep you posted here.

UPDATE: And we’re back up! Come on in to the Samurai Appliance Repair Forum and we’ll hepya fix your broken appliances!

Dacor Dishwasher Fault Codes

EDW/IDW Models

Display Indicates
F1 Inlet Valve Fault
F2 Circulation Pump Fault
F3 Electrical Heater Fault
F4 Drain Pump Fault
F5 Air Flaw Fan Fault
F6 Controller Fault
F9 WPS Sensor Fault


ED/ID30 Models

FAULT CAUSE EFFECT SOLUTION
Drain Pressure Switch is in the closed position after two full drain procedures Three long beeps, red light
flashes below door.
Press Cancel key twice to reset this fault. Fault will occur again in the first Drain if the conditions are still true. See component diagnosis section for troubleshooting.
Water in
Base Pan
Floor Guard switches to a open position caused by a flood condition in the base Cycle will stop, followed by three long beeps. Drain pump will activate until the floorguard switch is reset. Floorguard LED will turn ON and red light will stay steady below door. Floorguard switch will reset and clear this fault, when water is removed from the base pan.
F3 Controller failure to communicate with the Atmel 16 on the power board. The dishwasher loads will not function. A fault can be visible in the first 15 seconds of initial power-up. “F3” will flash on the display and will be visible to the user. Dishwasher will be disabled. Check Control and Power Board Compatibility. Check power/controller board communication cable.
F4 No response signal from the WPS Wash cycle will go into a default timetable and soil=3; temp=0. F-4 appears for the failure test mode. Check WPS connection. Replace WPS
F5 Controller failure to communicate with PIC or no PIC software in the power board PIC Microcontroller There is no temp or soil information reported to the controller. Controller will default to soil=2 & temp=0. F-5 appears in the failure test mode. Replace power board.
F9 Heater failure Temperature does not increase See component diagnosis section for troubleshooting.

NOTE: There will never be an F4 and F5 error at the same time.


MDW24 Models

Display Codes (Readout)  
LO Low Liquid in the Rinse Aid Dispenser 
PF A Power Failure has occurred 
HO Water Heating Delay 
CL Close and latch the door 
01-04 Hours delay before the dishwasher will start
CF Clean Filters 


ED/ID/PD/MD24 Models

FAULT CAUSE EFFECT SOLUTION
F1 Pressure Switch is in the closed position after two full drain procedures. Three long beeps. F1 will be displayed only during the Diagnostic mode. Press Cancel key twice to
reset this fault. Replace Pressure
Switch.
F2 Inlet Valve does not
close.
Three long beeps. F2 will be displayed to the user and in Diagnostic mode. Drain pump is ON until open door. Press Cancel key twice to reset this fault Replace Inlet Valve. Replace control board.
F3 Low inlet water pressure. Three long beeps. F3 will be displayed to the user and in Diagnostic mode. Press Cancel key twice to reset this fault. Ensure that Inlet hose is ON. Replace Flow Meter. Replace Inlet Valve.
F4 No response signal from the WPS. Wash cycle will go into a default time table soil 3 & temp 0. F4 will be displayed only during the Diagnostic mode. Check WPS connection. Replace WPS.
F9 Heater failure Temperature does not increase. Wash cycle will go into a default time table for Heater ON time. F9 will be displayed only during the diagnostic mode. Replace heater. Replace WPS. Replace Control board.

To learn more about your dishwasher, or to order parts, click here.

Replacing the Clutch in a Maytag FAV9800 TL Washer

Despite the fact that this is one of the crappiest top-loading washers ever built, replacing the clutch (a common repair on this machine) ain’t too bad a job– about half an hour and two mugs on the world-famous SUDS-0-Meter.

Here’s the brand new clutch and pulley assembly you’ll need for this job (click the pic to order it, right here online!):

clutch and pulley assembly for a Maytag FAV9800AWW washer

A talented Senior Apprentice Appliantologist, dh1200s, has written an illustrated step-by-step for this repair and posted it in the Samurai Appliance Repair Forum. For your reading pleasure, I’ve included his fine write-up below.

dh1200s wrote:

Tools required; 3/8 inch socket and socket wrench to remove clutch pulley bolt. Page 47 of the SM1/2 inch socket or wrench to loosen Drive Motor tension bolt; 5/16″ nut driver or 5/16, ¼” socket on an extension to remove front panel see page 41 of the Service Manual.

1. Lean the washer back and blocked up in that position against a wall for a better reach angle. Rotate 3/8” clutch Pulley Bolt CW to remove clutch bolt.

2. Follow SM page 46 & 47 to remove clutch pulley.

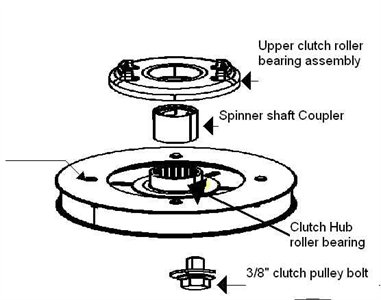
3. Remove 4 screws holding plastic cover on clutch, inspect clutch spring to make sure it is not broken. If either clutch spring retaining end is broken off then the clutch must be replaced. Inspect Roller Clutch bearings and clean up with WD-40 and re-lube with bearing grease. Most machine series use an Upper Roller Clutch bearing and always a lower clutch pulley Roller Clutch bearing. My series 16 machine doesn’t use the Upper Roller Clutch one way bearing. These bearings are one way rotation bearings in the Clockwise direction. Make sure the Spinner Shaft Coupler will rotate freely in the CW direction in both Roller Clutch bearings. If the Roller Clutch bearings or Spinner Shaft Coupler will not clean up with WD-40 I recommend a clutch replacement.

4. Replace white bearing plate into clutch pulley hub, insure key slot slips into clutch Spring pin in the clutch hub.

5. Replace Clutch plastic cover with 4 screws.

6. Reinstalling the Clutch Pulley assembly is the most difficult part of the process. With a tight work area try a test fitment of seating (if used) the Upper Roller Clutch bearing with the notches into the bottom of the wash tub. Then insert the Spinner Shaft Coupler into that bearing rotating CW to reseat the coupler notches to the spinner shaft. Then the clutch pulley to the squared end agitator shaft. Rock back and forth the clutch pulley assembly with upward lifting pressure to reseat the clutch assembly. When the clutch assembly is properly seated you will feel a 1/16-1/8″ gap between the Pulley face and shaft end as mentioned and shown on page 47 of the SM. On reinstallation, tighten Clutch Pulley bolt CCW to 96” pounds 8’ foot pounds (Snug no torque wrench required).

7. Do a quick wash and make sure clutch runs true with no wobble or clicking sound. If the clutch has not been seated properly it will spin off. If this happens go to page 16 of the SM Board Output Test and turn on Drain Pump in Service Mode to pump out excess water.8. Repeat steps 6&7 if the clutch has excessive noise or spins off.

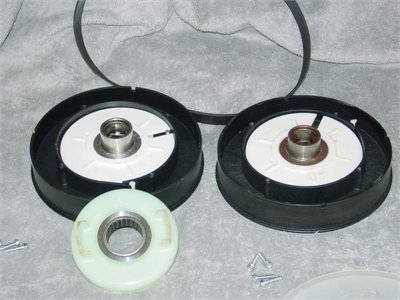
Some Pics for reference; not sure what Mytag calls the coupler that drives the spinner shaft coupler so I named it.

17829F9.jpg

My original clutch is on the right side clutch on the left is a new $50 replacement I wanted to try and it and it works fine in my series 16 nachine. My series 16 machine does not use the upper roller clutch bearing assembly.

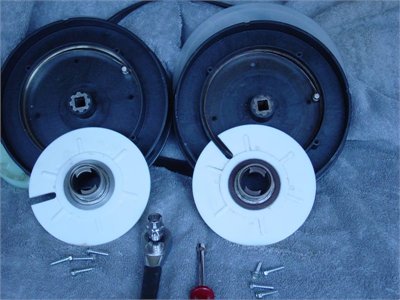
8D538C4.JPG

Clutch opened up:

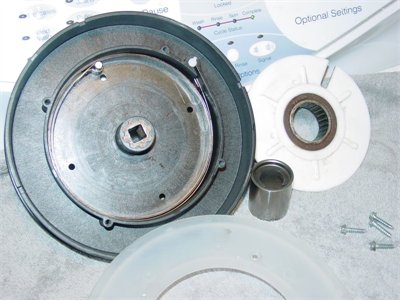
212D7AF.JPG

Some folks have found the spinner shaft coupler is rusted solid to the one-way roller clutch bearing.

AFBDEEA.JPG

I hope this will help others with their clutch issues on this machine type. Dick

To learn more about your washing machine, or to order parts, click here.

Viking Range Corporation Recalls Built-In Refrigerators Due to Injury Hazard; Doors Can Detach

NEWS from CPSC
U.S. Consumer Product Safety Commission Office of Information and Public Affairs Washington, DC 20207

FOR IMMEDIATE RELEASE – June 16, 2009 – Release # 09-242

Firm’s Recall Hotline: (888) 345-2650, CPSC Recall Hotline: (800) 638-2772, CPSC Media Contact: (301) 504-7908

WASHINGTON, D.C. – The U.S. Consumer Product Safety Commission, in cooperation with the firm named below, today announced a voluntary recall of the following consumer product. Consumers should stop using recalled products immediately unless otherwise instructed.

Name of Product: Viking Built-In Side-by-Side Refrigerator/Freezers and Refrigerators with Bottom Freezers

Units: About 45,000

Manufacturer: Viking Range Corporation, of Greenwood, Miss.

Hazard: The refrigerator’s doors can detach, posing an injury hazard to consumers.

Incidents/Injuries: Viking has received about 57 reports of doors detaching, including four reports of injuries involving bruises, broken toes/fingers, and strains. Also, several incidents of minor damage to floors and counters have been reported.

Description: This recall involves Viking built-in 48-inch wide side-by-side refrigerator/freezers and the built-in 36-inch wide refrigerators with bottom freezers with model and serial numbers with date codes listed below. The refrigerators come in stainless steel and various colors and wood finishes and are built into the kitchen cabinetry. “Viking” is written on the front of the refrigerator. The model and serial numbers are located either behind the produce drawer or on the ceiling of the interior of the refrigerators. The 42-inch wide or freestanding refrigerators are not included in this recall.

Model Numbers Starting With — Date Codes

VCSB481, VCSB482, DDSB482, DFSB482, DTSB482, DDBB362, VCBB360, VCBB362, DFBB362, DTBB362, DTBB363 — All units
VCSB483, DDSB483, DFSB483, DTSB483 — Date codes before 030104
VCSB483D, DDSB483D, DFSB483D — Date codes before 030105
VCBB363 — Date codes before 102005
DDBB363 — Date codes before 112305
DFBB363 — Date codes before 041006

The first six numbers in the serial number are the manufacture date of the unit in [mm][dd][yy] format, e.g., serial number 051903G0000000375 was manufactured on May 19, 2003 and serial number F01250210170 was manufactured on January 25, 2002.

Sold by: Appliance and specialty retailers nationwide from July 1999 through April 2006 for between $4,725 and $6,400.

Manufactured in: United States

Remedy: Consumers with recalled refrigerators should contact Viking immediately to schedule a free in-home repair. Consumers should immediately stop using the recalled refrigerator if the door isn’t sealing properly, is sagging, or fails to open and close properly. If the door is functioning properly, consumers may continue to use the refrigerator until it has been repaired.

Consumer Contact: For more information, contact Viking toll-free at (888) 345-2650 from 8 a.m. to 5 p.m. ET Monday through Friday or visit Viking’s Web site at www.vikingrange.com

To see this recall on CPSC’s web site, including pictures of the recall product, please go to:
http://www.cpsc.gov/cpscpub/prerel/prhtml09/09242.html


Dryer Venting Requirements

Dryer venting questions and confusions keep coming up in emails and in the Samurai Appliance Repair Forum. Lots of disinformation out there about dryer vents, too.

How Dryers Work

A dryer’s job is pretty simple: heat the clothes so that the water in the fabrics evaporates. Then get rid of all that water vapor (humidity) by moving lots of air through through the drum.

Pop Quiz: What happens if the dryer is heating OK, but it can’t move enough air through the drum?

Answer: The clothes will get warm but will not dry in a reasonable amount of time. Why is that, Capt. Ron? Because if the air inside the drum is already saturated with water vapor from the warm, wet clothes, then it can’t hold anymore water vapor. The air is what we professional appliantologists call, “saturated.”

Dryer Venting Q & A:

Q: How do you get the air to hold more water vapor?

A: By getting rid of the water vapor that’s already there!

Q: And how do we get rid of the water vapor in the air inside the drum?

A: Through the dryer vent!

Get the idea? If the vent is restricted, it won’t move enough air to purge the water vapor from inside the dryer drum. So your clothes stay wet.

When I tell people this, I invariably get the reply, “Well, I checked for lint buildup in the vent and it’s all clear.”

Ah, I see, so lint build-up is the ONLY possible way that dryer vents can become restricted? How about if the vent hose is crushed or kinked? What if the vent hood flapper on the outside of the house is stuck closed? Hmm…

Ponder these things whilst you grok on this handy guide on dryer venting requirements.

To learn more about your dryer, or to order parts, click here.