Bob wrote:
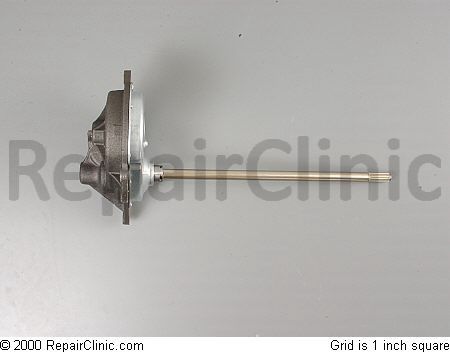
have a gss25jfmcww ge fridge, dont think the self defroster is working. please tell me the 3 or 4 parts needed to be changed and where they are. thanks

To learn more about your refrigerator, or to order parts, click here.

Bob wrote:
have a gss25jfmcww ge fridge, dont think the self defroster is working. please tell me the 3 or 4 parts needed to be changed and where they are. thanks
So the ol’ Sport is showing poor sportsmanship by refusing to make the drum tumble or spin? On these front loaders, like all of ’em, the motor is controlled by its own control board that tells it when to turn on and how fast to run. So, if the drum’s not moving, how do you know whether the problem is the motor or the control board or even something altogether different like the door switch?
Well, one method is the process we professional appliantologists call, “dee-ductive reasoning.” Oh yeah, see, in appliance repair school we learned about reasoning and logic an’ stuff ‘cuz we studied all the great philosophizers who wore bed sheets all the time and spoke furrin’ languages like Greek, or something.
Anyway, in the dee-ductive method, we use the process of elimination to show what the problem ain’t. Well, if you rack up enough ain’ts, pretty soon you’re left with the ’tis. And one of the ain’ts that’s easy to check is the motor. If the motor checks good, then you know the problem ’tis something else. See? I know, it’s real complicated an’ all but that’s why we professional appliantologists makes the big money! 

Testing the Motor:
– unplug the washer
– remove the front, bottom quarter panel from the washer
– unplug the five-wire connector from the motor
– set your ohm meter to the Rx1 scale and zero your meter
– touch your meter leads to the following pins, should get about 6 ohms for each reading: pins 1 and 2, pins 2 and 3, pins 1 and 3.
Next time your beer box is warming up, use this handy flowchart to quickly figure out what’s wrong and get on the right track for fixing it. Also makes a great gift for that special someone who already has it all. Go ahead and download it now so you’ll have it handy in case your beer starts warming up.
http://fixitnow.com/wp-content/uploads/2012/04/39305150-Warm-Refrigerator-Troubleshooting-Flowchart.pdf (PDF file, 700kb)
If you like this post, please share it with your friends using one of the share buttons below. Domo!
We’ve all been there: you drag yourself out of bed and shuffle to your GE refrigerator for your morning brewski before heading out job hunting. You open the door and right away notice sumpin’ ain’t raht. As you reach in for that 40-ounce can of Old Milwaukee, your worst nightmare is confirmed: WARM BEER! Red alert! Deflector shields up, arm photon torpedos!
In a blind panic, your hands starting to tremble slightly from fear of sobriety and early DTs, you snatch open the freezer door to find that the temperature inside seems normal. In a rare moment of clarity, you place several cans of Old Milwaukee in the freezer to start ’em chilling. As you’re shoving the last can in place, you notice the back wall inside the freezer is coated with fuzzy ice. Suddenly, like a light shining through the rapidly-dissipating fog from last night’s beers, you realize what’s happened: your GE refrigerator has had a defrost system failure.
With your bowels rumbling and your hands now fully shaking, you choke down the bile searing the back of your throat and race to your computer where you frantically pull up the one and only website that has always helped you in the past and that you know you can rely on in dark times like these: Fixitnow.com Samurai Appliance Repair Man. A quick search at the Samurai’s site pulls up this very post that you’re now reading on The Samurai Test for the Defrost Circuit in a GE Refrigerator with a Muthaboard… and the Quick Fix. Holy guacamole– it’s like looking in a mirror with another mirror behind you! But instead of seeing yourself, you see this:

The Samurai Test for the Defrost Circuit in a GE Refrigerator with a Muthaboard
(click for larger view)
The Quick Fix:
– If the defrost circuit tests good, replace the muthaboard and thermistors.
– Otherwise, replace the defrost heater and hi-limit.
Problem solved! Now go pull those beers outta the freezer before you forget and pop a cold one.
The Cliff Notes Version
Here’s a simple way of determining whether spin or agitate problem is with your washer’s transmission (also called a gearcase) or some other part like a clutch or a drive coupler.
First off, if the washer agitates okay but does not spin, even though you hear the motor running, you may have a bad lid switch or the lid switch plunger on the washer lid is broken off. Usually, if the lid switch is bad, it won’t make a “click” sound when you press in the lid switch slot with a key or screwdriver. Here’s the most common replacement lid switch for most direct drive models but you should use your model number make sure you’re getting the exact one for your model. Regardless of the particular variation of lid switch in your model, they’re replaced the same way on all direct drive washers and the technique is shown in this video:
If the lid switch is okay, your next step is to remove the cabinet and jumper the lid switch harness (tan to gray). Put the unit in spin and watch the shiny metal clutch disc that is on top of the transmission where the shaft comes out. If the machine starts and runs in spin, check to see if the disc is spinning. If it is, then the problem is not in the gearcase— look for trouble in the clutch (see the “Clutch” section below), basket drive or the tub drive block (see the “Drive Block” section below).
If, on the other hand, the disc is NOT spinning, check for a problem with the motor drive coupler or one of its retainers. This washer doesn’t have a belt. Instead, the motor is directly coupled to the gearcase by a drive coupler; that’s why it’s called a direct drive washer. BTW, replacing the motor coupler is probably the single most common repair on this washer.
To check the drive coupler, you need to actually remove the motor to do this properly– you can’t always tell it’s bad by just eyeballing it from underneath.
Here’s how to replace the motor coupler:
And you can buy the replacement motor coupling here.
If all that looks good, then you may need a new gearcase. If the machine tries to agitate and spin at the same time, this is always a bad gearcase.
(click it to git it)
Here’s how to replace the gearcase:
Weak or No Agitation
The agitator output shaft is the only thing bolted through the center of the machine. The agitator shaft is nested inside of the brake/spin/drive-tube shaft. The spin-tube is nested inside of the outer tub. As the motor spins the gear case the basket drive turns the clutch drum, which turns the clutch ring. The clutch ring applies force to a small cam-lever on the bottom of the spin-tube that releases the spring tension that holds the brake pads against the brake drum. That release allows the torque to then be transferred fully to the top of the spin tube, where the basket attaches.

(click to enlarge)
Weak agitation is rarely a sign of gear case failure— it’s usually the agitator dog and clutch kit.

The agitator is made of much weaker plastics and is designed to take the majority of the punishment. When the agitator dogs fail, you replace them and usually a strong wash cycle is restored. It’s possible for the gears to be worn in addition to the agitator dogs if the items being washed are larger than a bath towel, e.g. bed sheets, bed spreads, pillows, rugs etc. These type of top load machines are just not good at handling these items.
One common sign that the agitator needs to be rebuilt is if the bottom part of a dual-action agitator moves properly but the top part just wallows around lazily in the tub.

The agitator dog kit is easy to replace. The only tools you need are a flathead screwdriver and a 7/16th socket. Here’s the agitator repair kit and a how-to video to get you going:
Clutch Problems
The clutch will usually wear prematurely due to improper loading habits or the agitator clutch dogs being worn. The agitator clutch makes the top part of the agitator circulate the load and actually helps to balance the load. Running the machine with an unbalanced load causes the tub to oscillate erratically during spin and creates an imbalanced load on the clutch.
A quick eyeball test for the clutch is to lean it back and inspect the area around the gearcase and clutch for oil. If you find a lot of oil, you’ll need to replace the gearcase.
The Hand Test for the Clutch
If no hammering sound has ever been heard out of this machine, one of the unofficial tests we professional appliantologists will do in the field is called the Hand Test.
WARNING: This test is not sanctioned by Whirlpool Corporation; it involves bypassing safety equipment and then putting your hand on and near rotating machinery which could result in injury, dismemberment, disfigurement, disembowelment, mangling, hideous screaming, and a bloody death. Proceed at your own risk! Have a nice day.
– put the timer on a spin cycle and open the lid
– grab the inner basket with maybe 30% to 40% of your hand strength with your left hand
– turn on the machine and bypass the lid switch by depressing the lid switch with a key until the machine begins to spin
– if the clutch is engaging properly, the basket should immediately begin to spin and slip through your hand
– if it takes very little force to stop the tub from spinning, the clutch needs to be replaced.
The Clutch Eyeball Test
The Eyeball Test is less risky than the Hand Test but requires lots more time and mechanical fiddling. It’s not as comprehensive as the Hand Test because it only checks for one particular defect with the clutch. But it’s included here for your edification.
Use a pair of pliers to compress the spring of the clutch ring and remove it from the drum. Inspect the rivet holes that hold the pads to the ring. If these holes are packed with debris, then change the clutch. When a clutch is slipping, as well as any other frictional surface, it will develop a glazed look to it which will reflect light and look glossy, just like a lawnmower belt or washer drive belt that has been slipping. This can cause for a burnt rubber or plastic smell.
You don’t need to remove the outer tub to inspect the clutch drum and ring; all you need to do is remove just the gear case. This saves lots of time and headache and keeps the water seals intact and undisturbed.
Replacing the Clutch
Here’s the clutch kit:
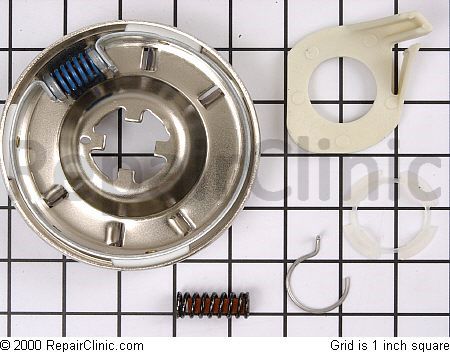
(click it to git it)
The blue spring is for large capacity washers; black for compacts.
Tools needed: flathead screwdriver, Phillips head screwdriver, pliers, putty knife, 7/16th socket, and a hex socket.
How-to video:
Drive Block

The basket is only coupled to the spin-tube through a cast-aluminum drive block. There are two tabs on the top of the spin-tube that interlock with 2 slots molded in the inner circumference of the drive block. When the drive block nut is tightened, it forces the basket down, which compresses the wedge shaped sides of the drive block into the face of the spin-tube, much like a compression fitting for a copper water line.
A worn drive block will usually have a pounding sound, like hammering metal, during spin when it first starts. If there is enough interlocking tab left on the drive block, you’ll see it finally engage at top speed with an empty basket.

Things for which you would need to remove the drive block include:
– inspecting the surface of the spin tube
– inspecting brake pad life and surface contamination
– inspecting brake drum surface and contamination
– inspecting or replacing the drive block
– inspecting or replacing the “self cleaning” filter on the bottom of the basket
– cleaning and inspecting of the inside surface of the plastic outer tub
– removing foreign objects from between the tubs
– possibly removal and installation of a counterbalance weight ring
Here’s how to remove/replace the drive block:
Tools Needed: flathead screwdriver, Phillips head screwdriver, pliers, putty knife, 7/16th socket, a hammer, and a spanner wrench.
And you can buy the replacement drive block here.
The dishwashers being made today ain’t like yo mamma’s dishwasher. Dishwashers made as recently as seven to 10 years ago used big honkin’ motors that practically sandblasted your dishes clean and then reversed direction to pump the water out. They used a lot more energy and water than the delicate little dainties being made today. They also lasted much longer and weren’t as prone to having problems with mineral buildup inside of ’em… but don’t get me started on that rant. Prodded along by the Beltway Bandits wielding the Energy Star stick, all the manufacturers are making their dishwashers with dainty little wash motors that drizzle the water on the dishes and a separate drain pump motor. So, for better or for worser, we’re all stuck with these limp-wristed dishwashers.
One of the consequences of using these low-wattage pumps and motors is that they have to run longer to get your dishes as clean as the old war horses did. Whereas yo mamma’s dishwasher would run for less than an hour, it’s not unusual for a new dishwasher to run for two or three hours. Although it seems counterintuitive (that’s one of those big words that we professional appliantologists use– please don’t try it at home as I cannot be responsible for your safety), the newer dishwashers are still using less energy than the older ones even when they run two or three times longer. It’s madness, I tell you, unmitigated insanity!
But, like with everything, there’s a downside to all this feel-good, Energy Star madness. If you have hard water (like most folks who get their water out of a well), the reduced water use and longer run times means you’re gonna get more mineral deposit gookus on your dishes and in the guts of your new fancy-pants, Energy Star dishwasher. This can cause all kinda washability and cleaning problems for your dishes, damage to the dishwasher’s dainty little innards, and increased energy consumption.

(click for larger view)
Four Ways to Handle Hard Water in Your Dishwasher:
Numero Uno: Use rinse aid! It’s not an option with today’s dinky dishwashers. Rinse aid allows the dishwasher to use less water with the same amount of cleaning and drying effectiveness. It does this by creating what we professional appliantologists call “sheeting action” of the water. By making the water sheet along dishes, rather than cluster into beads, it evaporates faster and with less energy. Look at the difference:

(click for larger view)
Numero Duo: If a little doesn’t work, use MORE rinse aid!

(click for larger view)
Numero Trio: Regularly use a dishwasher cleaner (Affresh) and performance booster (Glass Magic) to clear out the gookus and keep the build-up down.
Numero Quattro: Install a household water softening system or buy a fancy-pants dishwasher with its own water softener built in, like a Miele.
Lots of folks today are struggling to save shekels in this broke-back economy and that’s ezzacly why the Samurai’s here. One budget item that many households don’t have a good handle on is the electric bill. With just a little information from the appliance name plate and some third-grade math using a calcumulator, the Samurai’s gonna show you how to quickly and easily figger out how much electricity each of your appliances, large and small, are using.
Just like in a budget, you usually can’t point to any one item and say, “Aha! There’s the big money drainer!” Instead, it’s usually a process of “death by a thousand cuts”– trimming a few pennies here and a few pennies there and, next thing you know, you’ve saved some real money.
Wattage
Watts are the basic unit of power use and consumption. You can usually find the wattage of most appliances stamped on the bottom or back of the appliance, or on its nameplate. The wattage stamped on the appliance is the maximum power drawn by the appliance.
Kilowatts are just watts x 1000. Your power meter actually measures kilowatts over a period of time, called kilowatt-hours (abbreviated kWh). This is simply the amount of kilowatts your home is sucking off the grid times the number of hours. This is the sum total of all electricity usage going in your home at any given time.
Since many appliances have a range of settings (for example, the speed of a washing machine spin or the heat setting on a dryer), the actual amount of power consumed depends on the actual setting used when you run the appliance.
All this will become clear when we work through some ezzamples so hang with me…
Special note for refrigerators: For older models, you can estimate the number of hours that a refrigerator actually operates at its maximum wattage by dividing the total time the refrigerator is plugged in by three. Even though it’s “turned on” all the time, the refrigerator compressor actually cycles on and off as needed to maintain interior temperatures.
Newer refrigerators with the variable capacity compressors (VCC) are a little different. They’ll actually vary the speed at which the compressor runs which affects its power consumption. In theory, this reduces the power consumption so if you used the “divide by three” method, you’ll come up with a higher power consumption than it’s actually using.
One solution for finding the power consumption on these newer refrigerators is to use the Kitt-a-Watt meter (discussed below) to directly measure the refrigerator’s power usage.
Formula for Estimating Energy Consumption
Let’s start with some third-grade math. Here’s a simple way to estimate appliance energy consumption.
(Wattage × Hours Used Per Day) / 1000 = Daily Kilowatt-hour (kWh) consumption
Now, multiply this by the number of days you use the appliance during the year for the annual consumption. You can then calculate the annual cost to run an appliance by multiplying the kWh per year by your local utility’s rate (on your power bill) per kWh consumed.
Now for those promised examples:
Window fan:
Suppose you have a window fan that has a watt rating of 200 watts stamped on its nameplate and you use it four hours/day about four months out of the year. And suppose your power rate is 8.5 cents/kWh (this is pretty cheap power, BTW– up here in Yankeeland, we pay over 18 cents/kWh! The rate will vary widely– check your power bill for your actual rate). Let’s see how much that sucker’s costing you:
(200 Watts × 4 hours/day × 120 days/year) / 1000
= 96 kWh × 8.5 cents/kWh
= $8.16/year
Easy as pie, da tovarish?
Let’s tackle another one…
Personal Computer and Monitor:
Suppose the compooter on your desktop has a wattage rating of 120 watts stamped on its nameplate or somewhere in the manufacturer’s tech specs. Let’s also suppose the monitor you’re using to read this web page has a rating of 150 watts and you use your compooter about four hours per day, year ’round. Again, we’re just using the power rate of 8.5 cents/kWh for an example. So how much is that costing you?
(120 + 150 Watts × 4 hours/day × 365 days/year) / 1000
= 394 kWh × 8.5 cents/kWh
= $33.51/year
Sometimes, the wattage isn’t stamped on the appliance and they might only give the amps instead. Amps is a measure of the electric current draw; it’s a measure of flow like gallons per minute from the BP oil gusher, same idea.
If the wattage is not listed on the appliance, you can still estimate it by finding the current draw (in amperes) and multiplying that by the voltage used by the appliance. Most appliances in the United States use 120 volts AC (vac). Larger appliances, such as electric clothes dryers and electric cooktops, use 240 vac (gas clothes dryers use 120 vac).
If the amps aren’t stamped on the appliance anywhere, you can easily measure it with a nifty and inexpensive gadget called a Kill-a-Watt meter. You just plug the Kill-a-Watt into the wall, then plug the appliance into the Kill-a-Watt meter and you’ll read the amps, watts, and volts right on the meter. No fuss, no muss! Come git you one:
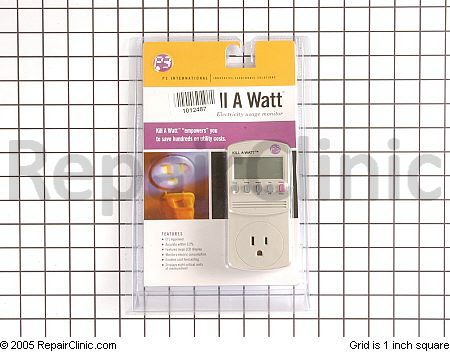
(click it to git it, Hoss!)
Typical Wattages for Appliances
For rough estimate purposes, here are some typical wattages of various household appliances.
Aquarium = 50–1210 Watts
Clock radio = 10
Coffee maker = 900–1200
Clothes washer = 350–500
Clothes dryer = 1800–5000
Dishwasher = 1200–2400
Dehumidifier = 785
Electric blanket- Single/Double = 60 / 100
Fans
– Ceiling = 65–175
– Window = 55–250
– Furnace = 750
– Whole house = 240–750
Hair dryer = 1200–1875
Heater (portable) = 750–1500
Clothes iron = 1000–1800
Microwave oven = 750–1100
Personal computer
– CPU – awake / asleep = 120 / 30 or less
– Monitor – awake / asleep = 150 / 30 or less
– Laptop = 50
Radio (stereo) = 70–400
Refrigerator (frost-free, 16 cubic feet) = 725
Televisions (color)
– 19″ = 65–110
– 27″ = 113
– 36″ = 133
– 53″-61″ Projection = 170
– Flat screen = 120
Toaster = 800–1400
Toaster oven = 1225
VCR/DVD = 17–21 / 20–25
Vacuum cleaner = 1000–1440
Water heater (40 gallon) = 4500–5500
Water pump (deep well) = 250–1100
Water bed (with heater, no cover) = 120–380
This range uses the finicky and temperamental Direct Spark Ignition (DSI) system. This is a different animal from the two most common gas oven ignition systems: standing pilot and hot surface ignition.
In the DSI system, when you turn on the oven, it makes a spark at the burner to ignite the gas and fire it up… except when it won’t. Hence this post.
Common complaints:
– oven shuts off during the Bake cycle and the food ain’t cooked
– oven won’t light or, if it does, it shuts right off
– burner ignition is sporadic or intermittent– sometimes it works, sometimes, tough cookie (or raw cookie)
– oven may “lockout” after it reaches the set Bake temperature
– oven cools down after pre-heat
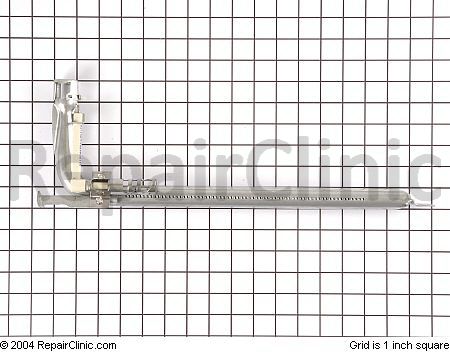
Most of the time, these problems are caused by the bake burner itself. Whirlpool added more holes to the gas burner tube to help it fire up more reliably. Check it out:

The cure is to buy and install the upgraded bake burner tube.
The newer GE and Hotpoint refrigerators– the ones with the muthaboard on the back– use thermistors to sense temperature in the freezer, beer compartment, and evaporator. The motherboard on the back of the refrigerator sends an electrical pulse to the sensor to measure its change in resistance and thus sense the change in temperature of the refrigerated space. The older thermistors had a defective seal which allowed water to seep in. This messes with the resistance and sends weird signals to the muthaboard resulting in erratic temperature control. The picture below shows the difference between the new and old-style thermistors (click for larger view):

(click to enlarge)
If you’re having temperature control problems in your GE fridge, check to see if you have the old-style thermistors. If you do, you should replace all of them. Most models have four: two in the beer compartment, one in the freezer, and one mounted directly on the evaporator, shown in the diagrams below (click ’em for a larger view).


Here’s the new-style thermistor you need:

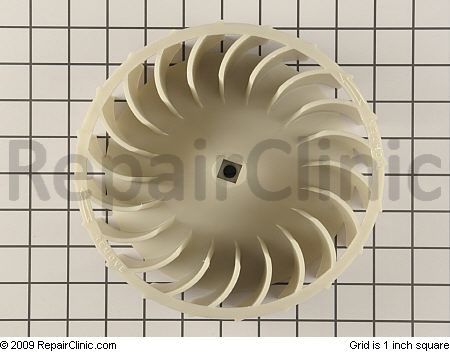
You’ll also find this dryer sold under the Sears Kenmore, Maytag, and Amana brands. These dryers have the lint filter in the door (as opposed to the top panel, like this one). This video shows you everything you need to know to replace the blower wheel. Tools you’ll need: hex socket, flat head screwdriver, Phillips head screwdriver, wrench, square 1/2″ drive socket wrench. And you can conveniently buy the blower wheel ratcheer. 🙂
Most icemakers are controlled by a simple wire feeler arm that hangs off the side of the icemaker. As the ice bucket fills up, it raises the feeler arm and eventually stops it from making any more ice so it doesn’t overfill the bucket.
But the engineers at Whirlpool were told that they needed to increase the usable space inside the freezer compartment without increasing the size of the compartment itself. To do this, they figgered they needed to re-design the icemaker, ice container system and freezer shelving. This needed what we professional appliantologists call Divine Intervention®.
 So the engineers burned some funny incense and chanted “OM” to the pot-bellied, bald-headed, golden Buddha. And, yea verily, the pot-bellied, bald-headed, golden Buddha did grin down upon them and granted them a miraculous vision of the electronified optical control icemaker system!
In this divinely-revealed icemaker control system, the mechanical feeler arm is replaced with the new optical controls, located on either side of the freezer liner, as shown below.
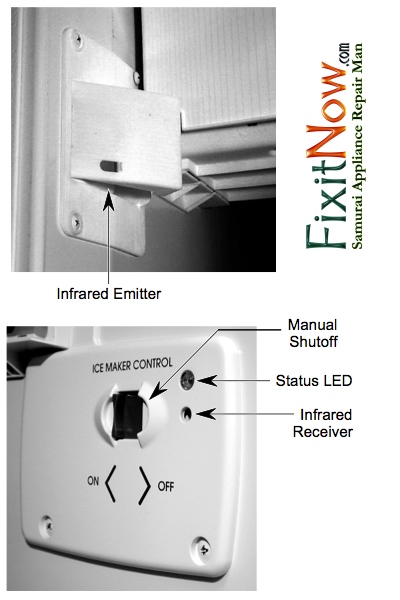
The optics use infrared light to sense the ice level in the ice bucket. The other change they made was to move the ice bucket from inside the freezer space to the freezer door. These changes increased the available usable space inside the freezer by over 50,000%! And the pot-bellied, bald-headed, golden Buddha did grin and the engineers did feast on fruit bats and breakfast cereals.
The main thing to keep in mind about this optical control system is that the only thing it really does is to shut off the icemaker. Other than that, it doesn’t affect the operation of the icemaker. There’s nothing new or special about the icemaker itself– it works the same way as the good ol’ Whirlpool-built modular icemaker that we’ve all come to know and love. So, for example, you can still manually start the harvest cycle the same way you would for any other Whirlpool-built modular icemaker with the feeler arm.
So that just leaves the optical control itself as something you may need to troubleshoot if you’re having problems with the icemaker not making ice… and that’s ezzacly what this spiffy troubleshooting flow chart will hepya do.
http://fixitnow.com/wp-content/uploads/2012/06/TroubleshootingOpticalIcemakerSystem.pdf
Word: This optical control system has been pretty reliable and I’ve not seen many of them fail. Most of the time, when I’m working on a no-ice complaint on one of these guys, I find either a bad icemaker or water inlet valve. But don’t be a parts changing monkey and just throw parts at it hoping to get lucky– do your troubleshooting so that, “…ye shall know the truth, and the Truth shall make you free.”
Can I hear an “Amen?”
Michael wrote:
O wise one, if I am forced to purchase a new gas dryer please tell me which brand you approve of.
Fondly drinking beer as well,
Mike
Get this one… if you can still find it:

Ahh, the good ol’ days when refrigerator defrost cycles were controlled by simple mechanical defrost timers. Yeah, used to be a man could go out on a refrigerator service call and make an easy $150 replacing a silly little $25 timer. The old mechanical timers would simply click the fridge into defrost mode every six or eight hours and fire up the evaporator defrost heaters for 21 minutes or so whether it needed it or not. But life never stays simple, does it? Alas, those days are rapidly disappearing.
Instead, the manufacturers have all taken to using the fancy-schmancy electronic timer boards so they could add an "adaptive defrost" feature. Supposedly, adaptive defrost makes the fridge more energy efficient by making the defrost cycle contingent on the number of door openings and other factors. I think it’s just an excuse to sell more expensive electronic parts that don’t really perform as advertised. It’s probably driven by some gubmint bureaucratic program–you know, the same geniuses who gave us the load of crap about how we can’t use R-12 anymore because it hurts the ozone layer.
Well, no use whining about it ’cause adaptive defrost is the wave of the future, for better or worse. And if you have a newer, high-end fridge, chances are that it has adaptive defrost. And one day, at the worst possible time, it will break.
The adaptive defrost board on Maytag fridges looks like this. To put this board into defrost, short "L1" and "Test" with a small screwdriver and wait three seconds. You should hear a clicking noise from the relay and the fridge will shut off and go through a defrost cycle.
The adaptive defrost on Amana fridges is a little different. A test procedure for this board is shown here. To initiate the defrost cycle, press the refrigerator light switch five times in six seconds. If you press it five more times within six seconds, this will cancel defrost and take the fridge straight into run mode. The operation is similar on both the bottom mount and side-by-side fridges. After the defrost terminator/thermostat opens, there will be a six minute delay before the compressor and condenser fan motor start running again, and a 10 minutes delay before the evaporator fan motor starts running. This is important to know because you can really start chasing your tail when things don’t start running when you think they should.
Whirlpool also has some adaptive defrost boards out there. I don’t need to post the diagnostic info on them here because it’s all in the mini-manual that comes with your fridge, usually folded up into a little itty-bitty square and tucked into a slot on the backside of the condenser grill, in front of the fridge.
For the nitty-gritty on the multitudinous varieties of adaptive defrost control systems used in all Whirlpool-brand refrigerators (includes Maytag, Amana, Kitchenaid, and Jenn-air) download this service manual (12.88mb).
Ok, so let’s say you’ve determined that your adaptive defrost board is fried. Well, you’ll need to replace that bad boy. Come git you one:
Ahh, sweet summertime– it’s what we professional appliantologists call “refrigerator season” because we get loaded up with calls for refrigerator problems. “Why is that, Captain Ron?” No one knows. Well, that ain’t ezzacly true. With the warmer temperatures and higher humidity, the refrigerator is having to work harder to keep your beer cold and get rid of all the extra moisture that accumulates inside. Here are some tips and tools that’ll hepya keep your beer tooth-crackin’ cold.
The single most important thing about your refrigerator for cold beer is temperature. This sounds obvious but did you know that most people have no idea what the temperature is inside their refrigerator? They ass-u-me that the setting on their refrigerator controls somehow correlates to a temperature inside the box year ’round, regardless of things like ambient temperature and humidity, amount of time the door is open, amount of pet hair on the condenser, etc. Read this quick explanation of how refrigerator controls work.
Pop Quiz: How can you tell what the temperature is inside the refrigerator?
Answer: By using a thermometer!
Every refrigerator should have a thermometer inside of it. Not having a thermometer inside your refrigerator is like driving a car without a speedometer. Here’s the thermometer you need:
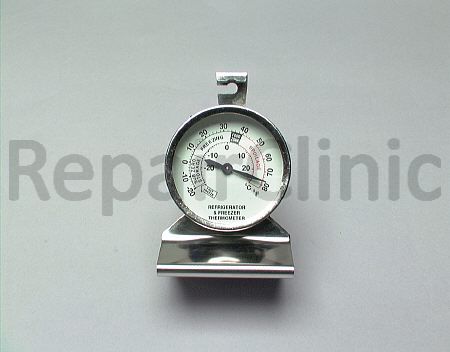
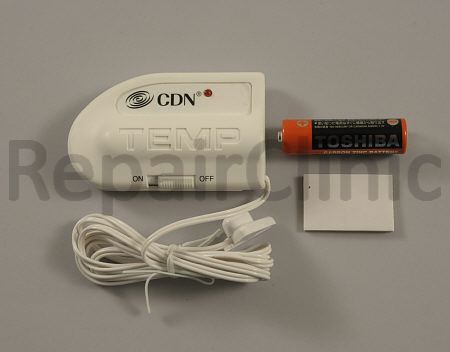
In addition to a thermometer inside the beer compartment, you should have a temperature alarm inside the freezer to give you an early heads-up incase it starts warming up. This can save big $$ by preventing spoiled food.
Summer can bring out lots of smells inside the refrigerator that were masked by the colder temperatures of winter. These smells can impart off-tastes to the ice cubes, too. This nifty carbon deodorizer sucks up that nasty stink to keep your fridge smelling sweet, baby, sweet.

Dirty condensers are one of the biggest causes for warm refrigerators in summer. During winter, your refrigerator might have been able to keep things cold inside despite the condenser being matted with cat or dog hair. But now with the warmer ambient temperatures of summer, it can’t quite make it anymore. What’s a brutha to do? Clean the condenser with your vacuum and a condenser brush!

And when was the last time you replaced the water filter in your refrigerator? The Samurai has a complete selection of water filters for any make or model of refrigerator. Come git you some!
Finally, ever wonder how much energy your refrigerator (or any other plug-in appliance) is using? Well, wonder no more with the Kill-a-Watt meter!
This washing machine is one o’ them designs that the engineers shoulda let die on the drawing board. Its one saving grace is that they’re pretty easy to work on, which is a good thing because you’ll be working on it a lot.
Replacing the U-joint in this beast is a pretty simple job, about three mugs on the world-famous SUDS-o-meter. Frequently, you gotta also replace the wash plate at the same time ‘cuz it gets warped from being banged around by the bad U-joint.
BTW, if this post or others ones here at Fixitnow.com are helpful to you, buy your tools and parts through the links on this site to help support us. Domo! 
Awwite, let’s light this candle.
You’ll need a special tool, called a spanner wrench, to remove the lock nut in the tub. Come git you one:
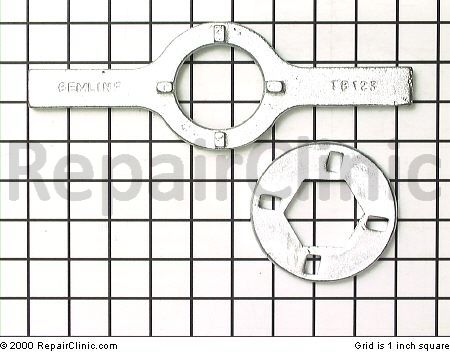
Next, you’ll need to the U-joint kit:
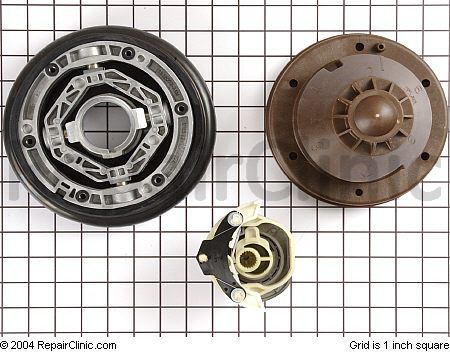
The kit comes with instructions but in case you want a sneak preview or you just enjoy reading technical instructions recreationally, you can download ‘em ratcheer==> Calypso U-joint Installation Instructions.
If the wash plate is warped or boogered up, now would be a good time to replace it, too:
As I mentioned, this really is a pretty simple job and the destructions that come with the kit are detailed and illustrated. If you’d like more info on this machine because you’re a noob and aren’t comfortable taking things apart, download the service manual for the Calypso washer.
Awwite, go make me proud! 


