Category Archives: Dishwasher Repair

GE Triton XL Dishwasher Trips Circuit Breaker

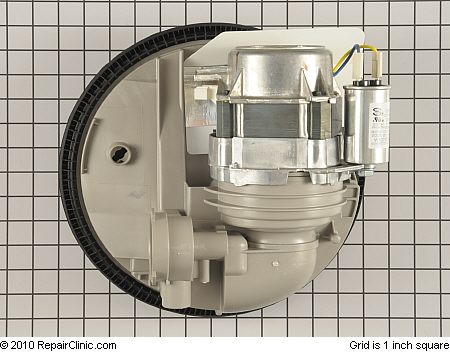
The Triton XL GSD6000, PDW7000, EDW4000 series of dishwashers contain a Dr. Who device called a transient absorber, or transorb. Its job is to absorb electrical transients created when the water valve is turned on and off.

dishwasher kickplate removal - click to enlarge
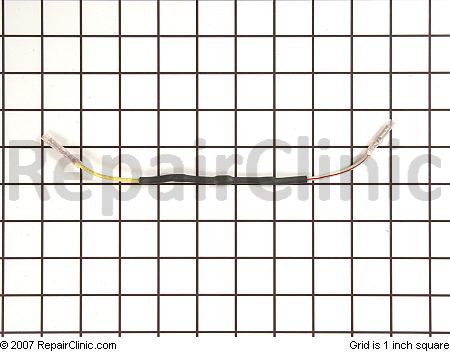
To get to the transorb, you’ll need to remove the dishwasher kickplate. The transorb is located about an inch and half from the red water valve harness connector. It’s covered in black heat shrink tubing with a yellow wire on one end and a white wire with a red stripe on the other. See photo below:

GE Triton XL Dishwasher Transorb Location

The transorb is wired in the harness between the line (yellow wire) and neutral (white-red wire) sides of the water valve circuit. When these suckers fail, they usually fail by shorting out, making a short circuit betwixt line and neutral. This would cause the circuit breaker to trip when the dishwasher control engages the water valve.

GE put out a new transorb kit to replace the old one. The new kit contains a transorb with two attached butt connectors and complete instamallation destructions.

Transorb kit *Shorted Transorb will likely damage the main electronic control board.

To install the new transorb, cut the defective part out of the harness and splice in the new one according to the installation instructions. This way, you don’t have to replace the entire harness. Oh, thank you, GE!

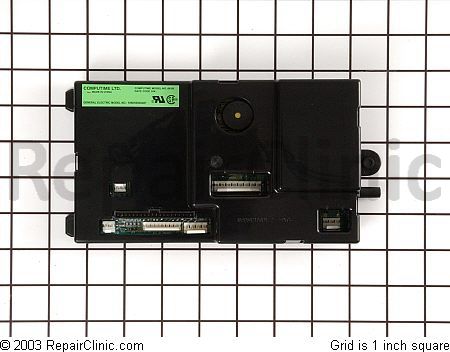
When replacing a transorb, you should also replace the electronic control. A shorted transorb may damage the water valve circuit in the electronic control and you’re likely to have intermittent and highly annoying water fill problems. If you’re a professional appliantologist, that means call-backs. And everyone hates a call-back!

GE Triton dishwasher control module assembly

To learn more about your dishwasher, or to order parts, click here.

Coping with Phosphate-free Dishwashing Detergents

An Inside Look at How Dishwashers Work

If you think your dishes aren’t getting as clean as they used to, you’re probably right! As of July 1 of this year, all the detergent makers removed phosphates from their detergents. This has caused a rash of washability complaints because the phosphates did a number of important things to help the detergent clean better.

For example, phosphate causes food to break apart and dissolve by removing the calcium that binds foods together. It also reduces spotting and filming during the wash cycle. Phosphate also helps break up and get rid of grease, helps control water hardness, and suspends soils within the wash water so they are not redistributed onto the plates.

The old-formula dishwashing detergents had about 30% phosphates. Now, with the phosphates removed, the calcium is free to run around inside the dishwasher slurry causing trouble.

The solution is to go to an enzyme-based detergent. We’re on a well with hard water, unsoftened, and have been using this stuff for years with excellent results==> CLICK

It’s a good idea to run Affresh every few loads, too, to de-gunkify the dishwasher’s innards.

To learn more about your dishwasher, or to order parts, click here.

Dishwasher Installation Questions: Water Supply Line and Electrical Connections

Eli wrote:

I found and I believe I repaired the leak in my dishwasher. I am currently re-installing it. I did not remove it to work on it, which is why these questions may seem silly. Do I use teflon tape while installing the water inlet pipe to prevent leaks. Also, I have two wires in the connection coming from the wall, but three in the area where they connect to the dishwasher–what do I do with the extra wire? Thanks.

Sublime Master appl.tech.29501 replies:

If your water supply line to the dishwasher has a compression fitting then no, no tape. If your talking about the elbow fitting that goes into the water valve it should have tape on the valve side only.

So you have 2 wires coming from your power source to the dishwasher and 3 wires coming out of the dishwasher? Should be black to black, white to white and green is your ground that connects to the dishwasher frame.

Read more: dishwasher installation question – The Kitchen Appliance Repair Forum – Do-It-Yourself Appliance Repair Help – ApplianceGuru.com: The Samurai Appliance Repair Forums http://applianceguru.com/view_topic.php?id=26833&forum_id=1&msg=5#ixzz0ws45t0Ta

To learn more about your dishwasher, or to order parts, click here.

Get Your LG Appliance Parts Right Here at Your Local Online Appliance Repair Shop

What does “local” mean anymore in this age of the Internet? I mean, can you get any more local than right here on your computer screen? I know we look big time an’ all, but we’re a mom & pop (literally!) operation, too. Instead of a brick n’ mortar repair shop, we’re your online DIY appliance repair shop; we’re every bit (pardon the pun) as real and we’re as close as your compooter screen. How’s that for local?

Fun Fact to Know and Tell: The “local” appliance repair shop in your town or city cannot buy LG appliance parts directly from their parts dealer like they do for other appliance brands; they have to buy them directly from LG.

What does this mean for you? It means you’re gonna pay a higher price and wait longer to get LG parts if buy them from your “local” parts house.

LG.jpgBut the Samurai has the solution: buy your LG parts right here through Fixitnow.com– your local online appliance repair place– you’ll save mucho dinero and you’ll get your parts delivered lickety-split. Just use the handy links below:

LG Appliance Parts Links

Dishwashers
Dryers
Ice Makers
Refrigerators
Microwave Ovens
Ovens/Ranges/Stoves
Refrigerators
Washers

KitchenAid / Kenmore Dishdrawers: Differences and Repair Manuals

KitchenAid (a Whirlpool brand) has been offering the popular dishdrawer-style dishwasher for several years now. They’re also sold under the Kenmore label. Prior to 2008, Fisher-Paykel manufactured the dishdrawers for KitchenAid; since 2008, KitchenAid has been sourcing them from Fulgor. IMHO, the Fulgor-built units (since 2008) are a much better design and more robust.

From the outside and from a user’s standpoint, both units appear very similar. But the units have profound differences in construction and design that affect troubleshooting, diagnosis, tear-down, and repair. So, if you’re working on one of these, it’s important to have the correct manual. Here’s how to tell the difference using the KitchenAid model number and links to the respective repair manuals:

– KUDD01 models [tech document KAD-9] are sourced from Fisher-Paykel
– KUDD03 models [tech document KAD-10 for “2008”] are sourced from Fulgor

A quick way to tell a difference between the two manufacturer sources without taking apart anything is by the wash arm. On the Fisher-Paykel-sourced units, the wash arm will lift right off without having to unscrew anything. On the Fulgor-sourced units, you’ll have to unscrew and remove a wash arm cap.

KitchenAid Dishdrawers
(click for larger view)

To learn more about your dishwasher, or to order parts, click here.

Dishwasher Drain Hose Installations

Ahh, the unsung dishwasher drain hose; working tirelessly behind the scenes to carry away the greasy, stinky water in your dishwasher and make your wine goblets and chilled salad forks safe for your puckered lips once more. Such a workhorse, yet so neglected. Shoddy drain hose installation is the cause of many washability complaints in dishwashers. If the dishwasher can’t completely drain the odious water from the basin between wash and fill cycles, then you’re washing your dishes in dirty water and you’ll have food gookus left on them.

So grab ‘hold of those two squishy lumps at the base of your spine and come tip toe through the drain hose tulips with me.

Dishwasher Drain Hose Configurations

Dishwasher drains will come in two flavors:

Direct Drain: drains directly into the kitchen drain pipe (Figures 1 and 1A)
Disposal Drain: drains into the disposal via the dishwasher drain port on the disposal; the disposal drains into the kitchen drain pipe (Figures 2 and 3)

The most important feature of a dishwasher drain hose– and the most often overlooked– is the “riser loop.” Notice in each diagram above that the dishwasher drain hose isn’t run to the drain by the most direct route; nawsir, it’s got what we professionals call a “riser loop” where it gracefully rises up to the underside of the cabinet and then descends to the drain point. “Why do you suppose they do it that way, Samurai?” To keep gooky water from the kitchen sink drain from running into the dishwasher basin.

BTW, if you need a new drain hose for your dishwasher, you can get one ratcheer==> Dishwasher Drain Hoses for Most Brands and Models.

Your local building code may or may not require an air gap (Figure 3). IMHO, the air gap for a disposal drain configuration is overkill and introduces another clog/leak point. But, I rectum gubmint knows what’s best ‘cuz they here to hayelp! So if your local gubmint is “helping” you install a crippled dishwasher drain with an air gap, you can get an air gap kit ratcheer==> Dishwasher Drain Air Gap Kit

To learn more about your dishwasher, or to order parts, click here.

Diagnosing Dishwasher Door Leaks

appliance tip of the day archiveWhen diagnosing a water leak from your dishwasher door, you need to determine if the water is coming from inside the door liner, from underneath the door, or out the door gasket. Here a few things to check before pulling out your tool box.

Dishwasher Installation is Critical!

The dishwasher has to be level, with all four legs firmly on the ground, and square. Check the level front to back and side to side. Level is especially critical if your dishwasher has a plastic tub because these can be warped by cruddy installation jobs.

Oversudsing

Gawd, I can’t even count how many service calls I’ve been on for leaking dishwashers only to find that the problem was either 1) using too much soap or 2) someone (usually hubby) put in liquid dishwashing soap instead of dishwashing detergent. In either case, the dishwasher will whip up more suds than an overcharged keg in a brewpub and you’ll end up with soapy water all over your floor.

Water Overfill

The water level should come up to the bottom edge of the heating element. To check this, open the door after the dishwasher fills with water and starts spraying. If the dishwasher is not level front to back and is pitched forward, the water level will be above the heating element in front but below the element in back.

Door Alignment

The door liner needs to be centered in the door gasket. If it ain’t…you guessed it, LEAK!

Door Gasket

Cracks, tears, and shrinkage can all cause a door gasket to leak. Sometimes, on older dishwashers, the gasket can look ok, but the rubber has become age-hardened and so doesn’t make a good seal with the cabinet anymore. This is especially true with Kitchenaids.

Lid Latch Grommet

This is the little gasket that seals the latch on the detergent compartment door. A common source of leaks with Maytag dishwashers is that this grommet will tear and cause leaks. Easy $2 fix.

Wash Arm

Sometimes, plastic wash arms will split at the seams. This pushes high pressure water directly at the door and out through the gasket. To check the spray arm for splits, run the dishwasher to heat the arm then grab both ends and gently twist, looking for splits. Also, gookus caught inside the spray arm can stick in the spray arm holes during wash and make high pressure water jets inside– like holding your thumb over a garden hose– that the door gaskets aren’t designed to withstand. Remove and clean out the spray arm.

Front Tub Flange

Sometimes the front tub flange on plastic basins can warp and pucker outward, causing leaks. Use a heat gun to warm up the plastic and bend it back into place.

Still confoosed, grasshoppah? For more pearls of wisdom about your dishwasher, click here.

grasshoppers waiting to load the dishwasher after the master finishes stuffing his pie hole with flesh meats.

Handling Hard Water and Mineral Buildup in Today’s Dishwashers

The dishwashers being made today ain’t like yo mamma’s dishwasher. Dishwashers made as recently as seven to 10 years ago used big honkin’ motors that practically sandblasted your dishes clean and then reversed direction to pump the water out. They used a lot more energy and water than the delicate little dainties being made today. They also lasted much longer and weren’t as prone to having problems with mineral buildup inside of ’em… but don’t get me started on that rant. Prodded along by the Beltway Bandits wielding the Energy Star stick, all the manufacturers are making their dishwashers with dainty little wash motors that drizzle the water on the dishes and a separate drain pump motor. So, for better or for worser, we’re all stuck with these limp-wristed dishwashers.

One of the consequences of using these low-wattage pumps and motors is that they have to run longer to get your dishes as clean as the old war horses did. Whereas yo mamma’s dishwasher would run for less than an hour, it’s not unusual for a new dishwasher to run for two or three hours. Although it seems counterintuitive (that’s one of those big words that we professional appliantologists use– please don’t try it at home as I cannot be responsible for your safety), the newer dishwashers are still using less energy than the older ones even when they run two or three times longer. It’s madness, I tell you, unmitigated insanity!

But, like with everything, there’s a downside to all this feel-good, Energy Star madness. If you have hard water (like most folks who get their water out of a well), the reduced water use and longer run times means you’re gonna get more mineral deposit gookus on your dishes and in the guts of your new fancy-pants, Energy Star dishwasher. This can cause all kinda washability and cleaning problems for your dishes, damage to the dishwasher’s dainty little innards, and increased energy consumption.

Hard Water Problems in Dishwashers
(click for larger view)

Four Ways to Handle Hard Water in Your Dishwasher:

Numero Uno: Use rinse aid! It’s not an option with today’s dinky dishwashers. Rinse aid allows the dishwasher to use less water with the same amount of cleaning and drying effectiveness. It does this by creating what we professional appliantologists call “sheeting action” of the water. By making the water sheet along dishes, rather than cluster into beads, it evaporates faster and with less energy. Look at the difference:

Rinse Aid in Dishwashers
(click for larger view)

Numero Duo: If a little doesn’t work, use MORE rinse aid!

Rinse Aid Settings in Dishwashers
(click for larger view)

Numero Trio: Regularly use a dishwasher cleaner (Affresh) and performance booster (Glass Magic) to clear out the gookus and keep the build-up down.

Numero Quattro: Install a household water softening system or buy a fancy-pants dishwasher with its own water softener built in, like a Miele.

To learn more about your dishwasher, or to order parts, click here.

Maytag Recalls Dishwashers Due to Fire Hazard

house_fire200x133.jpgWell, they done went and did it this time– them engineers at Maytag made a boo-boo that can make your dishwasher spontaneously burst into flames, engulfing your entire house and all your loved ones in a giant, hairy ball o’ flame!

Okay, so I overstate it a bit for entertainment value. I mean, c’mon, it’s a post about a boring appliance recall– I gotta do something to spice it up!

Here’s the recall notice from the CPSC:

Name of Product: Dishwashers

Units: About 1.7 million in the United States

Manufacturer: Maytag Corp. of Newton, Iowa or Maytag Corp. of Benton Harbor, Mich.

Hazard: An electrical failure in the dishwasher’s heating element can pose a serious fire hazard.

Incidents/Injuries: Maytag has received 12 reports of dishwasher heating element failures that resulted in fires and dishwasher damage, including one report of extensive kitchen damage from a fire. No injuries have been reported.

Description: The recall includes Maytag®, Amana®, Jenn-Air®, Admiral®, Magic Chef®, Performa by Maytag® and Crosley® brand dishwashers with plastic tubs and certain serial numbers. The affected dishwashers were manufactured with black, bisque, white, silver and stainless steel front panels. The brand name is printed on the front of the dishwasher. The model and serial numbers are printed on a label located inside the plastic tub on a tag near the left side of the door opening. Serial numbers will start or end with one of the following sequences.

maytag-dishwasher-recall-serial-numbers
(click for larger view)

Sold at: Department and appliance stores and by homebuilders nationwide from February 2006 through April 2010 for between $250 and $900.

Manufactured in: United States

Remedy: Consumers should immediately stop using the recalled dishwashers, disconnect the electric supply by shutting off the fuse or circuit breaker controlling it, inform all users of the dishwasher about the risk of fire and contact Maytag to verify if their dishwasher is included in the recall. If the dishwasher is included in the recall, consumers can either schedule a free in-home repair or receive a rebate following the purchase of certain new Maytag brand stainless-steel tub dishwashers. The rebate is $150 if the consumer purchases new dishwasher models MDB7759, MDB7609 or MDBH979; or $250 if the consumer purchases new dishwasher models MDB8959, MDB8859, MDB7809 or MDB7709. Consumers should not return the recalled dishwashers to the retailer where purchased as retailers are not prepared to take the units back.

Consumer Contact: For additional information, contact Maytag at (800) 544-5513 anytime, or visit the firm’s website at www.repair.maytag.com

Maytag Dishwasher Recall 6-3-2010
(click for larger view)

Changing Out the Motor-Pump Assembly in a Whirlpool-built Dishwasher

You know the drill: you open your Whirlpool-Kitchenaid-Kenmore dishwasher after it supposedly ran through the cycle last night and… the dishes still have last night’s grits and redeye gravy sauce smeared all over them. Or maybe the clean light is blinking seven times.

So you do some very intelligent button pushing on the control panel and, using your keen Vulcan-like powers of observation, discern that water does indeed flow into the dishwasher. And it gets pumped out after a while, too. OK, no problem with the water. But when it’s supposed to be washing, you hear a loud, low hum or growling noise instead of that old familiar quiet, almost inaudible sound of water swishing around.

Most likely what’s going on is that the wash motor in the dishwasher is what we professional appliantologists call FUBAR. Wellllll, you just grab ‘hold of those two mushy lumps at the base of your spine and let’s do the Samurai Fixit Romp!

Y’see, Hoss, this dishwasher is a lot different from the good ol’ dishwashers with the single big honkin’ center-mounted motor that sandblasted all your dishes clean and pumped the water out. As effective and reliable as that design was– still lots of ’em in still in service out there today– it was deemed politically incorrect by the Masters of the Universe.

So, Whirlpool dutifully developed the new Energy Star-compliant design, dubbed the Point Voyager dishwasher. It uses a much smaller wash motor and an even smaller drain pump. Good idea in theory and it sure does run a helluva lot quieter that the old war horses.

But their weak point seems to be the bearing seal in the wash motor. After a while, the bearing seal leaks and water gets in there, seizing up the wash motor. You could replace just the wash motor but, in my vast and awesome experience, it’s worth the few extra shekels to replace the entire motor pump assembly. That way, you’re getting a whole new impeller, macerator, and pump volutes, which can trap all kinda ca-ca. And replacing the motor-pump assembly is easier than replacing just the wash motor since you have to remove the motor-pump assembly in either case. It’s just plug n’ chug; easy job, about two mugs on the world-famous SUDS-o-meter.

This post has all the information you need to fix that puppy. First thang, come git you a new motor-pump assembly:

motor-pump assembly for a whirlpool-built dishwasher

Now, on to the destructions. Here’s a printed how-to on this surgical procedure from Whirlpool Corporation…

Whirlpool Dishwasher Motor-Pump Assembly Replacement

… or, for my grasshoppers who prefer a more cinematic experience, you may wish to watch the Samurai in action as he replaces the entire motor-pump assembly in less than four minutes, a world-record!

The only thing I didn’t show in the video was the pull tabs that hold the motor-pump assembly in place. That’s ‘cuz I’s moving so fast that it woulda just been a blur anyway. But here’s a still shot that shows what they look like and explains a bit about ’em. Click the pic for the larger view.

Whirlpool-built Dishwasher Motor-Pump Assembly Retaining Clips

To learn more about your dishwasher, or to order parts, click here.