Category Archives: Dryer Repair

Mailbag: Dryer Blows Circuit Breaker on Heated-Dry Cycle Only

rho wrote:

beaumark dryer older Ge style runs for 2-3 minutes then blows circuit breaker fuses, runs fine on air fluff circuit any ideas?
Thanks
Rho

_______________________________
The above message was sent when you were offline, via your LivePerson site.

Message sent from IP: 24.103.202.235

You didn’t say whether this is a gas or electric dryer; however, in my infinite wisdom and mercy, the Samurai divines that you have an electric dryer. Therefore, we shall proceed on this infallible divination. If I’m wrong, ask for a refund.

This might be a classic case of a grounded heating element. Oh, I know what you’re asking, “A do-what?” Say it with me one time: grounded heating element. This is where the electric heating element (which is really just a coil of steel that glows orange-hot when current runs through it) has split in two and one part is touching the dryer cabinet or the heating element housing. (A bobby pin or coin or some other conductive debris that got into the heating element area can create this same condition.) This makes a direct connection from one leg of the power supply to ground, i.e., a short. The circuit breaker is doing its job in cutting power to the dryer.

The other possibility is that the circuit breaker itself has gone bad and is no longer able to carry a load without tripping. If you do need to replace the breaker, make sure you use one with the the same current rating as the original. For example, don’t replace a 30-amp breaker with a 40-amp breaker.

Ok, happy fixing!

To learn more about your dryer, or to order parts, click here.

Appliance Repair Revelation: The Mysteries of Dryer Cord Wiring

appliance tip of the day archiveWiring in a new power cord for your electric dryer? Upgrading your electric dryer outlet from the old three-prong to the new four-prong outlet? Well, grab hold of those two large lumps at the base of your spinal cord and let’s romp through the wild and wacky world of dryer cords and outlets.


three-conductor dryer terminal--click for larger viewfour-conductor dryer terminal--click for larger viewThese two pictures illustrate the power wiring on a the terminal of an electric dryer. The one to the left here is the old-style three-wire configuration. Most people have this type in their homes. New code changes, though, require that dryers now have a four-wire cord, shown to the right. These are just just thumbnail pictures that you can click for a larger view. But I’ll bet you already figured that out, didn’t you?

Besides the number of wires in each cord, there are two important things to notice. First, in the four-wire configuration, notice that the dryer’s grounding strap is folded back on itself. The whole point of the four-wire cord is to separate the ground from the neutral. The green wire (the “new” extra wire in the four-wire cord) is attached to the dryer cabinet. In the three-wire configuration, the grounding strap is left intact and the neutral and ground are tied together.

anatomy of a three-prong dryer outlet--click for larger viewanatomy of a four-prong dryer outlet--click for larger viewIf you need to re-wire the outlet, these pictures will explain the anatomy of the three-prong (left) and four-prong (right) outlets. Once again, these pictures are just thumbnails–click ’em for a larger view.


One more thing. All these pearls of dryer cord wisdom apply only to electric dryers–gas dryers use a standard 120v wall outlet.

Recommended reading: Electrical Requirements for Appliances.

For more information on your dryer or to order parts, click here.

the master revealing the mysteries of dryer cord wiring to his grasshoppers

Online Dryer Diagnostic Guide

Dryer (Gas and Electric) Diagnostic & Repair Guide
Problem Possible Causes
[Gas and Electric]
Dryer drum won’t turn.
  • The belt’s broken. Turn the drum by hand. If it turns reeel easy, you gotsa broken belt, Hoss. Also, look for contributing causes for the belt to break such as worn drum rollers, damaged felt kit, or stiff idler roller. For belt replacement help on most major brands, click here.
  • The motor’s burned out. If you hear it "Hummmm…CLICK!" when you try to start it, you probably got a fried motor. Remove belt from motor pulley and start dryer to see if it still does it.
  • The thermal fuse is open. Check continuity with….your ohm meter.
[Gas and Electric]
The thing runs but it’s noisier ‘n my mother-in-law.
  • Could be worn drum rollers, idler pulley>, or drum front slide kit. Whirlpool/Kenmore problems will usually be in the rear drum rollers or idler pulley, Maytag problems will usually be the front slide kit. GE/Hotpoint problems will usually be the front slide kit or rear drum center bearing.
  • It’s fairly common for the blower wheel to wallow out and rattle around on Maytags and Magic Chefs. This type of noise is most noticeable when first starting the dryer and then when the stopping it.
  • If the idler pulley bearing is burned out, you’ll usually hear a high-pitched squealing noise.
[Gas and Electric]
Takes forever to dry a load of clothes.
  • Dryer vent is too long, kinked/restricted, or full of lint. I’ll betcha your using a big ‘ol run of white vinyl–that’s a Bozo no-no unless you want to burn down your house. Oh sure, don’t believe me. I only see this about every frikkin’ day. Do yourself a favor change out the cheesy vent system. For best results, vent length should not exceed 12 feet.
  • Your dryer lint filter is clogged with crap ’cause you’re too freakin’ lazy to clean it out each time you run a load of clothes.
  • Check them operating thermostats!
[Gas and Electric]
Lazy thing won’t run at all.
  • No power at the outlet, duh! Measure for 120v (gas dryers), and 240v L1 to L2 plus 120v L1 or L2 to neutral in an electric dryer outlet. More information on electric dryer outlet anatomy in this enlightening repair revelation.
  • The door switch is broken. Sometimes you can just look at it and tell, other times you gotta check the continuity using a meter (*gasp*).
  • The thermal fuse is open. Locate it with the help of the dryer’s wiring diagram and test it electrically. You gotta use the wiring diagram, Hoss. How in tarnation you gonna fix anything if you don’t use the wiring diagram? Don’t know how to read it? Well then, you shouldn’t be reading this repair guide, either–go call a professional.
[Electric Only]
My electric dryer runs but it won’t heat up.
  • One leg of the 240 volts AC at the dryer outlet is missing. Oh, I can hear you now, "Yo, Mr. Smarty=pants Samurai Guy, I know it has power because the motor runs. Dontcha get it?" Listen, knucklehead, the circuit breaker for an electric dryer is a two-pole, 30 amp breaker. One leg can break disabling the heating element leaving the other leg to run the motor. I only see this about every frikkin’ day, so try not running your mouth so much and learning something for a change. ‘K? ‘K.
  • The heating element is open. Ohm it out, Hoss. You should get between 12 to 35 ohms.
  • One of the thermostats are open. Check continuity.
  • Bad timer contact in heater circuit. You gotta use the wiring diagram here. If you can’t do this, call a pro.
  • Bad temperature selector switch…you know what to do.
[Gas Only]
My gas dryer runs but it won’t heat up.
  • First off, consult the much bally-hooed Gas Dryer Problem Solver.
  • Fried ignitor. This is definitely the case if the ignitor is visibly broken. Measure for 120v at the ignitor terminals. If you get 120v, it’s a bad ‘n.
  • Failed gas valve or holding valve coil. Check the resistance on each valve coil. You may also need to actuate each valve with a test cord since they may only fail after being actuated a couple of times. This can be tricky, Hoss, but I gots face in ya.
  • One of the thermostats are open. Check continuity.
  • Bad flame sensor. If flame fails to ignite at all and the ignitor is not getting 120v, suspect the flame sensor.
  • Couple links here on dryer gas burners: Dryer Gas Burner Know-How and How to Check the Components in a Gas Dryer Burner.

Recommended Reading: Dryer Disassembly for Most Common Brands and Models

Order Parts for Your Dryer

Appliance Repair Revelation: How Does that Dryer Belt Go Back On?

appliance tip of the day archiveWhen your dryer drum isn’t turning anymore, it’s usually a broken belt. Tearing the dryer apart is usually straight-forward enough but stringing the new belt on the motor and idler pulley can be tricky. This handy little picture shows the proper belt configurations for eight different makes of dryers. Your dryer is most likely included in this picture.

Didn’t see yours? No worries, mate. Check out the complete encyclopedia of dryer belt configurations.

I have more detailed photos illustrating the dryer belt configurations here for

Need a belt for your dryer? We got ’em for every brand and model you can imagine right here.

grasshoppers sitting with the master, wearing freshly washed robes free of unsightly link.

Mailbag: Maytag (or Magic Chef) Dryer Rumbles Only When Starting Up or Stopping

Tom Kern wrote:

Hello,

Ref: 13 Year old Maytag Electric dryer……

My dryer has just started making a noise / rumble only during
start-up…. The noise go’s
away one the dryer comes up to operating RPM’s…..

— The belt, Tension pulley, or wheels have never been changed…..

Can you advise what maybe causing this noise on startup ? I can then
order the parts.

Thanks
Tom Kern

Blower wheel used on Maytag dryers--come git you one!Ah yes, the mysterious rumbling dryer. The cause of this noise has eluded many do-it-yourselfers. But St. Applianopoulos, the patron saint of appliance repair, has led you here to the Oracle of Appliance Enlightenment® for further illumination. The problem is not the belt, idler pulley, or drum rollers. It’s the blower wheel, shown here to the right–click the picture for larger view.

What happens is that the hub of this plastic blower wheel eventually wallows out on the metal shaft and no longer makes a tight fit. That’s why you hear it rumbling when the motor shaft starts spinning the wheel from a dead stop. Once the blower wheel is spinning at the same speed as the motor shaft, the noise goes away. Likewise, when the motor stops, the blower wheel’s momentum causes it to again spin at a different speed than the shaft and the noise reoccurs. Replacing this blower is an easy repair, not even two mugs on the SUDS-o-meter.

blower wheel for a magic chef dryer--come git you one!To make this repair, you’ll first need to disassemble the dryer to get access to the blower wheel. To remove the old blower wheel and secure the new one in place, you’ll need a pair of external snap-ring pliers. If someone else reading this has a Magic Chef dryer, same deal applies. You’ll need to order a slightly different blower wheel, shown here to the left.

That’s about all there is to this bit of rocket science. Now go fix your dryer!

To learn more about your dryer, or to order parts, click here.

Common Replacement Parts for Whirlpool/Kenmore Gas and Electric Dryers

You’ll be able to fix most problems with your Whirlpool-built dryer (this includes most Kenmores) with one of these replacment parts.

Complete Whirlpool dryer repair kit, includes 2 rollers, felt seal, idler pulley, belt and adhesive.
Dryer lint screen for most standard capacity Whirlpool dryers with pull-out lint screens, measures 17 5/8If the drum thumps and bumps as it turns, you need one o’ these. Also, replace ripped, torn, or deformed lint screens promptly to prevent big problems, like burnt out motors or vent fires.


Most common Whirlpool-style dryer heating element.
Thermal cut-out (fuse) L360 and high-limit thermostat L250.This element fits almost all Whirlpool-built dryers (yes, that includes Kenmore) that have the lint filter in the top panel (that’s the most common and also the best one). This is the most common thermal cutoff switch. You’ll find this mounted on the heating element can.


Thermal fuse, on blower housing cover of Whirlpool dryers.  Cannot be re-set, must be replaced if is open (no continuity between pins). 3/16 inch terminals.
Thermal fuse, on blower housing cover of Whirlpool stacked laundry dryers.  Cannot be re-set, must be replaced if is open (no continuity between pins). 1/4 inch terminals--used in stack laundry models.If your dryer is part of a stack laundry center, then your thermal fuse probably looks like the one shown here to the right. Otherwise, it’s probably like the one to the left. The look the same but they differ in one important way: the size of the terminal spades. The spades on the statcked laundry thermal fuse are ¼” wide whereas the other one has 3/16″ wide spades.


Thermal fuse, disposable, on exhaust duct of Whirlpool dryers.On some models, the thermal fuse looks like this.


Igniter kit, will replace round or flat style, with bracket, wire nuts and mounting screw. Caution! The black heating element portion of this part is EXTREMELY fragile. Use caution when handling.
Gas dryer sensor for igniter and flame.
Gas valve solenoid coil kit, 2 and 3 wire, new style.

Gas dryer not firing up? Common troublemakers are shown here. From top to bottom they are: the ignitor, the radiant sensor, and the gas valve coils. A blown thermal fuse will also create a no-heat condition so be sure to ohm out the thermal fuse with your meter.

Remember Samurai’s Ichiban Law of Appliance Repair: Never replace a part unless you have proof that the part is bad. For help in getting that proof, read the Gas Dryer Problem Solver.


Mailbag: Gas Dryer Fires Up But Goes Out After a Few Minutes

Ed wrote:

I have a Whirlpool gas dryer and my problem is this:
It starts and ignites but after running for a few minutes the flame goes out. Model #LHI7801NO.
What is wrong

_______________________________
The above message was sent when you were offline, via your LivePerson site.

Message sent from IP: 66.208.215.167

You have a case of what we professional appliantologists call Ventitis Restricticus. That’s the academic Latin name for the diagnosis of your dryer problem. Actually, it’s not a problem with the dryer at all–it’s a bad vent. Specifically, the airflow through the vent is restricted by any number of factors: overly long, kinks, crimps, clogs, too many 90º turns, and yada-yada and so-forth and like that-there. Don’t believe me? Ok, here’s a quick and easy way to prove it: completely disconnect the vent hose from the back of the dryer and fire up the dryer. After observing the dryer heat up normally and averting your eyes at my brilliance, refer to The Ultimate Dryer Venting Guide to surgically correct the Ventitis Restricticus. Hail, Caesar!

Appliance Tip of the Day Encore: Dryer Disassembly

appliance tip of the day archiveAt some point during the life of your dryer, you’re gonna need to open it up to do some surgery. Here are basic disassembly procedures for the most common dryer brands and models. And, Hoss, a genuine manufacturer’s repair manual can be a valuable accomplice in your dryer repair odyssey. Come git you some.

For more information about your dryer or to order parts, click here.

grasshoppers visualizing a dryer disassembly with the master

To learn more about your dryer, or to order parts, click here.

Mailbag: Electric Dryer not Heating

mark wrote:

my very old model whirlpool does not heat up and the element is fine. what else could be the problem and how do I fix it?

_______________________________
The above message was sent when you were offline, via your LivePerson site.

Message sent from IP: 63.190.201.64

Since you refer to an element, and absent any other information about your dryer, I’m going to clairvoyantly assume that you have an electric dryer.

Before you even open the dryer, use your voltmeter to measure for 240v at the dryer wall outlet. You can’t just look at it and think it’s fine (I actually get people telling me that!) And just because the dryer motor runs, this doesn’t mean you’re getting 240v at the outlet, either. The motors runs on 120v but the heating elements require 240v and a common problem is for one leg, L1 or L2, of the 240v supply to open. If you’re not getting 240v at the dryer outlet, you’ll never get the elements to heat up. Plain n’ simple. Whether you have a four-prong outlet or a three-prong outlet, you gotta check the voltage at the outlet with a meter!

Ok, so you checked the voltage at the outlet and you actually measured 240v on your meter. Now, and only now, we turn our keen, laser-like attention inside the dryer. Let’s look at an example wiring diagram for an electric dryer. This one happens to be for a Whirlpool/Kenmore electric dryer and is probably very similar to yours. In the diagram, the heating element is shown in the lower right hand side. L1 and L2 are drawn on the either side of the diagram. The heating element connects to L1 and L2 through several different components. L1 connects to the heating element through the timer, a thermal cutoff, the operating thermostat, and the hi-limit thermostat. The heating element then connects to L2 through the motor centrifugal switch. All it takes is for any one of these components to fail open and this would prevent the heating element from receiving the needed 240v to get hot. Again, even though the example diagram is for a Whirlpool/Kenmore electric dryer, this is a typical configuration for any electric dryer.

Although any one of these components can kill the voltage to the heating element, there are a couple that tend to fail more commonly and can be easily checked. A quick and easy test to do is to measure the continuity of the thermal cutoff, the operating thermostat, and the hi-limit thermostat. Do this with the dryer unplugged and your meter set on the Rx1 scale. Disconnect at least one wire from the component being tested to isolate it from the rest of the circuit. If you find one that’s open, replace it and problem solved!

While you’re checking the continuity of these things, check the wiring for burnt or loose connections–this is another common cause for no-heat in electric dryers. If all those check out, then that leaves the the timer and the motor centrifugal switch.

Easiest way to test the timer is to detach one lead from the heating element (doesn’t matter which one), run the dryer and measure for 120v out of the timer pin that powers the heating element circuit–in our example, it’s pin R. Measure for this voltage by setting your meter to the 150vac scale and placing one probe on timer pin R and the other on any metal point on the dryer frame. Oh, I know what you’re asking, “But if the heating element needs 240v, why are we only measuring for 120v at the timer?” The heating element gets its 240v in two halves: 120v from L1 and 120v from L2. We’re only looking for the L1 half at the timer so we’re looking for 120v.

Finally, if the timer voltage checks good, then that only leaves the motor centrifugal switch which, if you’ve made it this far in your checks, you can safely assume is bad. Since the centrifugal switch is an integral part of the motor, this means you have to buy a new motor. A manufacturer’s repair manual and an AllenBar take a lot of the frustration out of this job.

Ok, go fix your dryer!

Mailbag: Dryer Heats but Drum Won’t Turn

Tom wrote:

I have a maytag gas dryer, it is heating up but the tumbler is not turning, what can the problem be?

_______________________________
The above message was sent when you were offline, via your LivePerson site.

Message sent from IP: 207.172.194.18

This can only be one thing: broken belt. Here’s your three-step prescription to dryer wellness:

  1. Get your dryer model number use that to buy a new belt.
  2. Disassemble your dryer to access the broken belt.
  3. Install the new belt.

Mailbag: Reconnecting the Wires to Dryer Thermostats

Clive Farrington wrote:

Cool website….I have a quick question, in the process of fixing my whirlpool drier. Does it matter which way round the wires go on the thermostats/temp sensors – there was one I’m not sure I hooked back up the right way round?

_______________________________
The above message was sent when you were offline, via your LivePerson site.

Message sent from IP: 65.31.135.182

For two-terminal thermostats, no. For three-terminal and four-terminal thermostats, yes. In these cases, use the wiring diagram to determine how the wires connect.

Mailbag: Non-Standard Dryer Vent

John Chisum wrote:

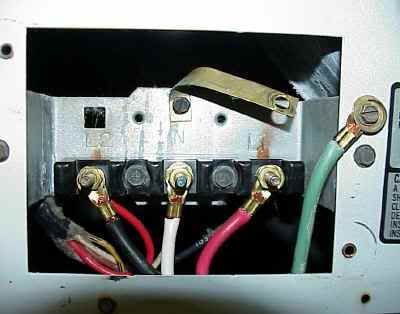
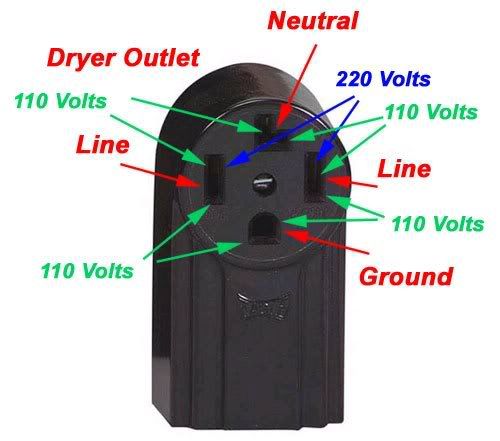
Hello, I am building a new house, the builder has put 3″ PVC VENT PIPE under the cement from landury room to the outside wall, now the inspector tells him that its supposed to be 4″ pipe, what I am asking is will the 3″ PVC VENT PIPE WORK(its installed under the cement floor. Are there any options so this will not have to be removed. and how do i hook up my dryer WHEN ITS A 4″ outlet out of the dryer. Thanks

_______________________________
The above message was sent when you were offline, via your LivePerson site.

Message sent from IP: 208.128.166.15

Holy Guacamole! There are so many things screwed up here I’m not sure where to begin: basic geometry, building codes, re-sale of your house, and plain ol’ common-friggin’-sense. Let’s start with the basics.

Come with me now on a journey back through time, all the way back to when you were just a devilish glint in yo daddy’s eye… Ok, not that far back, but let’s go back to 8th grade geometry class, you know, the one where you were too busy trying to look up Mrs. Soper’s dress to learn how to calculate the area of a circle. Anyway, Mrs. Soper was trying to tell you that to calculate the area of a circle, you multiply the constant PI (3.14) times the square of the radius, like ahso:

A = PI * R^2

Reducing the diameter from 4″ to 3″ (a 25% reduction in diameter, by the way) may not sound like much, but look at the equation for area again. Area varies with the square of the radius. This means little reductions in radius, make for big reductions in cross-sectional flow area. In your case, reducing the diameter from 4″ to 3″ reduces the cross sectional area from about 12.5 sq. in. to about 7 sq. in. So, a measly little 25% reduction in diameter really amounts to a 44% reduction in the cross sectional area. Do you think this will have an effect on your dryer venting efficiency, causing little annoyances like a 44% increase in drying time and a 44% increase in the cost of operating your dryer? Hmmm, there’s a brain tickler for ya. Well, hang with me, Hoss, ‘cuz we gittin’ to the good part.

Check out this table–it lists maximum dryer vent lengths for vents with varying numbers of turns and exhaust fittings for both rigid metal duct and flexible metal duct–all based on a standard 4″ diameter vent. Ok now, let’s take a ezzample. S’pose you have a common, 4″ rigid aluminum dryer vent that idiot builders with half their brains stuffed into Jim Beam bottles install every freakin’ day all across Ameedica. And let’s further suppose that the total length, including all turns, bends, and twists, is 20 feet, that you have three 90 degree elbows, and that the vent terminates in a standard 4″ vent hood. Referring again to the dryer vent length table, you’ll see that the maximum allowable vent length under these conditions is 18 feet–two feet shorter than our hypothetical vent, but probably close enough that the dryer will still work ok.

Now, just for grins, let’s pretend our vent duct is only 3″ diameter instead of 4″, all else remains the same. Ain’t no rocket science here, Hoss: just take the same answer we figgered out above and reduce it by 44%. In other words, where the allowable maximum length for our 4″ vent was 18 feet, if we reduce the vent diameter to 3″, our maximum allowable length is cut down to only 10 feet! With the total vent length at 20 feet, I can guaran-damn-tee you that you’re gonna be running clothes through the dryer at least twice before they get dry, longer as the vent ages and crap builds up in there, which a 3″ vent will do much more quickly. Can I hear a “Shazzayyam!”

Ok, enough higher math. Now tell me this dryer vent wasn’t your idea! If so, then you need to be taken out and thrashed brutally about the thighs and buttocks. What if the concrete settles and fractures part of the duct causing lint to build up at the fault point, you’re going to what…call Mr. Rooter for a ream job? Why not just build an external 4″ vent and then clean or replace every 5 to 10 years or so as needed?

Finally, what happens when you go to sell your house? If I were the home inspector and I saw that–and you better believe I’d look at something like a Jimmy Hoffa dryer vent reeeeal close–I’d tell the prospective buyer, my customer, to stipulate in the contract that the dryer vent be brought up to code. And then, since the house was built by Bozo-with-a-hammer, I’d start wondering what else wasn’t built to code and I’d go fishin’, documenting every little thing just to cover my sweet derriere.

You get my drift, home-boy? Awwite den, go fix that dryer vent.

Recommended Reading: The Ultimate Dryer Venting Guide

Mailbag: GE/Hotpoint Dryer (Old Style) Squeals

Mark Ratcliff wrote:

Hi Samurai!
Cool Website, dude! I found it by doing a search in AltaVista.
Right to my problem….
I own a GE electric dryer, model number DDE7100MCLWH. Yesterday when my wife was drying a load of clothes (3 small kids = tons of laundry!) the dryer starting making a real high-pitched squealing noise. Very annoying. I, in my infinite wisdom (lol), proceeded to turn it off and on several times, thinking that might fix it. Of course it didn’t – duh. The unit still works perfectly, in terms of it still goes thru its entire cycle, and still dries clothes perfectly. It just does all this with a blood-curdling high-pitched annoying whine and squeal. I’d like to fix this myself so as not to blow the family budget this month (and to quiet down my wife)! I navigated around your amazing website (tons of content, my head started spinning!), got sort of confused (is it the belt or pulley or roller? etc, etc), and decided to begin my Repair Quest with a personal email to You. Please advise and lead me from here, Oh Great Repair One.
Please email me at above address as soon as you can. It is greatly appreciated.
Sincerely,
Mark Ratcliff
Mountville, PA

_______________________________
The above message was sent when you were offline, via your LivePerson site.

Message sent from IP: 67.242.9.128

Powered by audblogaudio post powered by audblog

GE/Hotpoint Drum Rear Bearing and Post Kit
Figure 1
GE/Hotpoint Front Drum Glides
Figure 2
GE/Hotpoint Dryer Belt
Figure 3
GE/Hotpoint Dryer Repair Manual
Figure 4

Dryer Disassembly Link

SUDS Rating: Three Mugs

Mailbag: Dryer Console Hums when the Start Button is Pressed

Gary Showalter wrote:

Clothes dryer not working. KitchenAid Model KEYE665BWH1, serial MD3801078, stock EY665B, Electronic Drynesss Control, Extra Large Capacity/ Heavy Duty.
I do my own repairs on this “King of Clothes Dryers”, but this time I cannot figure it out. Just quit working while running. Not the circuit breaker, getting power, as when you push the start button (on any cycle) there is an engerizing humm from the timer dial unit and the start button. Front door trip switch appears to be working. I have opened it up and see no signs of anything failed that left evidence. I have inspected all wires, motor, etc. and all appears visually fine. This is where I am lost as I don’t know how to approach it with a tester in hand, etc. But I am a handy husband and follow orders very well. And if he can give me some pointers, you will sell me parts I am sure.
Gary Showalter

_______________________________
The above message was sent when you were offline, via your LivePerson site.

Message sent from IP: 209.173.170.87

Ahh, yes, the humming dryer console. I know it well. First thing to do is get a couple King of Beers to have handy while you work on your King of Dryers. This repair is not quite two mugs on the SUDS appliance repair rating system.

The problem lies in one of two components: the timer or the push-to-start relay. Best way to tell which is the culprit is to check the continuity of the push-to-start relay (or switch) using your ohm meter and the dryer’s wiring diagram. If you need more detailed instructions on how to check out the push-to-start relay, get the repair manual for this dryer.

If the push-to-start relay checks out ok, then replace the timer. You’ll be good to go, buddy-row!

Mailbag: Whirlpool/Kenmore Dryer Squeals

Janet wrote:

ok – I just wish for the free beer. Since I’m eight months pregnant, perhaps you could consume one (or more) on my behalf oh samurai!

Your site rocks and I was just looking for one additional point of clarification. I have a less than one year old Kenmore dryer. If the idler pulley bearing needs to be replaced (my guess based on the high screeching noise at the beginning of the cycle), can the dryer safely be used for a few loads of laundry or should I go to the laundromat until the weekend when I have time to fix it?

Thanks for your help oh wise one.

_______________________________
The above message was sent when you were offline, via your LivePerson site.

Message sent from IP: 24.59.36.210

whirlpool/kenmore dryer repair kit--come git you one
Dryer squeals at start.
Run a little: that’s ok.
Buy repair kit now!

Powered by audblogaudio post powered by audblog

Footnote: if your dryer is really less than one year old then fuggetaboutit–you should call for authorized warranty service so you don’t void the warranty.