As a faithful reader of these hallowed pages, you know that the door switch assembly and the machine control board has been the Achilles Heel on this otherwise superbly mediocre washing machine. In most of these failures, the root culprit have been the wax motor in the door switch assembly. The wax motor had a nasty habit of shorting out, which fried resistor R11 on the machine control board. The required repair was to replace both the wax motor and the machine control board for a total slam of about $250 in parts alone! Can you see now why Maytag had to sell out to Whirlpool? And the games continue…
The old wax motors had a brown plunger. If yours has this, then you should upgrade to the new wax motor which has a black plunger, shown below:
To learn more about your washing machine, or to order parts, click here.
So, you got bitten by the DIY bug and decided to replace the transmission in your Whirlpool direct drive washing machine (may have a Kenmore label on it, but same-o same-o, GI). It came out easily enough but now the blasted thing won’t set back in the machine correctly. What’s a grasshopper to do? Come, read these pearls of wisdom from Sublime Masters appl.tech.29501 and AccApp and they’ll help you get it in gear. And heed these tips from Academy Fellow Willie:
Pounding and banging or using the screws to pull transmission into place IS NOT THE WAY TO DO IT!!!!!!!!
If the transmission won’t slide up nice and smooth, right into place then you either have the brake release cam right on top of the clutch spring, or the most likely problem is that you let the basket drive/brake assembly drop down after removing the transmission.
Anytime you remove the transmission you must make sure the brakes are seated all the way up into the brake drum. You just need to turn the brake release cam and at the same time push the basket drive up as far as it will go then let the brake release cam go. The basket and basket drive/brake assembly will stay up in place if you don’t mess with the brake release cam while the transmission is out.
This is caused by the control board putting out the incorrect voltage to the timer. You’ll need to replace the control board. Be careful about the wiring– if you mis-wire the new board, you’ll blow it again. At $200 a pop, adult language will be forthcoming in liberal quantities. See this topic for more details.
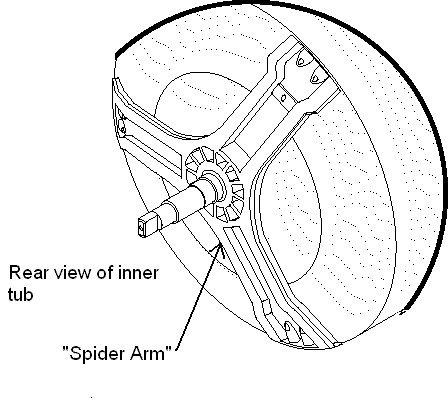
This is probably a bad drum “spider.”
For details on how to confirm, including a helpful excerpt from the service manual, see this topic in the repair forum.
The brake may not be holding which means you would need to replace both the brake stator and rotor. To confirm and for more detailed troubleshooting help on this problem, see this topic in the Samurai Appliance Repair Forum.
Not to be confused with the famous burned R11 on the Machine Control Board, this little nasty is on the board down inside the machine, below the drum. You can’t just replace the fuse– nawsir, you ain’t gettin’ off that easy…. or cheap. You’ll need to replace the motor and motor control board upgrade kit. Yessir, it’s just one of the many exciting common problems included with these washers at no additional charge!
To make sure you’re ordering the right kit, you’ll need the first two digits of your serial number in addition to your model number. You’ll find both of these stamped on the model number tag on your washer.
To learn more about your washing machine, or to order parts, click here.
Your Precious Words: I have a Kenmore Model 80, opened it up to do some cleaning now it vibrates like crazy during the spin cycle. The springs are attached on the bottom. When I move the tub around with my hand it feels unstable, very springy. I heard something about snubber pads…
Any ideas?? Thanks
This washing machine is the venerable direct drive washer made by Whirlpool Corporation. It was one of the best top-loading washers ever made in terms of reliability and serviceability. One of the features of this washer, which was revolutionary when it first came out 25 or so years ago, is self-levelling rear foot pads. Appliance techs loved this feature because it eliminated the drudgery of having to manually adjust the rear foot pads.
Whenever the washer is moved, as it would have been when you cleaned it, the foot pads need to be reset to ensure that each one is bearing about 25% of the machine’s weight. Otherwise, the washer won’t be stable when it goes into spin.
How can you tell the washer’s weight is evenly distributed among the four foot pads? Piece of pie, tovarish! We do this using a patented technique called “Rocking the diagonals.” Looking down at the top of the machine, place your hands on two opposite corners and try to rock the machine. Do this for both diagonal corners. If you get any movement, even the slightest, itsy-bitsiest movement, the washer will gyrate like a drunk at a disco during the spin cycle. Since this is a patented technique, please remember to remit your royalty payment if you use it. Domo!
OK, enough nostalgia and theory– let’s do the three-step fix for this bad boy:
1. Standing in front of the washer, grasp the back of the washer just below the control panel (DO NOT grab the control panel!)
2. Pivot the machine toward you just enough to raise the rear foot pads off the floor. You’ll hear a KER-CHUNK. That’s the sound you want to hear because it means the automatic levelers in the foot pads have done their thang.
3. Now gently lower the machine back down.
Problem solved! Now go crack a cold one and grab me one while you’re at it.
Now it’s easier than ever to find the appliance parts you need using the new pretty yellow appliance parts search box at the top of the page.
Let’s walk through a quick example of how easy it is to find parts with the new Part Detective using the Whirlpool Duet Sport washer as an example. Let’s suppose we have an F-01 error and have determined that this is a bad CCU (central control unit– a fancy word for an unreliable electronic circuit board) and we need to buy a new one. Now the fun part beings!
Just scroll up to the top of the page and use the handy parts search box in the cheerful yellow box and enter “whirlpool duet sport washer” in the form. The search box below is the same one at the repair forum and here at this website. I’ve already typed in the search term, “whirlpool duet sport washer” so we can move things along:
When you click the “Search for Parts” button in the search box above, you’ll go to a page of parts for the Whirlpool Duet Sport washer. Go ahead and click the button, it’ll open in a new page so you can keep reading this one.
Now refine your search using the “Part Type” box on the left hand side. Click the “Circuit Board / Timer” option.
You’ll see a page of mostly CCUs for the various models Duet Sport washers. At this point, you’ll need your model number, this page will help you find it. Once you have your model number, just click the your model number in the top box on the left hand side labelled, oddly enough, “Model Number.” The next page you see will have the exact CCU for your particular model.
You could also enter an appliance part type. For example, if you enter “icemaker valve” in the parts search box, you’ll get pages of pictures of water inlet valves for every type of icemaker. Since you see a picture of each valve, you can usually find the one you need by simply looking at it.
You’ve done your due-diligence checks and have verified that R11 on machine control board is not smoked. Now you need to do the motor phase voltage test described in your tech sheet inside the control console. Sublime Master of Appliantology Trying to help gives the CliffNotes version:
You will want to take the front off of the unit but leave the door on. Remove the two screws from the hinges, and the plates opposite of the hinge location on the other side of the opening (for door reversal). The front will then remove. After that, close the door, put the timer in a 6 hour delay, and pull the JP4 (Yellow, Red, Blue and a double White Jumper ) connector off the motor control board which is located behind the front panel on the front right machine floor and let it hang in the air. When you press the start button in this position, JP4 off, in delay, washer door closed you are in a motor test. The motor should start spinning in one direction at 50 RPM’s. If it does, let it run for a minute or two to see if it shuts off or if it will run. If it does not, you will need to do a voltage test on the board at the connector that has a white wire and a black wire (a green ground I believe as well). If you have 120VAC from white to black, and the motor is not turning, you will need the part listed below:
BigChiefNocaHoma, an Apprentice Appliantologist at the Samurai Appliance Repair Forums, owns a Bosch front washer, model number WFMC3301UC. Recently, his Bosch washer developed a problem where it would stop mid-cycle with an E04 error code in the display and he posted this problem in the Laundry Appliance Repair Forum. Sublime Master appl.tech.29501 talked him through it by leading him to check the pump for gookus (that’s a technical term that refers to anything what ain’t s’posed to be there; please, I *am* and professional, don’t use this word at home). Anyway, the stunningly simple solution and an illustrative page from the service manual are all posted in this topic at the repair forum.
Sublime Masters Trying to help and appl.tech.29501 recently helped a grasshoppah in the Laundry Appliance Repair Forum troubleshoot a no spin problem with his Maytag Neptune 5500 washer. Now for a limited time only, read the inspiring and heart-warming story of this grasshoppah’s struggle and ultimate triumph over his insolent washing machine.
This how-to applies to the cheap, GE top-loading washers, like the one you bought at Home Depot, with model numbers like WPSR3100WOWW. Some of the busted-transmission symptoms on this washer include:
– Loud roar like a jet engine during spin;
– Won’t agitate (Note 1: you already checked the belt and it’s OK; Note 2: a stripped out agimutator drive bell will also cause this problem, but this will be obvious when you remove the agimutator);
– Puddle of viscous red/brown oil underneath the washer.
If your washer has any of the above, then your washer’s transmission may be FUBAR. You need to either replace the transmission in this machine or buy a new washer. BTW, now is a good time to think about buying a new washer.
“*Gasp!* But, Samurai, how could you, the Fermented Grand Master of Appliantology and All Things Appliantological, even think about buying a new machine instead of doing the repair?”
Ahh, well said, my young grasshoppah; I couldn’t have asked a better question myself. According to Proto Grand Master Musashi, in the true strategy of Fixite Do, you learn to perceive that which you cannot understand or comprehend. In the words of Master Musashi, “By knowing things that exist, you can know that which does not exist.” Accordingly, I perceive that the money you now have in your bank account will no longer exist after you waste your time and cash fixing this pig.
The Jedi has created a very detailed step-by-step photo album on Flickr showing him executing this repair with his legendary finesse (including some patented Jedi-exclusive techniques). And many of the photos are annotated with pearls of enlightenment. So, to get the best overview of the Hell you’re in for should you decide to take on this repair– due to a dietary deficiency of Vitamin C, or something– start with this first photo in the set and then click through each one. That way, you can read the helpful notes and comments.
And may the pot-bellied, bald-headed Buddha grin down on yo’ ace.
Ever wanted to tear down your brand new Cabrio? This video will show you how. Since this washer is manufactured by Fisher-Paykel for Whirlpool, the teardown shown here will be very similar for the F-P GWL10 and 11 washers. Grab some popcorn and let’s watch a movie!
If your front-loading washer sounds like the washer below during high speed spin, well, they’s big trouble in little China, Budrow.
The machine above happens to be an 8-year old Whirlpool Duet washer. Why would such a (pending) catastrophic failure happen after less than 10 years of moderate use? The first reason most of us think of is that the bearing was either poorly designed or was made out of inferior materials. But the truth is that the ichiban killer of drum bearings in any front-loading washer is non-HE detergent. HE: High Efficiency. And no, using a smaller quantity of conventional detergent is not the same as using HE detergent, as explained below.
Y’see, HE detergent is not simply a concentrated formulation of the regular stuff. Since front loaders use much less water than top loaders (about 12 gallons per wash load vs. about 56 gallons in a conventional top-loader), front-loaders require a detergent with a whole different chemistry. So let’s answer some common questions and dispel common myths about front-loaders and HE detergents.
Q. I like to see lots of suds in my washer because then I know my clothes are getting clean!
A. Uhh, that wasn’t a question but, hey, let’s not pick nits. You have to start with the understanding that the tumble action of high-efficiency washers (i.e., front loaders) produce more suds than the agitator action in top loaders. Now most of people think, “Oooo, sudsy, that’s good!” No, not good. Suds do nothing to clean your clothes and are actually an undesirable by-product of the detergent’s chemical interaction with the water.
Q. OK, Mr. Monk, if suds aren’t the star of the show in a washer, how are detergents supposed to get the ca-ca off my clothes?
A. The main job of detergents is to remove soils and stains. They do this by breaking down the surface tension of water, in effect, making water “wetter.” The water is what actually does the cleaning by slipping in between the ca-ca and the fabric, separating them and suspending the ca-ca in solution.
Detergents are designed to freshen, remove odors, and brighten fabrics as they clean. Another key detergent function is to hold ca-ca, and any dyes from colored fabrics, suspended in the wash water so they aren’t re-deposited back onto the cleaned clothes. Traditional detergents are designed to do this in high water volumes used by conventional, top-loading water hog washers.
If you think about it, using HE detergent in your front loader is really common sense. Because of the low-water wash and rinse cycles in HE washers, HE detergents must work differently from traditional laundry detergents in order to be effective.
So, a bunch of them pointy-headed scientist types with all kinds of fancy degrees hung on their walls got together to design detergents that would be low-sudsing and quick-dispersing to get the best cleaning performance in front-loading washers.
Q. I still don’t get it: why is low-sudsing important in a washing machine?
A. Because excessive sudsing can cause problems in HE washers by “cushioning” — or even preventing — the tumbling action. HE detergents also hold soils and dyes in suspension in low water volumes, so they don’t re-deposit onto cleaned clothes. This means that if you’re using non-HE detergents in your front-loading washer, you’re wearing poopy germs and other ca-ca on your clothes right now and you are one of the Great Unwashed.
Q. I’ve just been buying the 100 lb. box of Super Saver detergent from Sam’s Club. So what if my clothes don’t get as clean?
A. It’s not just about your clothes getting clean, Homer. You’re also causing damage to your expensive front-loading washer. Excess suds can cause the washer’s pump to overheat causing premature failure of the pump. These excess suds also cause residue to build up inside the drum and hoses. After a while, your washer will start giving off a moldy funk and infecting your clothes with its faint, musky stink. Nothin’ says class like a whiff of Ode de Mildew!
It always amazes me when I talk to people who buy a front-loading washer that costs two to three times more than a top-loading water hog, and then they want to pinch pennies using cheap, conventional detergent; penny-wise, plain-stupid!
Q. If suds are the problem, can I just use a smaller amount of regular laundry detergent?
A. No. Using a lesser amount of regular detergent will not alleviate the sudsing problem — and in addition, will compromise cleaning performance. That’s why you need to use HE detergents. How many times do I have to say it? HE detergents have a totally different formulation in order to get the skid marks outta your skivvies in low-water conditions.
Q. My new front-loader uses considerably less water than my agitator washer. Should I just use less conventional detergent to compensate?
A. What’d you do, jump into the middle of this article and start reading? No — you should not use conventional, non-HE detergent in your front-loading washer. Ever. Scroll up and start reading from the beginning.
Q. What can I do to keep my front loader from becoming another casualty like the washer in that cool movie you posted above?
A. Low wash temperatures and/or use of regular detergent (which causes excess suds) may prevent some ca-ca from completely rinsing out of the front-loading washing machines. Oily soils and some dirt-type soils are especially sensitive to lower wash temperatures and medium to high suds levels. Over time, ca-ca will accumulate in the washer and lead to the growth of bacteria and mold, which we professional appliantologists refer to as bio-gookus. This bio-gookus will start stinking and may even impart odors to your clothes. Worse yet, you’re wearing all the crud next to your body and private parts! To avoid all this unpleasantness, you should periodically run a maintenance cycle on your front-loader.
Q. OK, I’ll bite: How do I run a “Maintenance Cycle” on my front-loader?
1. Select the hot water setting. If there is no hot water setting, then select a “white” or a “stain” cycle setting. (Note: do not put laundry in the washer.)
2. Select the “extra rinse” option, if offered.
3. Add liquid chlorine bleach to the bleach dispenser. Fill to its maximum level.
4. Run the cycle through its completion.
5. If the washer does not have a second rinse option, manually select an additional rinse cycle to ensure that no chlorine bleach remains in your washer.
6. If your washer still has a funk, repeat steps 1 through 5 as necessary.
BTW, this is good to do periodically on top-loaders, too.