Category Archives: Refrigerator Repair

GE TFX28PBD Water Door Dispenser Slow Water Flow

Randy wrote:

The door dispenser will eventually have a good flow when holding the switch with a cup in the door. I have changed the filter. If used frequently within the hour, the unit dispenses as it should. If it sits for more than few hours the delay starts. You can hear the pump activate when the door witch is engaged. The Ice Maker works flawlessly and continues to output good ice and quantity. No leaks under unit. All hoses on back of unit are straight and not kinked. I verified the same of the connections where the water supply enters the unit.

Some thoughts and direction would be appreciated.

Thanks,

Randy B

First, you should know that there’s no pump– the water flows out under normal water pressure in your house. If you’re hearing a humming sound, that’s probably the coil on the water inlet solenoid valve in back.

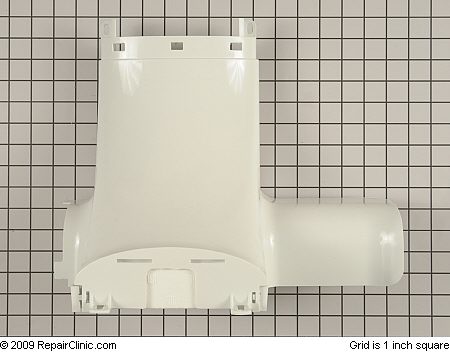
What’s happened with your dispenser is that the water inlet valve for the dispenser has gone “lame,” as we say in the trade. Your water inlet valve is located in back of the refrigerator, behind the service panel as shown in the following two photos:

GE TFX28PBD Water Inlet Valve 1

GE TFX28PBD Water Inlet Valve 2

(click the pics for larger views)

The circled blue valves in the photo above are the dispenser valve. But this is all one assembly and the entire assembly is replaced as a set. Here’s the new and improved replacement water inlet valve assembly you need, comes with complete, illustrated destructions, too:

Water inlet valve conversion kit w/tubing and instructions. Includes both primary and secondary valves together.

(click it to git it)

Fun Fact to Know and Tell: Whenever you change the filter, you should run a good amount of water through the system, this will hopefully push out any air which gets trapped in the system which can later cause air cushions.

To learn more about your refrigerator, or to order parts, click here.

Why is the Cabinet Around My Refrigerator Door Very Warm or Hot?

Many refrigerators– most side-by-side models and some top-and-bottom models– use an extra run in the sealed system tubing that runs around the perimeter of one of the doors or in that cabinet strip (called the mullion) between the freezer and fresh food compartments. The extra tubing is called the yoder loop and it’s there to keep condensation and the resulting slimy gookus from accumulating on the cabinet and door gasket. You can see the yoder loops in both types of refrigerators in these two diagrams:

yoder loop in a top mount refrigerator yoder loop in a side by side refrigerator
(click for larger view)

Legend has it that the yoder loop was invented by the renowned Amish refrigeration engineer, Jakob Yoder, though this is disputed by some.

The warm refrigeration tubing of the yoder loop running behind the cabinet surface keeps things warm enough that the condensation evaporates, keeping things clean and dry. The mullion should feel warm to the touch. But sometimes that cabinet area may feel unusually warm or even hot. If this happens, it’s usually an early warning that there’s a problem with the condenser area. The condenser is the hot, dusty part of the refrigerator that’s located underneath on refrigerators with a condenser fan (called forced-air condensers) or it’s in the very back on the refrigerator cabinet on units without a condenser fan (called natural convection condensers).

The condenser’s job is to get rid of all that heat that the compressor makes while it’s running and from inside the refrigerated space. If it can’t do that, then everything starts warming up. All that extra heat has to go somewhere and the yoder loop is gonna get part of it. The temperatures inside the box will start eventually start rising, too.

A common problem with forced-air condensers is that they get so clogged up with dog hair and dust bunnies that air can’t move over it and cool it off– see this page for refrigerator tuneup tips. Or the condenser fan motor may be burned out.

The most common problem with natural convection condensers is that they’re installed in a cabinet that doesn’t have enough of a gap on the sides and top of the cabinet to allow air to circulate. You may be able to get by with this with cooler ambient temperatures but in the heat of summer in an unairconditioned house, well, hope you like warm beer!

To learn more about your refrigerator, or to order parts, click here.

Get Your LG Appliance Parts Right Here at Your Local Online Appliance Repair Shop

What does “local” mean anymore in this age of the Internet? I mean, can you get any more local than right here on your computer screen? I know we look big time an’ all, but we’re a mom & pop (literally!) operation, too. Instead of a brick n’ mortar repair shop, we’re your online DIY appliance repair shop; we’re every bit (pardon the pun) as real and we’re as close as your compooter screen. How’s that for local?

Fun Fact to Know and Tell: The “local” appliance repair shop in your town or city cannot buy LG appliance parts directly from their parts dealer like they do for other appliance brands; they have to buy them directly from LG.

What does this mean for you? It means you’re gonna pay a higher price and wait longer to get LG parts if buy them from your “local” parts house.

LG.jpgBut the Samurai has the solution: buy your LG parts right here through Fixitnow.com– your local online appliance repair place– you’ll save mucho dinero and you’ll get your parts delivered lickety-split. Just use the handy links below:

LG Appliance Parts Links

Dishwashers
Dryers
Ice Makers
Refrigerators
Microwave Ovens
Ovens/Ranges/Stoves
Refrigerators
Washers

Troubleshooting the Muthaboard in GE Profile Arctica Side-by-Side Refrigerators with the CustomCool™ Feature

The CustomCool is a gimmicky marketing name that GE came up with for what is basically a souped-up crisper drawer in the refrigerator. The drawer has been outfitted with a system of dampers, a fan, a temperature thermistor and a heater. Depending on the function selected on the CustomCool settings in the controls at the top of the refrigerator, a combination of these components can be used to theoretically chill items quickly, thaw items or hold the drawer pan at a specific temperature.

CustomCool™ should not be confused with TurboCool™, which is yet another gimmicky marketing name for a different feature of dubious value in the some GE refrigerators.

I’ve previously posted troubleshooting flowcharts for GE refrigerators and a generic warm refrigerator troubleshooting flowchart. This flowchart is a little different– it’s for troubleshooting the muthaboard in GE Profile Arctica refrigerators with the CustomCool™ feature. You can download it here:

GE Profile Arctica Refrigerator Main Board Troubleshooting Flow Chart (370 kb, PDF file)

As a result of your troubleshooting using the flowchart that I’ve graciously and generously provided above, you’ll probably find one of the components in this handy list needs to be replaced. I’ve included links to more information on each item. And you can conveniently buy them right here– just click the pictures to get ’em. Your purchase is what helps keep this site going so if you like what I do here, please buy your appliance parts through my links. Domo!

Muthaboard

GE refrigerator muthaboard
(click it to git it)

FAQs for Replacing the Motherboard in a GE Refrigerator

Thermistors

GE refrigerator temperature sensor (thermistor)
(click it to git it)

Upgraded Thermistors in GE Refrigerators

Damper Assembly

GE Refrigerator air inlet cover/damper kit with fan motor. Damper and fan assembly has been updated to prevent freezing in the refrigerator.
(click it to git it)

GE Arctica Refrigerator: Broken Air Damper and Everything’s Freezing in the Beer Compartment!

Testing the Damper Door in a GE Profile Arctica Refrigerator

How to Remove the Fresh Food Air Damper in the GE Arctica Pro Side-by-Side GSS23-GSS25-GSS27-PSS23-PSS27-PSS29-PSSS25 Refrigerator

GE Side by Side Refrigerator Freezing the Beer

Evaporator Fan

GE refrigerator evaporator fan
(click it to git it)

How to Test the Evaporator Fan Motor in a GE Profile Refrigerator

How to Replace the Evaporator Fan and Motherboard in a GE Arctica Refrigerator

Defrost Heater

GE refrigerator defrost heater assembly
(click it to git it)

The Samurai Test for the Defrost Circuit in a GE Refrigerator with a Muthaboard… and the Quick Fix

To learn more about your refrigerator, or to order parts, click here.

Replacing the Water Line in the Freezer Door of a Whirlpool Side-by-Side Refrigerator

Why would anyone contemplate such an invasive repair? Usually because the water tube broke inside the door and now every time you use the dispenser, water dribbles on your floor from the bottom of the freezer door. Less than impressive.

The repair itself is a bit of rectal cramp– about four mugs on the SUDS-o-meter— but the dispenser nozzle and water tube kit is inexpensive.

dispenser nozzle and water tube kit for a whirlpool side-by-side refrigerator
(click it to git it)

The tubing kit is all one piece and replaces the entire run of tubing up through the freezer door and into the dispenser right up to and including the nozzle that squirts the water into your glass. It comes with complete instructions for replacing the tubing inside the freezer door. But the instructions are light on details for how to disassemble the dispenser and replace the nozzle. That’s why the Samurai, in his infinite wisdom and mercy, is providing this instructional supplement on disassembling the dispenser so you may complete your repair odyssey.

Removing the Water Dispenser Fill Tube in a Whirlpool SxS Refrigerator

Can I hear an “Amen?”

To learn more about your refrigerator, or to order parts, click here.

Diagnostic Flowcharts for GE Refrigerators With a Muthaboard

Here are ten action-packed, fun-filled flowcharts to help you figure out why your over-priced, over-electronified GE refrigerator ain’t keeping your beer cold anymore… or why it’s freezing it!

For other refrigerators without a muthaboard– including non-muthaboard GEs– use the more generic Warm Refrigerator Troubleshooting Flowchart.

Diagnostic Flowcharts for GE Refrigerators With a Muthaboard

To learn more about your refrigerator, or to order parts, click here.

Warm Refrigerator Troubleshooting Flowchart

Next time your beer box is warming up, use this handy flowchart to quickly figure out what’s wrong and get on the right track for fixing it. Also makes a great gift for that special someone who already has it all. Go ahead and download it now so you’ll have it handy in case your beer starts warming up.

http://fixitnow.com/wp-content/uploads/2012/04/39305150-Warm-Refrigerator-Troubleshooting-Flowchart.pdf (PDF file, 700kb)

To learn more about your refrigerator, or to order parts, click here.

If you like this post, please share it with your friends using one of the share buttons below. Domo!

The Samurai Test for the Defrost Circuit in a GE Refrigerator with a Muthaboard… and the Quick Fix

We’ve all been there: you drag yourself out of bed and shuffle to your GE refrigerator for your morning brewski before heading out job hunting. You open the door and right away notice sumpin’ ain’t raht. As you reach in for that 40-ounce can of Old Milwaukee, your worst nightmare is confirmed: WARM BEER! Red alert! Deflector shields up, arm photon torpedos!

In a blind panic, your hands starting to tremble slightly from fear of sobriety and early DTs, you snatch open the freezer door to find that the temperature inside seems normal. In a rare moment of clarity, you place several cans of Old Milwaukee in the freezer to start ’em chilling. As you’re shoving the last can in place, you notice the back wall inside the freezer is coated with fuzzy ice. Suddenly, like a light shining through the rapidly-dissipating fog from last night’s beers, you realize what’s happened: your GE refrigerator has had a defrost system failure.

With your bowels rumbling and your hands now fully shaking, you choke down the bile searing the back of your throat and race to your computer where you frantically pull up the one and only website that has always helped you in the past and that you know you can rely on in dark times like these: Fixitnow.com Samurai Appliance Repair Man. A quick search at the Samurai’s site pulls up this very post that you’re now reading on The Samurai Test for the Defrost Circuit in a GE Refrigerator with a Muthaboard… and the Quick Fix. Holy guacamole– it’s like looking in a mirror with another mirror behind you! But instead of seeing yourself, you see this:

The Samurai Test for the Defrost Circuit in a GE Refrigerator with a Muthaboard
(click for larger view)

The Quick Fix:

– If the defrost circuit tests good, replace the muthaboard and thermistors.

– Otherwise, replace the defrost heater and hi-limit.

Problem solved! Now go pull those beers outta the freezer before you forget and pop a cold one.

To learn more about your refrigerator, or to order parts, click here.

GE Profile and Arctica Refrigerators: Upgraded Thermistors

The newer GE and Hotpoint refrigerators– the ones with the muthaboard on the back– use thermistors to sense temperature in the freezer, beer compartment, and evaporator. The motherboard on the back of the refrigerator sends an electrical pulse to the sensor to measure its change in resistance and thus sense the change in temperature of the refrigerated space. The older thermistors had a defective seal which allowed water to seep in. This messes with the resistance and sends weird signals to the muthaboard resulting in erratic temperature control. The picture below shows the difference between the new and old-style thermistors (click for larger view):

GE Refrigerator Thermistor Replacement Guide
(click to enlarge)

If you’re having temperature control problems in your GE fridge, check to see if you have the old-style thermistors. If you do, you should replace all of them. Most models have four: two in the beer compartment, one in the freezer, and one mounted directly on the evaporator, shown in the diagrams below (click ’em for a larger view).

GE Profile and Arctica Refrigerator Thermistor Locations - Beer Compartment

GE Profile and Arctica Refrigerator Thermistor Locations - Freezer Compartment

Here’s the new-style thermistor you need:

GE refrigerator new-style thermistor-- click it to git it, Hoss.

To learn more about your refrigerator, or to order parts, click here.

Troubleshooting Icemakers with the Fancy Optical Controls

Most icemakers are controlled by a simple wire feeler arm that hangs off the side of the icemaker. As the ice bucket fills up, it raises the feeler arm and eventually stops it from making any more ice so it doesn’t overfill the bucket.

But the engineers at Whirlpool were told that they needed to increase the usable space inside the freezer compartment without increasing the size of the compartment itself. To do this, they figgered they needed to re-design the icemaker, ice container system and freezer shelving. This needed what we professional appliantologists call Divine Intervention®.

pot-bellied, bald-headed buddha
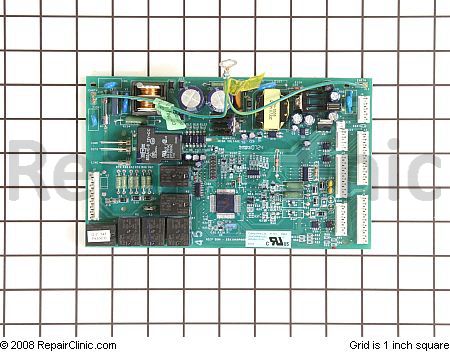
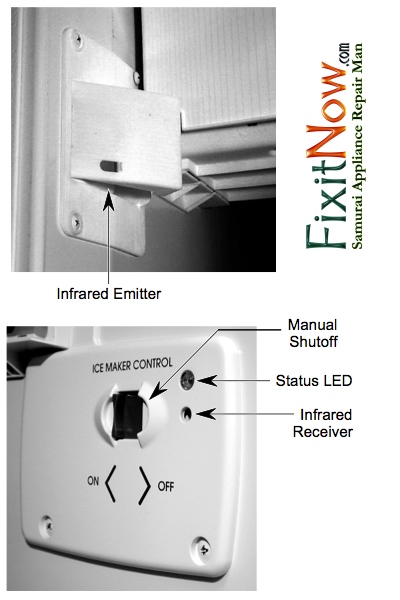
So the engineers burned some funny incense and chanted “OM” to the pot-bellied, bald-headed, golden Buddha. And, yea verily, the pot-bellied, bald-headed, golden Buddha did grin down upon them and granted them a miraculous vision of the electronified optical control icemaker system!

In this divinely-revealed icemaker control system, the mechanical feeler arm is replaced with the new optical controls, located on either side of the freezer liner, as shown below.

Whirlpool Optical Icemaker Controls.jpg

The optics use infrared light to sense the ice level in the ice bucket. The other change they made was to move the ice bucket from inside the freezer space to the freezer door. These changes increased the available usable space inside the freezer by over 50,000%! And the pot-bellied, bald-headed, golden Buddha did grin and the engineers did feast on fruit bats and breakfast cereals.

The main thing to keep in mind about this optical control system is that the only thing it really does is to shut off the icemaker. Other than that, it doesn’t affect the operation of the icemaker. There’s nothing new or special about the icemaker itself– it works the same way as the good ol’ Whirlpool-built modular icemaker that we’ve all come to know and love. So, for example, you can still manually start the harvest cycle the same way you would for any other Whirlpool-built modular icemaker with the feeler arm.

So that just leaves the optical control itself as something you may need to troubleshoot if you’re having problems with the icemaker not making ice… and that’s ezzacly what this spiffy troubleshooting flow chart will hepya do.

http://fixitnow.com/wp-content/uploads/2012/06/TroubleshootingOpticalIcemakerSystem.pdf

Word: This optical control system has been pretty reliable and I’ve not seen many of them fail. Most of the time, when I’m working on a no-ice complaint on one of these guys, I find either a bad icemaker or water inlet valve. But don’t be a parts changing monkey and just throw parts at it hoping to get lucky– do your troubleshooting so that, “…ye shall know the truth, and the Truth shall make you free.”

Can I hear an “Amen?”

To learn more about your ice maker, or to order parts, click here.

To learn more about your refrigerator, or to order parts, click here.

Adapting to Adaptive Defrost

Ahh, the good ol’ days when refrigerator defrost cycles were controlled by simple mechanical defrost timers. Yeah, used to be a man could go out on a refrigerator service call and make an easy $150 replacing a silly little $25 timer. The old mechanical timers would simply click the fridge into defrost mode every six or eight hours and fire up the evaporator defrost heaters for 21 minutes or so whether it needed it or not. But life never stays simple, does it? Alas, those days are rapidly disappearing.

Instead, the manufacturers have all taken to using the fancy-schmancy electronic timer boards so they could add an "adaptive defrost" feature. Supposedly, adaptive defrost makes the fridge more energy efficient by making the defrost cycle contingent on the number of door openings and other factors. I think it’s just an excuse to sell more expensive electronic parts that don’t really perform as advertised. It’s probably driven by some gubmint bureaucratic program–you know, the same geniuses who gave us the load of crap about how we can’t use R-12 anymore because it hurts the ozone layer.

Well, no use whining about it ’cause adaptive defrost is the wave of the future, for better or worse. And if you have a newer, high-end fridge, chances are that it has adaptive defrost. And one day, at the worst possible time, it will break.

The adaptive defrost board on Maytag fridges looks like this. To put this board into defrost, short "L1" and "Test" with a small screwdriver and wait three seconds. You should hear a clicking noise from the relay and the fridge will shut off and go through a defrost cycle.

The adaptive defrost on Amana fridges is a little different. A test procedure for this board is shown here. To initiate the defrost cycle, press the refrigerator light switch five times in six seconds. If you press it five more times within six seconds, this will cancel defrost and take the fridge straight into run mode. The operation is similar on both the bottom mount and side-by-side fridges. After the defrost terminator/thermostat opens, there will be a six minute delay before the compressor and condenser fan motor start running again, and a 10 minutes delay before the evaporator fan motor starts running. This is important to know because you can really start chasing your tail when things don’t start running when you think they should.

Whirlpool also has some adaptive defrost boards out there. I don’t need to post the diagnostic info on them here because it’s all in the mini-manual that comes with your fridge, usually folded up into a little itty-bitty square and tucked into a slot on the backside of the condenser grill, in front of the fridge.

For the nitty-gritty on the multitudinous varieties of adaptive defrost control systems used in all Whirlpool-brand refrigerators (includes Maytag, Amana, Kitchenaid, and Jenn-air) download this service manual (12.88mb).

Ok, so let’s say you’ve determined that your adaptive defrost board is fried. Well, you’ll need to replace that bad boy. Come git you one:


Maytag Adaptive Defrost Control Board
Amana Adaptive Control Board for Side-by-Side Models
Amana Adaptive Control Board for Bottom Freezer Models
Whirlpool Defrost Control Board
Whirlpool Defrost Timer Control Board
Whirlpool Defrost Control
To learn more about your refrigerator, or to order parts, click here.

Refrigerator Tuneup Tips for Summer

Ahh, sweet summertime– it’s what we professional appliantologists call “refrigerator season” because we get loaded up with calls for refrigerator problems. “Why is that, Captain Ron?” No one knows. Well, that ain’t ezzacly true. With the warmer temperatures and higher humidity, the refrigerator is having to work harder to keep your beer cold and get rid of all the extra moisture that accumulates inside. Here are some tips and tools that’ll hepya keep your beer tooth-crackin’ cold.

The single most important thing about your refrigerator for cold beer is temperature. This sounds obvious but did you know that most people have no idea what the temperature is inside their refrigerator? They ass-u-me that the setting on their refrigerator controls somehow correlates to a temperature inside the box year ’round, regardless of things like ambient temperature and humidity, amount of time the door is open, amount of pet hair on the condenser, etc. Read this quick explanation of how refrigerator controls work.

Pop Quiz: How can you tell what the temperature is inside the refrigerator?

Answer: By using a thermometer!

Every refrigerator should have a thermometer inside of it. Not having a thermometer inside your refrigerator is like driving a car without a speedometer. Here’s the thermometer you need:

refrigerator thermometer

In addition to a thermometer inside the beer compartment, you should have a temperature alarm inside the freezer to give you an early heads-up incase it starts warming up. This can save big $$ by preventing spoiled food.

freezer alarm

Summer can bring out lots of smells inside the refrigerator that were masked by the colder temperatures of winter. These smells can impart off-tastes to the ice cubes, too. This nifty carbon deodorizer sucks up that nasty stink to keep your fridge smelling sweet, baby, sweet.

Refrigerator deoderizer

Dirty condensers are one of the biggest causes for warm refrigerators in summer. During winter, your refrigerator might have been able to keep things cold inside despite the condenser being matted with cat or dog hair. But now with the warmer ambient temperatures of summer, it can’t quite make it anymore. What’s a brutha to do? Clean the condenser with your vacuum and a condenser brush!

refrigerator condenser brush

And when was the last time you replaced the water filter in your refrigerator? The Samurai has a complete selection of water filters for any make or model of refrigerator. Come git you some!

Finally, ever wonder how much energy your refrigerator (or any other plug-in appliance) is using? Well, wonder no more with the Kill-a-Watt meter!

To learn more about your refrigerator, or to order parts, click here.

Finding the Tech Sheet / Wiring Diagram in a Kitchenaid or Whirlpool Side-by-Side Refrigerator

Tell you what, compadre, if you need to troubleshoot one of these modern electronified fridges and you don’t have the tech sheet, well, you’re up a creek without any beer. On Kitchenaid (and Whirlpool) SxS refrigerators, the tech sheet / wiring diagram is folded up into a leetle itty bitty wad and stuffed into a crevasse in the toe grill. Just open the doors, remove the toe grill, flip it over and there it be:

Tech Sheet Location in a Kitchenaid Side-by-Side Refrigerator

To learn more about your refrigerator, or to order parts, click here.