Category Archives: Dryer Repair

Dryer Venting Diseases: Venterialsclorosis

If the inside of your dryer vent looks like this…

Venterialsclorosis

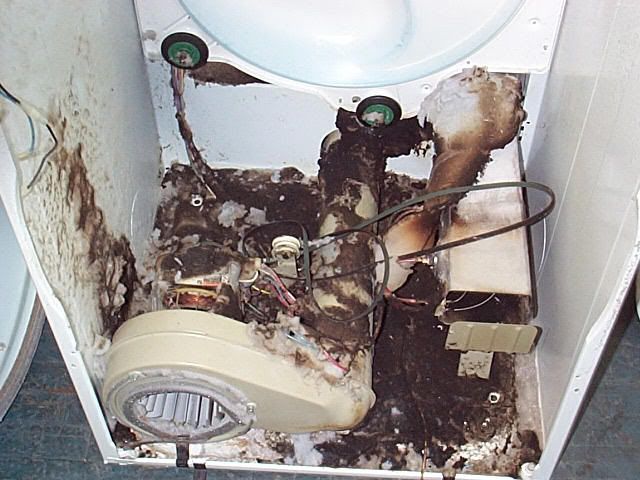
… then you have what we professional appliantologists call Venterialsclorosis. This disease is caused by lint accumulating on the inside walls of the dryer vent. As it progresses, it reduces the effective area of the dryer vent resulting in longer drying times. The end result is that the inside of your dryer will look like this…

Amana Dryer Guts, Before Cleaning

That nice mat of dryer lint is very efficient at wicking the oil out of the motor bearings, resulting in premature motor failure. It’s also an excellent fire starter.

Yeah, I hate it when I wake up and find myself burnt to a vaguely human-shaped lump of black, flakey charcoal. Very difficult to quaff a mug of my flavorite fermented beverage in that condition.

So, to avoid all that unpleasantness, I periodically disassemble my dryer and vacuum it out thoroughly, especially around the drum rollers, motor, and heating element/burner. Then I’ll disassemble my dryer vent and use my supah-bad LintEater Rotary Dryer Vent Cleaning Kit to clean it out.

Contrary to the urban myths, Venterialsclorosis is an effect of poor dryer venting, not a primary cause. This means that the dryer vent was poorly designed and/or installed and was a cruddy venting system when it was brand new. As you used the dryer, the restricted air flow through the vent, coupled with possible condensation problems inside the vent, caused the lint in the dryer exhaust to settle out of the exhaust stream and begin accumulating inside the vent.

BTW, if your dryer vent is made out of spiral wound foil or, worse yet, white vinyl, then you’re really achin’ fer a bakin’, Budrow. These are very inefficient materials that create backpressure in the vent and long drying times which means wasted energy and money. And, in the case of the white vinyl, the vent itself poses a fire hazard. Oh, I know, you’re thinking, “Heck, Bubba and them all vent their dryers using this cheap garbage so that must be the way to go. Why’s this Samurai guy tellin’ me it ain’t?” I explain why ratcheer.

New Roper Gas Dryer with a Mystery Hole in the Front Panel

MESSAGE SENT THROUGH YOUR WEBSITE

Name: Patty

IP Address: 24.118.140.136

I just had a Roper gas dryer delivered. There is a hole in the front panel below the door that wasn’t on the electric dryer at the store. The delivery guys didn’t know what it was for, nor did the salesman at Menards. Do you know what it is for? It is 3/4 of an inch with a round top and a straight bottom located in the lower left corner of the front panel of the dryer. Thanks for any help you can give me!

That hole in the front panel is what we professional appliantologists call the Gas Burner Peep Hole. It’s a nifty little troubleshooting aid for gas dryer burners.

Using that peep hole, I can look in while the burner is trying to fire and see whether or not the ignitor is glowing. If it is, but still no flame, then I know I’m getting voltage clear up to the burner. So that means that the cycling thermostat, timer, thermal fuse, and high limit thermostat are all good in the dryer and that the problem is either 1) the gas is turned off, 2) the valve coils are bad, or 3) the radiant sensor is bad.

On the other hand, if I do not see the ignitor glow, then either the burner assembly is not getting voltage or the ignitor itself is bad. Further troubleshooting required.

By the way, the burner peep hole should have had a decorative plastic cap. It probably got sheared off while transporting the dryer. You can buy a replacement cap here.

If you’re still confoosed, need more help figuring out what’s wrong with your dryer, or to order parts for your dryer, come hither. Or you can get interactive help from professional Master Appliantologists in the Samurai Appliance Repair Forum.

Mailbag: Using a Digital Multimeter in Appliance Repair

i would like to understand the process of useing a digital multimeter to figure out why my kenmore gas dryer will not operate.

i just bought it (used) brought it home , hooked it up and ran it for a few minutes (empty) now …….nothing, i don’t understand how to use this tool properly to make a diagnosis. will you PLEASE give me some of your profound input

_______________________________
The above message was sent when you were offline, via your Timpani site.

Message sent from IP: 68.6.171.207

Ahh, Grasshoppah, the Samurai anticipated your questions ages ago when he wrote his timeless parable, Making Basic Electrical Measurements. It has since become a classic in the sacred scriptures of Appliantology. Be there now.

Your loins now girded with this arcane wisdom, come use this parchment from the sacred scrolls to test the components in your dryer burner and cast out the demons. Procure your replacement parts here.

Can I hear an, “Om shanti?”

Dryer Venting Wisdom

MESSAGE SENT THROUGH YOUR WEBSITE

name = Greg

email = *********@yahoo.com
country =   USA
comments = You have given me a TON of info about my dryer vent, and I appreciate it. Can you help me with the one problem that is driving me mad? I can’t get my vent to stay attached to the back of my drier! Is it safe to use duct tape to tape it in place? How long does the hose have to be? My dryer is close to a wall (in a closet) and I am wondering if I am using too long a vent hose and this might be making it easier for the thing to fall off. OH GREAT SAMURAI, HELP ME!!!

Please open your appliance repair hymnal to page 127: The Ultimate Dryer Venting Guide. Wherein it is written… well, lots of stuff about dryer venting and dryer venting materials. Of particular interest to you would be the 4″ vent hose clamps at the bottom of the list. Here’s a free tip: always make your 90-degree turns using a pre-formed, aluminum fitting, such as this one. And the spiral-wound slinky hose should only be used sparingly, to make tricky connections. See The Ultimate Dryer Venting Guide for lots of other dryer vent construction materials and kits.

Dryer Vent LenghtAs for dryer vent length, that depends on several things, like the vent material, number of turns and bends, and type of discharge hood. The diagram shown here explains, click it for a larger view.

For more information about your dryer or to order parts, click here.

How to Check the Burner Components in a Gas Dryer

The radiant sensor, ignitor, and valve coils should all show continuity. The ignitor will have a resistance in the range of 100-300 ohms and will increase as the ignitor gets older.

The Mysteries of Gas Dryer Burner Components Revealed!

The resistances of the coils will be higher. This page has detailed explanations and specs on the valve coils.

Checking the Components in a Gas Dryer

The only component not shown in the photo above is the high limit thermostat, which is attached further down the burner cone, shown here.

As always, click the thumbnails for the larger view. Can you believe I have lots of grasshoppers reading this post who didn’t know to do that until just now? 😆

To learn more about your dryer, or to order parts, click here.

Looking for Help on a Noisy Frigidaire Dryer

Diana opined:

I can’t find anything on a fridgidaire [sic] dryer. The drum thumps when it is running but heats up and drys [sic] clohes [sic].It is level and I’ve triied [sic] one piece at a time and still it thumps

_______________________________
Message sent from IP: 69.171.158.185

Well, for starters, you’re misspelling Frigidaire, among other words. Since I always speel everthing at this websight 100% cerrectly 100% of the thyme, the only article you’ll find in my site search using the key word fridgidaire will be this one. Spelled correctly, however, you’ll find a plethora of information on this very machine such as:

this page on the Frigidaire dryer front drum glides, or

this one on the Friggidaire (this is an accepted alternate spelling for Frigidaire amongst us professional appliantologists) rear drum bearing,

or this page which has complete, illustrated disassembly instructions for every Ameedican dryer, including the Friggi-freakin-daire.

Would you like fries with that?

No heat in Maytag model MDE9700AYW dryer

Hot tip on this problem from our friends at Maytag:

A poor connection between the wire terminals and the heater relay causes high current draw and damages the terminals on the heater relay on the main control board.

The correction is to replace the main control board as well as both 1/4″ female tin terminals on the wire harness and any damaged wire.

Production changes for units made after Feb. 25, 2005 have corrected this problem.

Unlocking the Control Lock on Certain Electrolux Washers and Dryers

MODELS affected:

Washers:

BLTF2940ES, BTF2140ES, FTF2140ES, FWFB9200ES, GLTF2940ES, LTF2140ES and LTF2940ES

Dryers:

BCEQ2152ES, BEQ1442ES, FE/GQ1442ES. FEQ1442CES, FEQ2152ES, GCE/GQ2152ES, GLE/GQ2152ES, GLE/GQ1442ES and GLE/GQ2152ES.

You know this problem: you turn the selector knob or press any button and get an obnoxious flashy beepy thing in the display. Some models will even taunt you with an “Err” in the display.

I know many of you have been ripping your hair out over this one– I’ve been getting lots of disgusting photos of clumps of hair attached to bloody chunks of scalp. So, I figgered I better post the solution to this little annoyance. This is super easy: The problem is that somehow the control lock has been enabled. “LOC” is displayed on digital displays and the control lock status light is lit. To unlock the control, press the “Options” and “Select” buttons simultaneously. The control lock status light will no longer be lit and you can let your hair grow back!

Fixitnow.com Appliance Repair Radio Update

listen to our podcast or we'll break into your house at night and slice open our bellies on the new marmoleum floor in your kitchen.You wanted another all listener emails episode. You’ve flooded us with email demanding it. And a surprising number of you have actually immolated yourselves and had your cousins mail me photos of your smoldering, sizzling carcasses. That got our attention. So, here it is, another all listener email episode! (Now, stop with the photos, please.) And, best of all, it’s less than 15 minutes short.

Bob has a Kenmore electric range that doesn’t heat; the lights work and a warming burner, but the main oven and stove elements don’t get hot. What are the things to check?

As a result of Euclidean geometry, Doug is contemplating venting his dryer into the crawl space of his house. To do otherwise would require a very long dryer vent with multiple turns. What’s the problem with venting a dryer into a crawl space?

Ah, grasshoppah, listen and learn!

Podcast homepage | Podcast RSS feed

Disassembling a Maytag Drying Center

Common model numbers are MCE8000AY and MCG8000AW. These models have been out long enough for something to break and need fixing. Here’s the Cliff Notes tear down procedure:

  • Remove the two screws that connect the front panel to the lint trap housing.
  • Open the upper cabinet dryer and unscrew the four screws that span across the rear of the control panel.
  • Move the control panel up and be aware that you will have to detach at least one electrical connector to get the panel out of the way. This will allow you to swing the control panel to the left.
  • Remove the five screws located across the top of the bottom panel– previously hidden by the control panel).
  • Swing the top of the panel out and gently pull up to remove the bottom of the panel from the brackets.
  • Unhook the electrical connector on the lower right side which will allow you to swing the panel to the left.
  • Sit back and reward your self with a cold one. Hey, grab me one while you’re at it. Domo!

Kenmore Elite and Whirlpool 27″ Electric Dryers: Run but Doesn’t Heat

If the dryer runs but doesn’t heat, don’t even think it’s the thermal fuse. If the thermal fuse was the problem, the dryer wouldn’t run at all.

First thing to do is verify your source voltage for the dryer; for those of you in Manhattan, this means to use your multi-meter to measure the voltage at the dryer outlet to make sure you have 240v. Y’see, Slick, the dryer motor only needs 120v supplied by one of the lines to run. But the heating elements, on the other hand, need 240v supplied by both lines to get hot.

If the source voltage is ok, then the most likely bad parts are listed below. As always, you should use your meter and the tech sheet supplied with your dryer (and cleverly hidden inside the control panel) to verify:

1. Even Heat Board

2. Heater Relay

3. Thermostat

4. Sensor

To learn more about your dryer, or to order parts, click here.