Need help replacing a broken belt on your ASKO (oh NO!) dryer? Got the wisdom and gentle words of encouragement you need ratcheer.
ASKO Dryer- belt stringing (T700)
Leave a reply

Need help replacing a broken belt on your ASKO (oh NO!) dryer? Got the wisdom and gentle words of encouragement you need ratcheer.
Read this now.
Related article: Dryers and Fires
This has gotta be the most freaky dryer outlet problems I’ve ever seen! This woman is damn lucky her whole house didn’t burn down.
This is almost always a sign of a bad motor. This forum thread has some good information for determining if this is the case as well as background information on how electric motors work.
Bucky wrote:
How do I change the motor in a Maytag Dryer Model# MDE9306AYA, oh great Samurai? And also, oh great one, which side of the belt goes against the dryer drum, ribbed or flat side? Domo orogato!! You are ichi bon. I love you no shit. Fried or steamed?
_______________________________
Message sent from IP: 24.33.141.158
 First step to replacing the motor is to tear down the dryer. You’ll also need to remove the blower wheel. With all the guts torn out of the dryer, you have unencumbered access to the motor. You will replace the old motor with the new motor that you bought here, which helps to support all this free help you get here at the colossus of appliance repair websites.
I also have a handy page of belt configurations for all dryers, including yours. On older Maytag dryers, the flat side of the belt goes against the drum.
Even in the worst of conditions, this repair rates a mere three mugs on the SUD-o-meter. Piece of pie, comrade!
Steamed, please. And shaken, not stirred.
I had a call from a customer complaining of black smudges on her clothes, she thinks from her washer. She also reported that her dryer needed service because it made an awful noise.
Now, whenever I get a call about black smudges on clothes, I know it’s usually one of two things:
1) A chemical reaction between some detergents and fabric softeners can create black spots on clothes in the washing machine. You can tell if this is the case by seeing if the black spots will come off using soap and water. (Uncommon: if the spots will only come off using petroleum distillates, then this is oil from the washing machine’s transmission.)
2) Rubber and/or metal filings from a wallowed out drum roller in the dryer getting on the clothes. In this case, you’ll see amorphous smudges instead of well-defined, circular spots.
Turns out that, on this service call, the source of the staining was definitely the dryer. When I started up the dryer, it emitted a loud rumbling. I shut it off immediately and disassembled the dryer. After removing the drum, I saw the source of the black smudges right away. You can see it below (click it for a larger view):
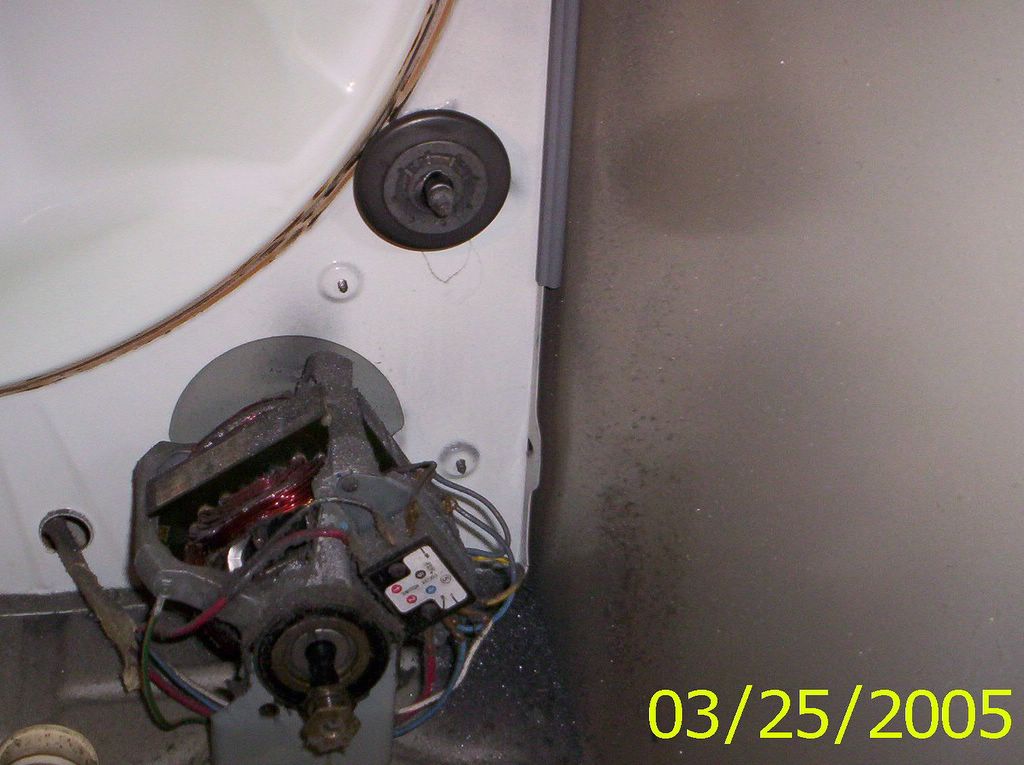
Wallowed-Out Drum Roller on a Whirlpool-Built Dryer
As you can see, the drum roller is nuked. Amazingly, the roller shaft was still serviceable. If you looked at the larger view, you may have noticed all the metal shavings on top of the motor and piled in the back corner. With the drum roller so wallowed out, the rear drum seal was sloppy and would let metal filings into the drum while the dryer was running. These metal filings get on the clothes and leave black smudges. I replaced both drum rollers, the belt, and the idler pulley. Since this was a Whirlpool-built dryer, these parts all come in a convenient rebuild kit.
If you have a Friggidaire dryer (also sold under the Kenwhore brand) that chews holes in your clothes, you probably need to replace the drum front upper felt glide kit. The picture below shows you what I’m talking about (click the picture for a larger view):
Frigidaire Front Drum Glide, Old and New
To light this candle, start by removing the front panel– see my enlightening tome on Dryer Disassembly for instructions on this.
Next, use a stiff, sharp-edged putty knife to scrape off the old glide kit. Maybe sand it down a bit just to make a nice surface. Wipe off all the grotus and residue with a clean towel.
The kit comes with high-temp adhesive. Open the tube and slather that stuff on. Now, I’ll share an old-timer’s trick with you. Squeeze whatever glue you have left into a paper lunchbag then put it up to your nose and mouth and hyperventilate violently for several minutes until your vision starts to tunnel inward. Then hold your breath and wait for the special appliance trick to be revealed.
Ok, after you’ve awakened from your chemical slumber, slap on the new felt kit. Note the orientation: the overlap of the teflon pads should go toward the door panel. Clamp it for a minutes using the proprietary technique illustrated below:
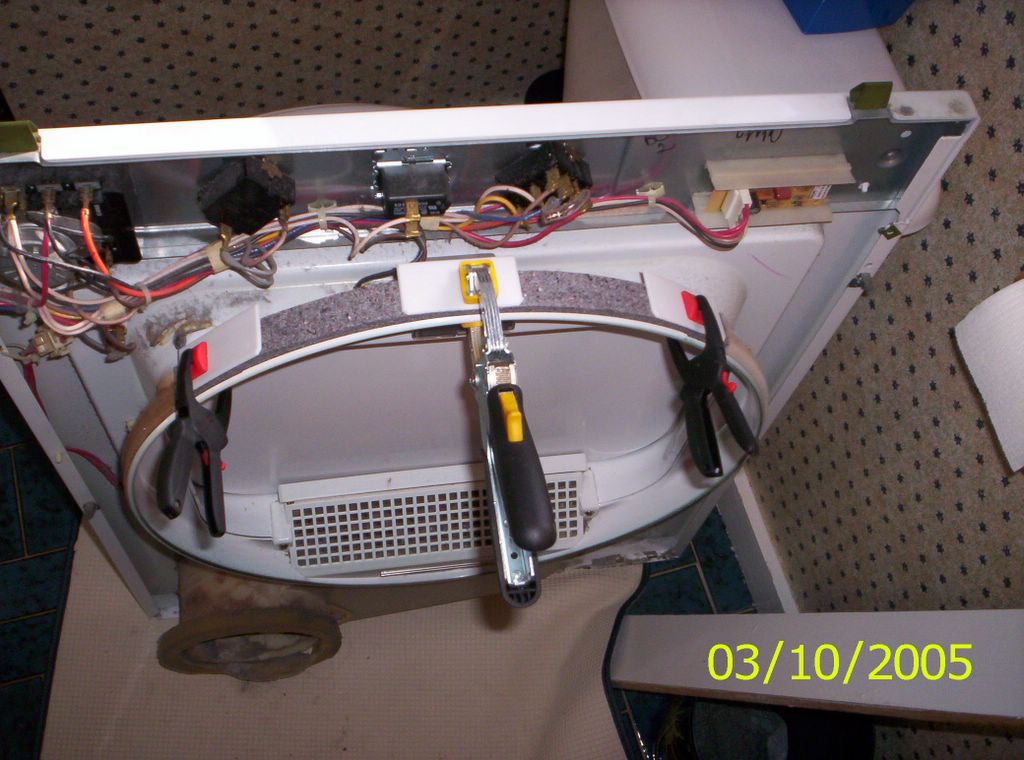
Installing the New Drum Glide Kit
Note that this is a patented technique so, if you use it to install your glide kit, you must remit your royalty payment to the United Samurai Beer Fund.
To learn more about your dryer, or to order parts, click here.
 (Click the pictures for a larger view.)
If yours is the gas version, the gas burner assembly is conveniently accessed from the front of the dryer by simply removing the quarter panel below the door panel. You’ll see the assembly on the right hand side, as shown below.
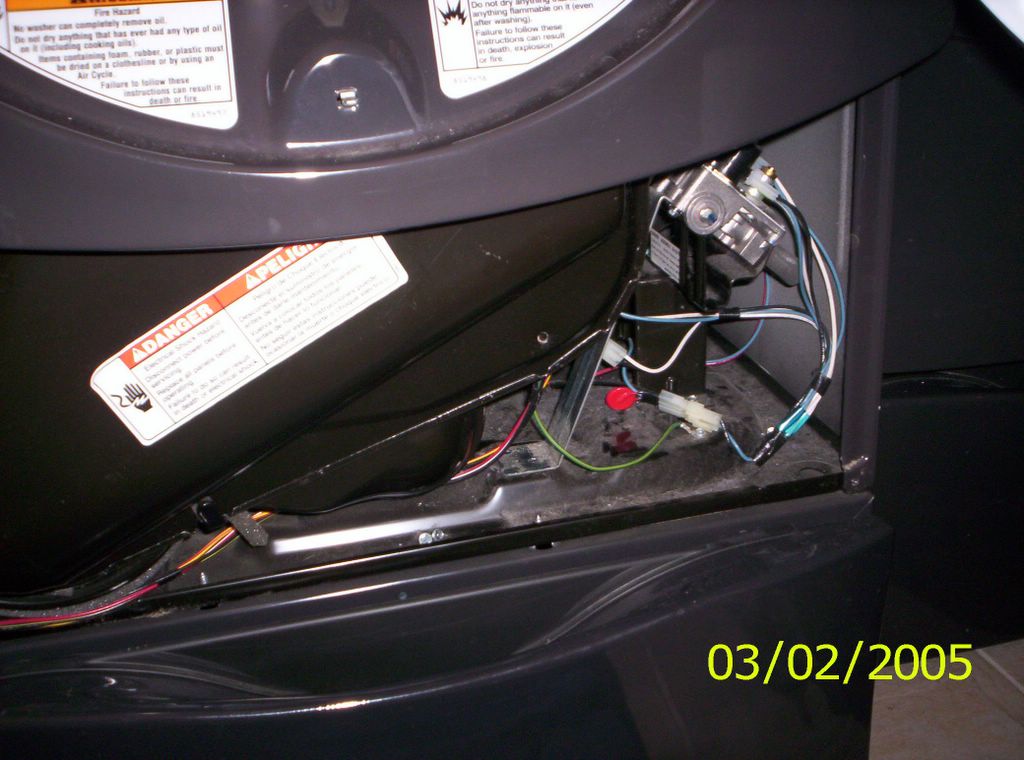
Gas Burner Assembly
All appliances these days have a tech sheet hidden somewhere inside of them. To find the tech sheet on the Duet dryer, you have to remove the top panel and thar she blows, as Samenilla points out below.

Tech Sheet Location
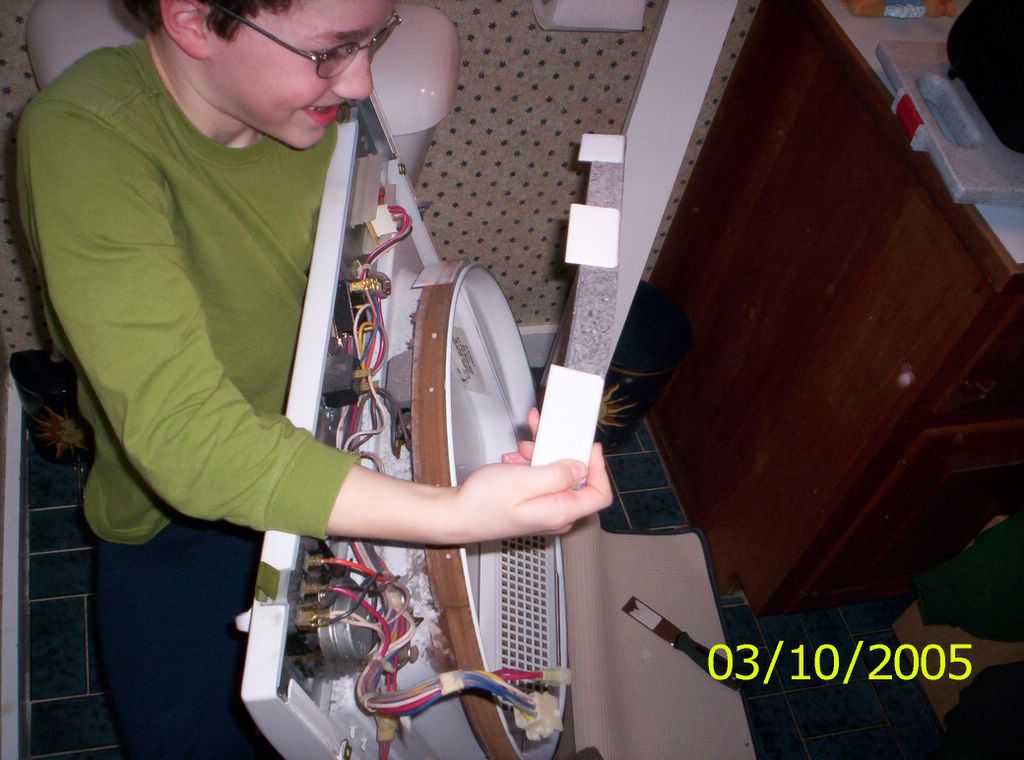
If you need to get deep into the guts of this beast, such as to replace a belt or change the venting from the side to the back, then you’ll need to remove the door panel assembly. To do this, you first need to remove the top control panel. You’ll undo some screws, as shown below, and then the control panel slides up and out. Be sure to secure this panel because if it slops around, you could damage some delicate ribbon connectors. With the control panel lifted off, you have full access to all the mounting screws for the door panel. The rest is trivial and I won’t bore you with it.
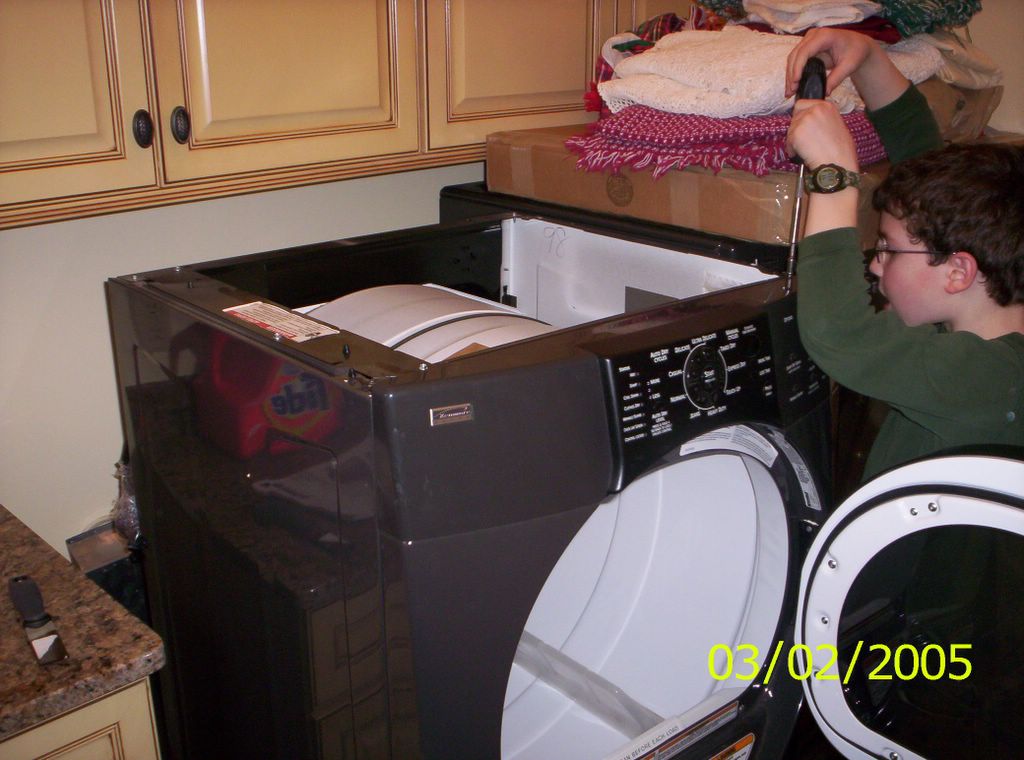
Remove Top Panel to Remove Control Panel
Ok, tear ’em up!
For more information about your dryer or to order parts, click here.

You can click the pictures below to see a bigger version.
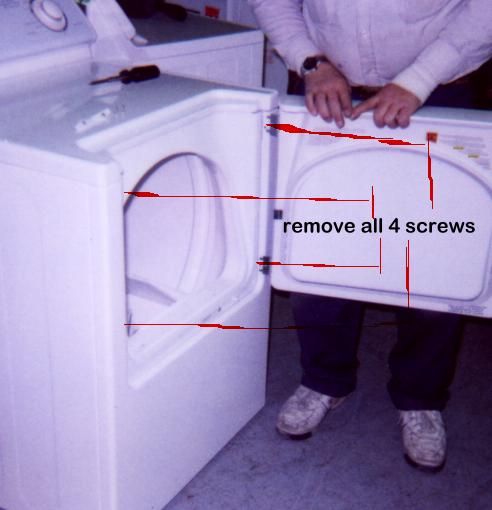
Remove the Door Jamb Screws
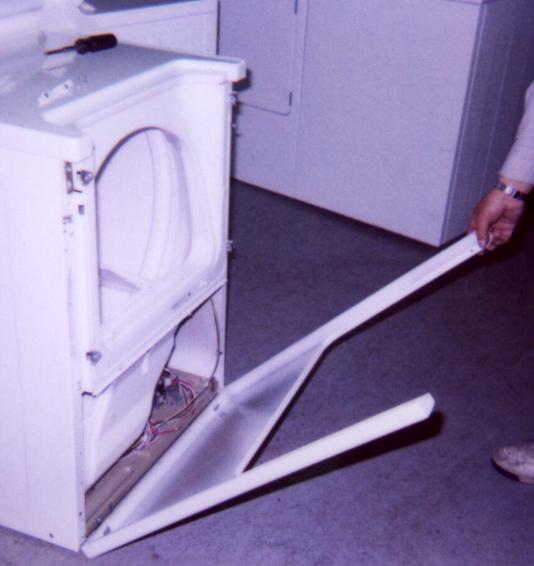
Pull Off the Front Panel
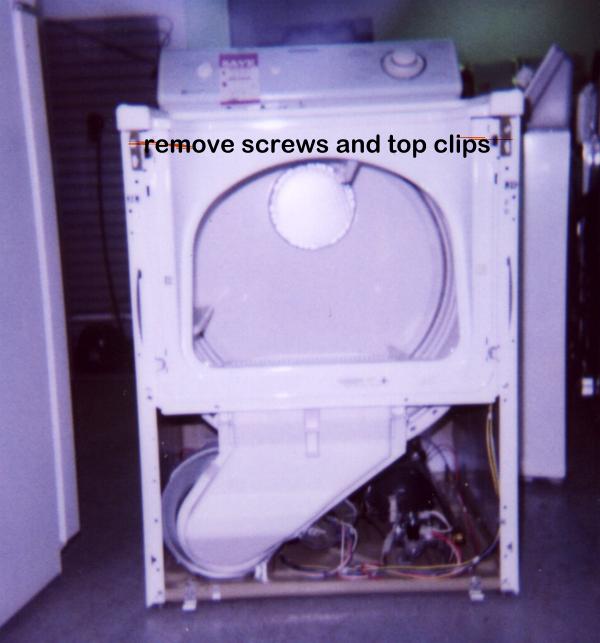
Remove Clips to Lift top Panel
The remainder of the disassembly follows the procedure for the regular Maytag dryers.
For more information about your dryer or to order parts, click here.
To learn more about your dryer, or to order parts, click here.
rosehillworks wrote:
I am thinking about buying a new washer and dryer instead of repairing my kenmore frontloader set. Is there a brand worth buying that will last awhile before dying. I am a family of six and really need a dependable washer and dryer set.
Thanks,
Helen(Posted in the Appliantology Group repair forum)
A good question and one I get asked a lot during service calls. It’s also hard to find unbiased information on this topic. Like Terry said, forget about Consumer Reports— they are either a scam organization or just plain stupid, I haven’t figured out which. Here, I’ll talk about the cheap top loaders that everyone likes to buy; in a subsequent post, I’ll talk about two of the best washers on the market today: the Staber and the Whirlpool Duet.
First off, you have to accept that the days of getting ~15 trouble-free years of service from a new appliance are long gone. On average, expect to do repairs every two to four years, no matter which brand you buy. What varies among the brands is the frequency and expense of the repairs. And, no, it’s not an evil plot by the manufacturers. Think about it: you can buy a new washer, dryer, refrigerator, whatever, for about the same number of dollars that you would have paid 15 years ago. Meanwhile, during that period, inflation has increased (so the dollar buys less), manufacturer’s costs have increased (materials, labor, insurance, worker’s comp., etc.), yet, magically, you can still buy that appliance for the same number of Federal Reserve Notes! How is this possible?
Because it’s not the same quality appliance that you would have purchased 15 years ago. “Aha! So they deliberately build them flimsier so they’ll fail more!” Nah, nothing nearly so exotic. The real story is a mundane matter of the manufacturers having to build appliances that people will buy, that people can afford to buy. If you had the opportunity to buy an appliance of the same quality and workmanship that you could have gotten 15 years ago with today’s dollars, you’d pay at least four to five times as much for that appliance.
Ok then. So the good news is that you can buy a new appliance for the same number of Federal Reserve Notes as it would have cost you 15 years ago. The bad news is that there’s a hidden cost of ownership in that you’ll be doing repairs every two to four years. But then, that’s why God gave us Fixitnow.com and the Appliantology Group!
Now, on to brands. In general, Whirlpool brands seem to provide the best overall value, meaning the best optimization of price and reliability. This is not to say they’re trouble-free, no-siree-Bob, not by a long-shot. You’ll still be doing repairs on ’em about every two to four years. But, in general, the repairs will be comparatively minor. For example, after three years, you may need to replace the drive coupler or the lid switch on a Whirlpool direct-drive top-loading washer– both of these are simple repairs that rate at most two mugs on the SUDS-o-meter. On the other hand, in the same three year period, you could be replacing the transmission or some other major drive component in a Maytag or GE top-loading washer. Even if such a repair is covered by warranty, you have to deal with the whole fuss of getting warranty service which, in some areas, could take weeks.
I’ve also found that, as a company, Whirlpool is very easy to deal with. They tend to go the extra mile to take care of the customer. They make warranty parts procurement easy, even for the consumer. And they make technical information readily available, a particularly enlightened paradigm when other manufacturers seem to go out of their way to make it difficult for independent servicers to obtain technical service information on their products. GE is especially bad in this regard. Speaking of GE…
Avoid GE appliances and all GE brands. They charge a premium for their products yet their repair frequency is as much or more than other brands. And the repair will cost you more because GE parts can cost two to three times more than comparable parts for other brands; it’s not like they’re better parts, either– GE just charges more for ’em. Why? ‘Cuz they can. Appliance techs often joke that GE stands for Greedy Electric. But, sadly, the real joke is on the schlumps who buy GE appliances.
Another sad joke is Maytag. This once-venerable maker of the standard-bearer of appliance reliability has taken a page from the GE playbook: make cheap junk and sell the hell out of ’em. The recent class-action settlement for the Neptune washer is one visible example. The only Maytag-brand appliances that I like anymore are the Maytag-branded dryer and the Maytag- or Magic Chef-branded gas ranges. Avoid the highly over-rated Jenn-Air brand– it’s just overpriced junk.
Frigidaire (often pronounced Frigg-i-daire by technicians working on their equipment) makes about the same quality product it always has: mediocre. If someone held a gun to my head and made me pick from either GE, Maytag, or Friggidaire, I suppose I’d choke down my bile and take the Friggidaire. The worst part about the Friggidaire is working on them. Friggs require a high degree of manual dexterity for some repairs, especially on their washing machines. These machines seem like they were designed to be worked on by extra-terrestrial technicians who have a third arm sprouting out of their chest. And from the customer’s standpoint, Frigidaire is a real pain in the pooper to deal with– unlike Whirlpool, they won’t send out needed warranty parts directly to a consumer to make their own arrangements for the repair.
Then lots of people ask, “Ok, well, what about Kenmore? Is that a good brand?” Well, who makes Kenmore? If you bothered to click that link, you’d have seen that everyone makes Kenmore… except Kenmore. Y’see, the only thing Kenmore makes is money. There ain’t no Kenmore factory in Malaysia or anywhere else. In the old days, all Kenmore appliances were made by Whirlpool exclusively. But not so any longer. So, if you buy a Kenmore, you don’t really know what you’re getting. The other problem with Kenmore is that you’re stuck dealing with Sears to resolve warranty issues since Kenmore takes over the product warranty from the manufacturer. Running a do-it-yourself appliance repair website, I hear all kinda sordid stories about people getting ripped-off or jerked-around. This one about a Kenmore refrigerator in Florida has got to be one of the all-time classics.
Recommended Reading:
Jeremy wrote:
I am trying to fix my Whirlpool Dryer. The dryer will not ignite the burner.
I am suspecting the gas valve, but I have a question before I purchase it. Do
both solenoid coils need to be energized at the same time? Both coils do
switch on, but not at the same time. Am I barking up the wrong tree?Thank you.
_______________________________
Message sent from IP: 24.5.153.62
Come bark up the Samurai’s Tree of Knowledge and read my Appliance Repair Revelation on this very subject: Burner Operation in a Gas Dryer.
“Arf!” he said.

Dryers, gas or electric, are the simplest appliances you’ll ever work on. But judging by the amount and type of questions I get about gas dryers, specifically about the gas valve and burner, has prompted me to bring down another pearl of appliance wisdom from on high. This Appliance Repair Revelation explains how the burner in a gas dryer is controlled by these cute, button-looking coils on the valve, shown here to the right. Ok, hang on for some major geek-speak.
Many gas burners use a split coil
design. Valve No. 1 (see diagram below) has two coils to actuate its
plunger, thus giving the split-coil burner its name. Neither the hold coil nor the assist coil alone is strong enough to open the valve. The combined magnetic action of both coils is needed. Once the valve is open, however, the hold coil can hold it open by itself. The circuits of both coils will serve as a quick shut-off function.
When voltage is applied to 1V and 3V, a circuit is
completed from 1V to the ignitor, and through the
sensor to 3V as shown below.
Simultaneously, the hold coil is energized, and the
assist coil is energized through the radiant sensor.
This action means that the ignitor is heating and No.
1 valve is open. No gas flows, however, until No. 2
valve also opens. Note the resistor in series with the
assist coil. This is a balancing resistor which is used
only on one style of valve. It will not be present on all
split-coil valves.
The ignitor has reached a temperature sufficient to
open the radiant sensor contacts as shown below. This
action causes valve No. 2 to be energized through
the ignitor. Gas flows through the valve and is ignited
instantly by the still hot ignitor. Current through the
assist coil on valve No. 1 is very low at this point.
Magnetism created by the hold coil is sufficient to
hold the No. 1 valve open.

Another important thing to be aware of is that the radiant sensor is closed when it does not sense radiant heat and it opens when it does sense radiant heat. This means that in order to ohm out the sensor to verify its proper operation, you first need to make sure the sensing port is covered. In this condition, you should have a very low resistance reading between the terminals. Then, uncover the sensing port and hold a lit Bic lighter flame in front of the sensing port (yes, it has to be a Bic). In this condition, you should have a very high resistance reading (ideally, open) between the terminals. A bad sensor will also cause the meter reading to jump all around during either test.
Here’s a good reference on radiant sensors:

If you suspect the valve coils are burned-out, you can use your meter to make resistance measurements. The diagram below shows you what to measure:
Recommended reading:
For more information on your dryer or to order parts, click here.
Kenmore gas dryer-Mod.#11077694100
No fire–replaced ignitor–still no fire–checked for voltage to valve
assy.–none–checked safety switches on fire box & vent–normally closed condition
okay–how do I check the centrifical switch & pressure switch for
proper operation?_______________________________
The above message was sent when you were offline, via your HumanClicked site.Message sent from IP: 64.12.116.76
How ’bout instead of guessing which part might be bad, we use the dryer’s schematic diagram to determine which part is bad based on actual measurements? Sound like a plan? ‘Course it is: I am the Samurai.
Here’s a typical schematic diagram for a Whirlpool / Kenmore gas dryer (Note: the diagram for your dryer may be significantly different depending on features and model. Always endeavor to use the exact diagram that came with your dryer.)
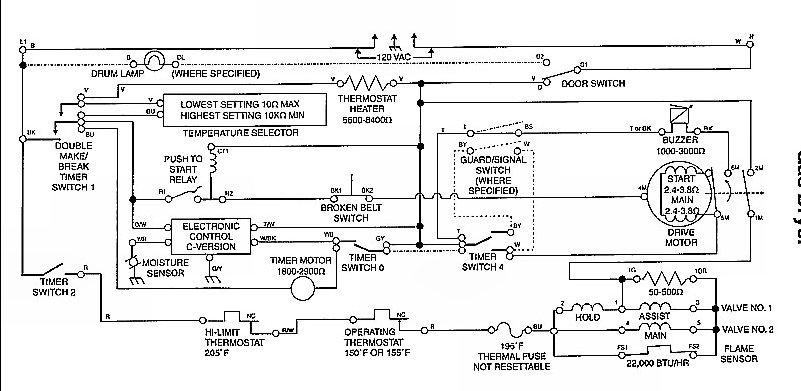
Typical Schematic Diagram for a Whirlpool / Kenmore Gas Dryer (lint filter on top panel)
Are you still with me? Ok, recalling your statement that the gas valve coils were not getting voltage, I see four components in the example diagram that could break the circuit to the gas valve coils: timer, hi-limit thermostat, operating thermostat, and thermal fuse. Any one of these can fail open and break the circuit to the valve coils.
Pop Quiz: What test would you do to test each component? Discuss amongst yourselves…
Finished already? Ok, survey said? Ding, ding ding! That’s right: continuity test–you’re a quick study!
Bonus question: how do you test continuity?
Tic, toc, tic, toc, tic, toc…
Done already? Let’s see…mm hmm, hmmm, yes: set the multimeter to the lowest ohms scale and remove at least one wire from the component being tested to isolate it from the rest of the circuit, then you test the component like this. Yes, good work!
Armed with this sacred appliance wisdom, you may proceed with diagnosing and repairing your insolent appliance. Buy the parts you need here.
To learn more about your dryer, or to order parts, click here.
Sinsa:
One thing you might mention in your incredibly helpful guide to the Maytag
Dryer belt is that the evil geniuses at Maytag made a grove in the drum very close
to where the belt is supposed to run. If(make that when) the belt falls into
that groove while replacing the belt or idler wheel, when you put it back on it
will seem as though you have not properly looped it around the motor and idler
wheel, even when you have. It will seem as if the belt is (has somehow become)
too long, and drags against the alignment slot, until you rotate the drum
enough to get the belt out of the groove and up on the drum, where it belongs. I
respectfully suggest you might add this tidbit to your otherwise excellent
instructions.Now, my belt is back on. The dryer is running smoothly without banshee squeel.
Spouse is happy. Back to my quest for free beer!_______________________________
The above message was sent when you were offline, via your LivePerson site.Message sent from IP: 12.77.173.243
Good comment–consider it added.
Remember, also, that on Maytag dryers, the smooth side of the belt goes against the drum.
I have a Whirlpool Duet Gas Dryer model no. GGW9200LW0 that is stuck on “control locked” mode. I am unable to use my dryer due to this problem. Please send me any info you have that can help me with my problem, thanks..
_______________________________
The above message was sent when you were offline, via your LivePerson site.Message sent from IP: 4.12.210.98
Ahh, Grasshopper, the Samurai is pleased to help you out of your dilemma. Come, sing along with me…
To unlock the Control Locked feature:
Press and hold the End Of Cycle Signal button
for 3 seconds to turn this feature off.
NOTE: When the dryer is running and Control
Locked light is on, the dryer can be stopped by
pressing the Pause/Cancel button, but cannot
be restarted until the control is unlocked.