Monthly Archives: October 2005

The Naked Truth about being an Appliance Repair Tech

Somedays, after running service calls and dealing with one or two USDA Grade A pricks, I conjure up images of my day where all I do is go to unoccupied homes, fix the appliance, take the check left for me on the counter and then head off to the next job. Even though most folks are really cool to work for, about one customer in every hundred is a real ball-buster– they’re the ones that make you wanna leave humans outta the repair picture.

One of my readers, J. “Dusty” Tingstrom, captures this spirit perfectly in her ode to appliance techs:

Just for the Samurai Repairman:

As a fixer I’m hoping to see

Less need for to fix the fixee

May the good mechanized

Just be less eulogized

So more time for more beer there will be.

J. Tingstrom

9/05

Did she capture every tech’s on-the-job prayer, or what? But it don’t work that way in the real world now does it? Nope, there’s other people involved every step of the way, from the initial call for service to the collecting payment and leaving. And this reveals a fact of life about doing professional appliance repair that many techs just don’t get:

You don’t just fix appliances– you also fix customers.

You could be the best tech in the world, with an encyclopedic knowledge about the innards of all appliances, ranging from the low-end to the exotic, but if the customer thinks you’re a ‘tard, what have you gained? Once the customer puts you under the technician microscope, they’ll find some reason to think you’re incompetent and didn’t fix the appliance right. Maybe they’ll think it sounds funny or smells funny after you fixed it. Whatever. The point is, you gotta fix the customer– fixing the appliance is only part of the job while you’re there in the house.

How do we fix the customer? By communicating with them in a straight-forward manner; by not bullshitting when you don’t know something; by doing everything you said you’ll do, when you said you’ll do it; by taking care not to crap up the customer’s home while you’re in there; and, of course, by fixing the broken appliance and standing behind your work with a meaningful warranty.

Using the Concept of Appliance Half-Life to Determine When to Replace an Old Dryer (or any other appliance)

Susan wrote:

Thank you, Samurai, for your table of the half-life of appliances. The Maytag gas dryer in my rental unit wouldn’t heat. The pilot light wouldn’t stay lit and following the instructions on the access door for lighting the pilot didn’t help. The dryer was not new when I bought the property 17 years ago. Your table helped me to decide that, this time, it is probably not worth it to spend the money and aggravation to try to repair it. I’ll check with you next time one of my appliances is “on the fritz”.

Honor to you!

Susan

_______________________________
Message sent from IP: 68.253.208.116

Your visit to my website seeking appliance wisdom honors me!

The problem with your dryer was most likely a fouled pilot assembly. I don’t even know if burner parts are still available for pilot-ignition gas dryers. Nevertheless, let’s do a repair benefit analysis from the superior persepective afforded by reading my enlightening tome, “How Long Should Appliances Last?” which you mentioned in your email.

Looking up dryers in the appliance half-life table, we see that dryers have a half-life of 13 years. Since your 17-year old dryer is four years older than the half-life, your chances for a successful repair on this dryer is approximately 35%. Lemme put it this way: If one of my local customers were to call me to schedule a service call for this dryer, I would encourage them to get a new one.

You made the right decision.

Gas Dryer No Heat; dryer troubleshooting and repair, gas dryer won’t fire up; dryer repair

Filomena wrote:

I have a Whirlpool gas dryer model # LGC8858EQ2 that isn’t working. It runs, but isn’t heating. I have replaced the gas valve, the thermostat, and the ignitor and still nothing. I can use some advice. I have two kids and one is a toddler with a disability and really need a working dryer.

Thanks for any advice you may give.

Filomena

_______________________________

Message sent from IP: 66.81.136.231

The most important advice I can give you is Samurai’s Ichiban Law of Appliance Repair, “Never replace a part unless you have proof that it is bad.”

But people tell me, “Yo, Samurai, we don’t know how to test stuff and use those fancy instruments like you do, so how we gonna get the ‘proof,’ smart guy?”

Ah, grasshoppah, seek and ye shall find. But you gotta seek. And you gotta be honest with yourself about knowing what you know as well as what you don’t know. In the long run, you’ll save time and money, and you’ll gain the satisfaction of learning something, too (they say that continual learning is the key to avoiding old-age dementia).

Now, let’s apply these principles to fixing your dryer using the information freely and readily available on the Internet… like at this website, for instance. Easiest way to find the information you need ratcheer to fix your dryer is to do a site search using Yahoo!™. In your case, fer ezzample, I’d use a moderately specific search term such as, “gas dryer no heat.” Let’s pop that little gem into the Yahoo! site search box below:


and clicking the search button reveals this page-full of gas dryer repair wisdom.

What’s that you’re saying, “How ’bout makin’ them fancy electrical measurements, like they talk about on some of those pages pulled up by the Yahoo! site search?” Great question! It shows you’re really thinking. Let’s apply the search principles we’ve just learned to this new nugget of knowledge needed to complete our Illumination. Plugging the term electrical measurements into the Yahoo! search box gives this excellent and mercifully short primer on making simple electrical measurements, such as measuring resistance, voltage, and current.

I’d like to summarize the foregoing discussion with a haiku that I wrote just for you and rendered in traditional 5-7-5 meter:

Gas dryer won’t dry.

Shotgunned parts but still no joy.

Search Samurai’s site.

How to Find the Exact Appliance Repair Help You Need Right Here at FixitNow.com

Did you know this website, Fixitnow.com Samurai Appliance Repair Man, has over 2,000 pages of free, easy-to-understand appliance repair help for the do-it-yourselfer? Oui, oui, I shi’ite you not. While I do have a site map that I keep updated, it’s just not an efficient way to find what you need if you’re on a mission to fix a specific problem with one of your appliances.

Fortunately, you have a way of jumping through the vast universe of information at this site and landing on exactly what you need to fix it now. Just use one of the site search engines found on every page of this website; it’s either a Yahoo! or a Google site search box. Because I’m such a thoughtful and oh-so-damned-good-looking guy, I’ve included both below.

Happy searching!


Google

 
Web

Fixitnow.com


Bosch Dishwasher Diagnostic Procedures; dishwasher repair

And now, a special treat for you Bosch dishwasher owners out there…

SHI/U 43 MODELS

To start test program, press and hold both POWER SCRUB PLUS and REGULAR WASH program buttons, then turn unit on by pressing ON/OFF button. When program buttons are released, lights above them will flash. To end test program, press ON/OFF button.

To check each program indicator light, press its button.

To start testing, press both POWER SCRUB PLUS and REGULAR WASH buttons a second time. When testing has ended and a fault was detected, the following indicator lights will be lit:

WASH = Heater fault

RINSE/DRY = Water filling fault (over or under filling)

CLEAN = NTC (temperature sensor) fault ? note circulation motor stops shortly after it started during an NTC fault

To check for heater, high limit or flow switch problems, start testing until heating starts. Using a meter with a current coil, measure current going into dishwasher. If current is ~ 11 A, then heater, high limit and flow switch are OK. If current stays at ~ 1.5-2 A, then heater, high limit or flow switch are faulty.

If water level switch (f1) has failed (opened), RINSE/DRY light will come on and unit will continually fill and drain where testing won’t be completed. If flow switch (e5) has failed (opened), water won’t heat (to 150?F) and water won?t stop circulating. If NTC probe (f2/f4) has failed (opened), CLEAN light will come on immediately and testing will end shortly after water has started circulating.

If more than one fault occurs, more than one light will be lit.

SHU 4322 & 4326 MODELS

To start test program, press and hold both REGULAR WASH and RINSE & HOLD program buttons, then turn unit on by pressing ON/OFF button. Initially, control module version # will be displayed (e.g./ ?20? = version 0 without jumper). When wash program buttons are released, lights above them will flash. To end test program, press ON/OFF button.

To check each program indicator light, press its button. To check Cycle Countdown display, Refill Rinse Agent light and REGULAR WASH light, press REGULAR WASH button (press Delay Start button to test Cycle Countdown display alone). Cycle Countdown display will show “88” when REGULAR WASH button is pressed and “8h” when Delay Start button is pressed.

To start testing, press both the REGULAR WASH and RINSE & HOLD buttons a second time. When testing has ended, Cycle Countdown display will show a fault using codes below. If more than one fault occurs, code numbers will be added together, (e.g./ ?6? = faults 2 + 4).

0 = No faults detected 2 = Heating fault 8 = NTC (temperature sensor) fault

1 = Aqua Sensor (“Sensotronic”) fault 4 = Filling fault F = Filling fault (display occurs during wash, not test)

To check for heater, high limit or flow switch problems, start testing until heating starts. Using a meter with a current coil, measure current going into dishwasher. If current is ~ 11 A, then heater, high limit and flow switch are OK. If current stays at ~ 1.5-2 A, then heater, high limit or flow switch are faulty.

If water level switch (f1) has failed (opened), display will show fault code “4” and unit will continually fill and drain where testing won’t be completed. If flow switch (e5) has failed (opened), display will show “0”, water won’t heat (to 150?F) and water won?t stop circulating. If NTC probe (f2/f4) has failed (opened), display will show fault code “8” immediately and testing will end shortly after water has started circulating.

SHU 53 MODELS

To start test program, press and hold both SCRUB WASH and DELICATE/ECONO program buttons, then turn unit on by pressing ON/OFF button. Initially, control module version # will be displayed (e.g./ ?21? = version 1 with jumper). When wash program buttons are released, lights above them will flash. To end test program, press ON/OFF button.

To check each program indicator light, press its button. To check Cycle Countdown display, Refill Rinse Agent light and REGULAR WASH light, press REGULAR WASH button (press Delay Start button to test Cycle Countdown display alone). Cycle Countdown display will show “88” when REGULAR WASH button is pressed and “8h” when Delay Start button is pressed.

To start testing, press both the SCRUB WASH and DELICATE/ECONO buttons a second time. When testing has ended, Cycle Countdown display will show a fault using codes below. If more than one fault occurs, code numbers will be added together, (e.g./ ?6? = faults 2 + 4).

0 = No faults detected 2 = Heating fault 8 = NTC (temperature sensor) fault

1 = Aqua Sensor (“Sensotronic”) fault 4 = Filling fault F = Filling fault (display occurs during wash, not test)

To check for heater, high limit or flow switch problems, start testing until heating starts. Using a meter with a current coil, measure current going into dishwasher. If current is ~ 11 A, then heater, high limit and flow switch are OK. If current stays at ~ 1.5-2 A, then heater, high limit or flow switch are faulty.

If water level switch (f1) has failed (opened), display will show fault code “4” and unit will continually fill and drain where testing won’t be completed. If flow switch (e5) has failed (opened), display will show “0”, water won’t heat (to 150?F) and water won?t stop circulating. If NTC probe (f2/f4) has failed (opened), display will show fault code “8” immediately and testing will end shortly after water has started circulating.

SHI/U 68– MODELS

To start test program, press and hold both SCRUB WASH and DELICATE/ECONO program buttons, then turn unit on by pressing ON/OFF button. Initially, control module version # will be displayed (e.g./ ?20? = version 0 without jumper). When wash program buttons are released, lights above them will flash. To end test program, press ON/OFF button.

To check each program indicator light, press its button. To check Cycle Countdown display, Refill Rinse Agent light and REGULAR WASH light, press REGULAR WASH button (press Delay Start button to test Cycle Countdown display alone). Cycle Countdown display will show “88” when REGULAR WASH button is pressed and “8h” when Delay Start button is pressed.

To start testing, press both SCRUB WASH and DELICATE/ECONO buttons a second time. When testing has ended, Cycle Countdown display will show a fault using codes below. If more than one fault occurs, code numbers will be added together, (e.g./ ?6? = faults 2 + 4).

0 = No faults detected 2 = Heating fault 8 = NTC (temperature sensor) fault

1 = Aqua Sensor (“Sensotronic”) fault 4 = Filling fault F = Filling fault (display occurs during wash, not test)

To check for heater, high limit or flow switch problems, start testing until heating starts. Using a meter with a current coil, measure current going into dishwasher. If current is ~ 11 A, then heater, high limit and flow switch are OK. If current stays at ~ 1.5-2 A, then heater, high limit or flow switch are faulty.

If water level switch (f1) has failed (opened), display will show fault code “4” and unit will continually fill and drain where testing won’t be completed. If flow switch (e5) has failed (opened), display will show “0”, water won’t heat (to 150?F) and water won?t stop circulating. If NTC probe (f2/f4) has failed (opened), display will show fault code “8” immediately and testing will end shortly after water has started circulating.

SHV 43/48 MODELS

To start test program, press and hold both POWER SCRUB PLUS and REGULAR WASH program buttons, then turn unit on by pressing ON/OFF button. When program buttons are released, lights above them will flash. To end test program, press ON/OFF button. NOTE: TO ENABLE LIGHTS TO COME ON, DOOR MUST BE OPENED.

To check program indicator lights (POWER SCRUB PLUS, SCRUB WASH, REGULAR WASH and RINSE & HOLD), press and hold each program button. When SCRUB WASH program button is pressed, CLEAN and REFILL RINSE AGENT lights also come on (for SHV 4803 models) or CLEAN light also comes on (for SHV 4303 models). NOTE: TO ENABLE LIGHTS TO COME ON, DOOR MUST BE OPENED.

To start testing, press both POWER SCRUB PLUS and REGULAR WASH buttons a second time. When testing has ended and a fault was detected, the following indicator lights will be lit:

POWER SCRUB PLUS = Heater fault

SCRUB WASH = Water filling fault (over or under filling)

REGULAR WASH = NTC (temperature sensor) fault ? note circulation motor stops shortly after it started during an NTC fault

To check for heater, high limit or flow switch problems, start testing until heating starts. Using a meter with a current coil, measure current going into dishwasher. If current is ~ 11 A, then heater, high limit and flow switch are OK. If current stays at ~ 1.5-2 A, then heater, high limit or flow switch are faulty.

If water level switch (f1) has failed (opened), SCRUB WASH light will come on and unit will continually fill and drain where testing won’t be completed. If flow switch (e5) has failed (opened), water won’t heat (to 150?F) and water won?t stop circulating. If NTC probe (f2/f4) has failed (opened), REGULAR WASH light will come on immediately and testing will end shortly after water has started circulating. NOTE: TO ENABLE LIGHTS TO COME ON, DOOR MUST BE OPENED.

If more than one fault occurs, more than one light will be lit.

SHU 9902/9905/9906 (Millennium) MODELS

To start test program, press and hold both POWER SCRUB PLUS and REGULAR WASH program buttons, then turn unit on by pressing ON/OFF button. When program buttons are released, lights above them will flash. To end test program, press ON/OFF button.

To check program indicator lights (POWER SCRUB PLUS, SCRUB WASH, REGULAR WASH and RINSE & HOLD), press and hold each program button. When SCRUB WASH program button is pressed, CLEAN light also comes on.

To start testing, press both POWER SCRUB PLUS and REGULAR WASH buttons a second time. When testing has ended and a fault was detected, the following indicator lights will be lit:

POWER SCRUB PLUS = Heater fault

SCRUB WASH = Water filling fault (over or under filling)

REGULAR WASH = NTC (temperature sensor) fault ? note circulation motor stops shortly after it started during an NTC fault

To check for heater, high limit or flow switch problems, start testing until heating starts. Using a meter with a current coil, measure current going into dishwasher. If current is ~ 11 A, then heater, high limit and flow switch are OK. If current stays at ~ 1.5-2 A, then heater, high limit or flow switch are faulty.

If water level switch (f1) has failed (opened), SCRUB WASH light will come on and unit will continually fill and drain where testing won’t be completed. If flow switch (e5) has failed (opened), water won’t heat (to 150?F) and water won?t stop circulating. If NTC probe (f2/f4) has failed (opened), REGULAR WASH light will come on immediately and testing will end shortly after water has started circulating.

If more than one fault occurs, more than one light will be lit.
SHU 991x/992x (Integra) MODELS

To start test program, press and hold both POWER SCRUB PLUS and REGULAR WASH program buttons, then turn unit on by pressing ON/OFF button. When program buttons are released, lights above them will flash. To end test program, press ON/OFF button.

To check program indicator lights (POWER SCRUB PLUS, SCRUB WASH, REGULAR WASH and RINSE & HOLD), press and hold each program button. When SCRUB WASH program button is pressed, CLEAN light also comes on andan audible tone (?beep?) also occurs.

To start testing, press both POWER SCRUB PLUS and REGULAR WASH buttons a second time. When testing has ended and a fault was detected, the following indicator lights will be lit:

POWER SCRUB PLUS = Heater fault

SCRUB WASH = Water filling fault (over or under filling)

REGULAR WASH = NTC (temperature sensor) fault ? note circulation motor stops shortly after it started during an NTC fault

To check for heater, high limit or flow switch problems, start testing until heating starts. Using a meter with a current coil, measure current going into dishwasher. If current is ~ 11 A, then heater, high limit and flow switch are OK. If current stays at ~ 1.5-2 A, then heater, high limit or flow switch are faulty.

If water level switch (f1) has failed (opened), SCRUB WASH light will come on and unit will continually fill and drain where testing won’t be completed. If flow switch (e5) has failed (opened), water won’t heat (to 150?F) and water won?t stop circulating. If NTC probe (f2/f4) has failed (opened), REGULAR WASH light will come on immediately and testing will end shortly after water has started circulating.

If more than one fault occurs, more than one light will be lit.
SHU 33 MODELS

To start test program, press and hold both POWER SCRUB PLUS and RINSE & HOLD program buttons, then turn unit on by pressing ON/OFF button. When program buttons are released, lights above them will flash. To end test program, press ON/OFF button.

To check program indicator lights (POWER SCRUB PLUS, REGULAR WASH and RINSE & HOLD), press and hold each program button. When REGULAR WASH program button is pressed, CLEAN light also comes on.

To start testing, press both POWER SCRUB PLUS and RINSE & HOLD buttons a second time. When testing has ended and a fault was detected, the following indicator lights will be lit:

POWER SCRUB PLUS = Heater fault

REGULAR WASH = Water filling fault (over or under filling)

RINSE & HOLD = NTC (temperature sensor) fault ? note circulation motor stops shortly after it started during an NTC fault

To check for heater, high limit or flow switch problems, start testing until heating starts. Using a meter with a current coil, measure current going into dishwasher. If current is ~ 11 A, then heater, high limit and flow switch are OK. If current stays at ~ 1.5-2 A, then heater, high limit or flow switch are faulty.

If water level switch (f1) has failed (opened), REGULAR WASH light will come on and unit will continually fill and drain where testing won’t be completed. If flow switch (e5) has failed (opened), water won’t heat (to 150?F) and water won?t stop circulating. If NTC probe (f2/f4) has failed (opened), RINSE & HOLD light will come on immediately and testing will end shortly after water has started circulating.

If more than one fault occurs, more than one light will be lit.
To learn more about your dishwasher, or to order parts, click here.

Subscribe to Appliantology: The Oracle of Appliance Enlightenment

Yes, Grasshopper, now you, too, can receive the Samurai’s secret pearls of appliance repair wisdom delivered to your email in a discreet brown wrapper. Taunt your friends and delight your enemies with your amazing new knowledge! Just enter your email address below. And, no, the Samurai would never stoop to selling or sharing your email address and you can opt out at any time.

Fill out your e-mail address
to receive our newsletter!
Subscribe Unsubscribe

Appliantology Archive

Whirlpool Washer wont spin – The Laundry Shack – Appliance Repair Hut – The Samurai Appliance Repair Forums; washer repair

This post in the repair forum illustrates a clever use for a digital camcorder in helping to diagnose the problem with this washer. Turns out the washer wouldn’t spin because the coupler was stripped out. For someone who has no idea about how these machines work to try to describe the sound is tough. After viewing and listening to just two seconds of the clip, I could tell the problem was a stripped out drive coupler– heard it many times. Easy repair, too. Got complete instructions here.

To learn more about your washing machine, or to order parts, click here.

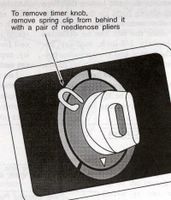
Removing timer knob on KitchenAid washer KAWE777BWHI – The Laundry Shack – Appliance Repair Hut – The Samurai Appliance Repair Forums; washer repair

Removing a washer timer knob can be tricky and you could cause more damage if you’re not careful. For the Whirlpool, Kenmore, or Kitchenaid top loading washer, there’s a good explanation of how to remove the timer knob in the repair forum. You can read it here.

War Story: Maytag Washer LAT9714AAE Spins but Won’t Fill or Agitate; washer repair


Mouse Chew
Originally uploaded by Zenzoidman.

Went on a service call on a Maytag Washer today. Complaint was that the washer was dead. When I got there, I started by verifying the customer’s complaint. Turns out that the washer would, in fact, spin but would not fill with water. No fill with water == no agitate.

Now, this is a very different problem from the washer being completely dead. This illustrates an important principle of appliance repair: the first step to problem resolution is problem identification. How you gonna fix the problem if you’re not even identifying the right problem? All you’ll end up doing is fixing the wrong problem!

So, with the problem properly identified, I proceeded to troubleshoot the washer. I listened for the soft hum of the water inlet solenoid valves being energized. But all was silent. Time to break out the meter and go fishin’.

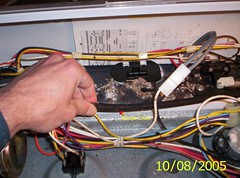
I figured the problem was gonna be either the pressure switch or the timer. So, I opened the control panel on the washer to commence my scientific inquiry. One problem was immediately apparent: I saw some fuzzy stuff inside the console that, upon closer examination, turned out to be the dearly departed remains of a wayward rodent. All that was left was clumps of hair and parts of a little mouse skeleton.

Looking closely at the air tube on the pressure switch, I could see that our deceased mouse friend must’ve gotten bored inside that control panel because he started gnawing on it. I tried to get a picture of it but my less-than-$100, 3.2 mega-pixel Kodak digital camera only allows me to get so close. You can still kinda make it out in the picture, though. Just use your imagination for the rest.

Anyway, did some more testing and found that the pressure switch wasn’t getting voltage– that’s a bad timer, slam dunk. Replaced that air tube for good measure, too. Problem solved!

Who Made my Kenmore?

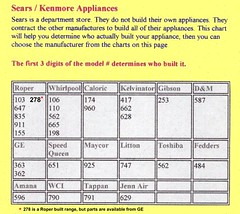
Awwite now, Bubba, one thang you gotsta under-freakin’-stand is that Kenmore ain’t no manufacturer of appliances. Nawsir, “Kenmore” represents nothin’ more than a bunch of bureaucrats at Sears who sit around and write specifications of and haggle over the price for someone else to make their stuff for them. Period. There ain’t no “Kenmore” factory somewhere in Malaysia or anywhere else.

So, who makes Kenmore stuff? Well, lots o’ folks. You can tell by looking at the three digit number to the left of the decimal point in the model number. Did I slide that’n by y’too fast, Slick? Read it again: the three digit (that means individual numerals) number (that means sequence of digits) the left of (that means not to the right of) the complete model number (which is a big ol’ hairly long ace number).

Still confoosed, Grasshopper? Let’s take a ezzample. S’pose I gotsa Kenmore refrigerator (or “refirgerator” for the keyboard impaired) with a model number of 363.58097890 and I need to know who actually made that fridge. Well, using Figure 1, above, I look up the “363” portion of the model number and, lo, GE done made that fridge! It’s just like FM (freakin’ magic), ain’t it?

Appliance Service Call


Working Fall
Originally uploaded by Zenzoidman.

Driving to an appliance service call, I had to pull over for some, eh hem, essential kidney maintenance. It’s tough trying to repair an oven, refrigerator, dishwasher, or whatever, while your teeth are chattering from excessive abdominal pressure. In addition to providing that after-glow of relief, it was a nice view.

Thermador Electric Wall Oven Won’t Bake; oven repair

Went on a service call the other day on a Thermador electric wall oven; complaint – no bake. Now, wall ovens can be tricky to troubleshoot and repair so I came ready for the worst-case scenario which would require me to remove the wall oven. I packed my All Dolly wall oven cart in my Fixite Do service van and off I went.

The problem turned out to be evident right off the bat. Following Samurai’s 6th Law of Appliance Repair, “Begin troubleshooting right at the problem,” I went right to the bake element for a look-see. And, oh my, whatta look-see it was:


Burned out Bake Element in a Thermador Electric Wall Oven (click for enlargement)

As you can see, this calrod heating element finally self-destructed. “But how?” you ask, intrepidly.

“No one knows,” I answer, sagaciously.

“But I thought you were the Samurai?” you exclaim, quizzically.

“Samurai-schmamurai,” I retort, sardonically, “just replace the element already.”

At which point, you click here, obediently.

Hillstomping Update: Ragged Mountain, 10032005


My Three Nads: Samenilla, Stephenitza, and Bubba on Ragged Mountain’s Eastern Summit (click to enlarge)


Autumn Takes Root at Ragged Mountain in Danbury, NH (click to enlarge)


Brown, Smudgy Smog Layer Settles in Over the White Mountains (click to enlarge)

this is an audio post - click to play
Report from the Trail, Part 1

this is an audio post - click to play
Report from the Trail, Part 2

(Part 3 was deleted due to poor cellular phone call quality.)

this is an audio post - click to play
Report from the Trail, Part 4